Blog

  • How to Remove Samsung Bloatware (Pre-installed Apps) Without Root

    How to Remove Samsung Bloatware (Pre-installed Apps) Without Root

    We provide easy steps to remove pre-installed apps on Samsung phones. You can do this without rooting or using unofficial firmware. Our guide is for both tech experts and regular users in the United States. It helps you make your Samsung device faster and cleaner.

    Samsung phones come with apps from carriers and the manufacturer. These apps take up space, battery, and use resources in the background. We’ll show you how to use system Settings, Safe Mode, and trusted tools to remove these apps without rooting.

    We also explain how to run diagnostics with Samsung secret codes. This includes using the #0# code and other test sequences for hardware checks.

    It’s important to be safe: removing apps through Settings is usually safe and keeps your warranty valid. Rooting or using unofficial firmware can void your warranty and pose security risks. We discuss these risks to help you make informed choices.

    Here’s a step-by-step guide. We cover definitions, the impact of bloatware, and how to find and remove unwanted apps. You’ll learn about Safe Mode, running diagnostics, managing permissions, and when to reset your device. We also offer tips for maintaining your device and advice for buying new phones to avoid bloatware.

    Key Takeaways

    • We show non-root Samsung bloatware removal methods that protect warranty and stability.
    • System Settings, Safe Mode, and select third-party apps let you disable or uninstall pre-installed apps.
    • Samsung secret codes and the Samsung diagnostic menu, including the #0# code, help verify hardware and app behavior.
    • Avoid rooting unless you accept warranty and security risks; prefer manufacturer-safe options first.
    • The guide balances step-by-step removal, permission control, and long-term maintenance for better performance.

    Understanding Bloatware and Its Impact

    When we buy a Samsung phone, it often comes with apps from Samsung, carriers, and third parties. These apps include useful tools, trial versions, and duplicate services. Knowing what bloatware is helps us decide what to keep and what to remove.

    What is Bloatware?

    Bloatware are apps that come pre-installed with the phone. They include branded services like Samsung Pay and tools from carriers. Some are trial apps or duplicate utilities that take up space and run in the background.

    How Bloatware Affects Device Performance

    Bloatware uses up RAM and CPU, making it hard to multitask and slow down app switching. It also drains battery life with background sync and notifications. It takes up storage space, leaving less room for photos and updates.

    Real-world effects include longer boot times and lower benchmark scores. Excess data usage can also lead to going over data limits on limited plans.

    Reasons to Remove Bloatware

    We remove unwanted apps to free up storage, improve battery life, and speed up the phone. A cleaner UI means fewer notifications and less clutter. Security and privacy concerns are also a big reason, as some apps request broad permissions and may collect data.

    However, we sometimes keep OEM or carrier apps for essential features. Samsung Knox, Samsung Cloud, and certain carrier tools provide security, backup, or warranty-linked functions. These are important for business users or those who rely on these services.

    Tools like Samsung secret codes and the Samsung diagnostic menu help identify issues and highlight problematic apps. Using these tools lets us see which apps drain resources and target them for removal or disabling.

    Impact Area What Bloatware Does Why We Care
    Performance Consumes RAM and CPU with background services Slower app switching, reduced multitasking, lower benchmarks
    Battery Background sync and push notifications Shorter battery life and more frequent charging
    Storage Pre-installed apps occupy space Less room for photos, apps, and system updates
    Privacy & Security Wide permissions and telemetry collection Increased attack surface and potential data sharing
    Diagnostics Identifies faulty or heavy apps via menus Samsung diagnostic menu and Samsung secret codes reveal culprits

    Identifying Bloatware on Your Samsung Device

    Before we remove apps, we need to know what’s safe to disable or uninstall. This guide helps us find common Samsung bloatware, check installed packages, and tell essential system services from optional preloads.

    We keep a checklist when auditing apps. First, scan visible apps. Then, look into system packages. Note package names and take screenshots for easy restoration if needed.

    Common Samsung Bloatware Apps

    Many Galaxy phones have Samsung-branded utilities like Samsung Health and Samsung Pay. Carrier apps include My Verizon and AT&T Visual Voicemail. Trial apps often look like games or streaming services. Some phones come with third-party apps like Facebook and Microsoft Office.

    How to Check Installed Apps

    Here’s how to check installed apps on Samsung devices:

    • Open Settings and tap Apps or Apps & notifications.
    • Use the search field to find an app by name or package.
    • Sort the list by size or last used to spot heavy or rarely opened apps.
    • Tap the three-dot menu and enable Show system apps to reveal system packages.
    • Open App info to view storage, permissions, and battery use before taking action.

    We recommend checking again after each change and noting behavior for at least a day. This reduces the chance of breaking features unintentionally.

    Differentiating Between Bloatware and Essential Apps

    We judge an app by its function. Essential apps include Phone, Messages, and telephony services. Also, Knox, Samsung Account services, and components for features like Samsung Pay or Samsung Cloud.

    To confirm an app’s role, research package names and consult reliable sources. When hardware behavior seems off, use the diagnostic menu to test components directly.

    Dialer codes can help. For example, *#0*# on many Galaxy models opens the hardware test menu. This lets us test display, sensors, and connectivity. Note that *#0# code functions may fail on carrier-locked or updated firmware. Some codes require the phone app to accept them.

    App Type Typical Examples Action to Take
    Samsung-branded utilities Samsung Health, Samsung Members, Samsung Pay Review usage; disable if unused; keep Samsung Pay if we use mobile payments
    Carrier apps My Verizon, AT&T Visual Voicemail Disable or uninstall if carrier functions remain intact; test calling and voicemail first
    Trial apps Preloaded games, streaming trials Uninstall immediately to reclaim space
    Third-party preloads Facebook, Microsoft Office Disable or uninstall based on personal use; check permissions
    System-level services Phone, Messages, Knox, account services Leave enabled unless documentation shows safe removal; record package names before changes
    Diagnostic tools Dialer codes, hardware test menu Use *#0# code to test hardware Samsung components before blaming apps

    Methods to Remove Bloatware

    We show you how to free up space and speed on Samsung phones. We start with built-in tools, then talk about safe ways to remove apps. Remember, each step is important to keep your phone working right.

    Using the Built-In App Manager

    First, open Settings > Apps to see all installed apps. Tap any app to open its info. There, you can stop, disable, uninstall, check storage, and permissions.

    Look for Show system apps in the Apps list menu. This shows preinstalled services. Sort by size to find big apps first. This helps us know which to remove or disable.

    Disabling Unwanted Apps

    Disabling apps stops them from running. They disappear from the app drawer and use no background resources. The app stays in system storage.

    To disable, open App info and tap Disable. Confirm your choice. This is safe for system apps that can’t be removed. Disabling is easy to reverse if needed.

    Uninstalling Apps via Settings

    Some apps, including some preloads, can be removed fully. From App info, tap Uninstall. You can also long-press an icon on the Home screen and drag it to Uninstall.

    For some apps, you might see Uninstall updates instead. This reverts the app to its original version. For full removal, we might need special tools, but we should be careful.

    On Diagnostic Tools and Samsung Secret Codes

    Samsung secret codes open diagnostic menus. Use them for troubleshooting, not for removing apps. Some codes can reset your device or change partitions, so be careful.

    Troubleshooting and Recovery

    If removing an app breaks something, we can re-enable or reinstall it. Use Google Play Store or Galaxy Store to get back official Samsung apps. Clearing caches and checking Samsung account sign-in often fixes issues.

    Action Use Case Risk Level How to Reverse
    Disable app System app causing background drain Low Open App info and tap Enable
    Uninstall app User-installed or removable preload Moderate Reinstall from Play Store or Galaxy Store
    Uninstall updates OEM/carrier app with updates only Low Install updates from the store
    Use Samsung secret codes Run diagnostics or check modules Variable Only use non-destructive codes; avoid reset codes

    Using Samsung’s Safe Mode

    Safe Mode starts a Samsung phone with only basic system apps. It disables third-party apps to see if they cause problems. This way, we can find out if a new app or bloatware is the issue.

    What is Safe Mode?

    Safe Mode runs Android with only essential apps and services. It helps us figure out if third-party apps are causing issues. If problems go away in Safe Mode, it’s likely a non-system app is the culprit.

    How to Boot into Safe Mode

    To enter Safe Mode on Samsung devices, follow these steps:

    • Press and hold the Power button until the power menu appears.
    • Long-press the Power off option until a Safe Mode prompt shows.
    • Tap Safe mode to restart the phone with third-party apps disabled.

    Alternatively, power off the device, then power it on and press and hold Volume Down during boot. The exact steps might vary, so check your model if needed.

    Removing Bloatware in Safe Mode

    In Safe Mode, we can easily remove third-party apps. This is because they won’t run in the background. To do this, go to Settings > Apps, pick the app, and choose Uninstall or Disable.

    Safe Mode usually doesn’t affect preinstalled apps. If a system app still causes issues, we can use the Samsung diagnostic menu or advanced tools. Dialer codes like #0# code can open diagnostic screens and help us check before making changes.

    After removing apps in Safe Mode, reboot the phone normally. Watch for any issues. If problems are fixed, we know which app to avoid. Always back up important data before making big changes. Remember, Safe Mode can’t remove system bloatware without the right tools or permissions.

    Third-Party Applications for Bloatware Removal

    We look into trusted third-party tools for removing unwanted apps from Samsung phones without rooting. Our goal is to provide steps that both tech experts and power users can follow. This ensures the device works well and keeps the warranty intact.

    Recommended Bloatware Removal Tools

    ADB (Android Debug Bridge) is our go-to for deep uninstall and disable tasks. It lets us run commands from Windows, macOS, or Linux to remove packages for the current user. This method is powerful and doesn’t need root access.

    We use package viewers to find exact package names. Tools like Package Name Viewer from Google Play help list package IDs. This way, we can target only unwanted apps. We also have a non-root uninstaller for simple user-app removals that follow the standard uninstall flow.

    How to Use Third-Party Apps Safely

    We’re careful when giving permissions to third-party apps. We download tools from Google Play or trusted vendor sites. Before installing, we check reviews and the permissions they ask for.

    When using ADB uninstall Samsung, we first enable Developer Options and USB Debugging on the phone. We install ADB platform tools on our computer, then run adb devices to check the connection. To remove a package for the current user, we run:

    • adb shell pm uninstall –user 0 package.name

    We find package.name with a package viewer or via Settings > Apps. If we need to restore a package, we use commands such as:

    • adb shell cmd package install-existing package.name

    We document each change. We avoid uninstalling packages that look critical. Removing essential services can break features like telephony, NFC, camera, or others.

    Safety Checklist and Diagnostic Pairing

    We check removals using Samsung secret codes and diagnostic menus. These codes help us test sensors, radios, and other hardware after changes. We use diagnostics to ensure modem and sensor services remain intact.

    We avoid apps that request device admin or root unless we intend to root. Many apps that promise system-level removals simply open the regular uninstall prompt. We treat such claims with skepticism.

    Tool Requires Root Main Use Recovery Option
    ADB (Android Debug Bridge) No Remove or disable packages for current user from a PC adb shell cmd package install-existing; factory reset
    Package Name Viewer No Identify exact package names for targeting Reinstall from Play Store or ADB
    Non-root Uninstaller (Play Store) No Call uninstall intents for user apps; quick removals Reinstall from Play Store
    Diagnostic Menu (Samsung codes) No Verify hardware and services after removals Run tests and re-enable packages if needed

    We follow legal and warranty guidance. ADB uninstall Samsung actions usually don’t void warranty because they operate at the user level. Rooting or editing system partitions can affect warranty and serviceability. We advise technicians to log changes and obtain client approval before proceeding.

    We emphasize reversibility. Most removals performed with ADB or standard uninstaller tools can be undone. We recommend a full backup before any mass removals and a documented rollback plan in case factory reset or reinstallation becomes necessary.

    Understanding App Permissions

    We need to control what apps can access on our Samsung phones. Managing permissions helps protect privacy and limits access to camera, microphone, and location. This step often reduces the harm from pre-installed apps without full removal.

    manage app permissions Samsung

    Limiting unnecessary permissions reduces data leak risk and stops apps from using sensors when we do not want them to. When we manage app permissions Samsung-wise, we cut idle battery use and curb unwanted tracking by bloatware. We keep core services like Phone and Messages working by being selective rather than sweeping.

    How to check app permissions

    To check permissions Samsung owners can open Settings > Apps, pick an app, then tap Permissions. We can also go to Settings > Privacy > Permission manager to view permissions by category such as Location, Camera, and Microphone. This view makes it easy to spot which apps hold sensitive rights.

    Adjusting permissions step-by-step

    We revoke access by selecting a permission and choosing Deny or Allow only while using the app. Modern Android and One UI use a runtime permission model, so most permissions ask at first use. This model gives us tighter control and clearer prompts when an app requests live access.

    Post-uninstallation cleanup

    After removing an app we still check the permission manager for orphaned grants. We clear app caches and data before uninstalling to remove stored tokens and account links. If leftover entries appear, revoking them ensures inactive packages keep no active privileges.

    Permissions and system apps

    Some preloaded system apps need certain permissions to work properly. We avoid revoking rights from core services such as Contacts sync or Phone unless we accept loss of functionality. If a critical feature breaks, we re-enable permissions or reinstall the app to restore service.

    Privacy tools we can use

    Samsung offers a Privacy Dashboard that shows which apps access Location, Camera, and Microphone and how often they do so. We combine that with Android’s privacy controls to monitor activity and make informed decisions about granting or revoking permissions.

    Quick reference: diagnostics and fallback

    If we suspect hidden behavior, we may use the Samsung diagnostic menu or enter a troubleshooting code like #0# code on compatible devices to run hardware checks. These tools do not replace permission management but help verify whether sensors behave normally after changes.

    Resetting Your Phone: A Last Resort

    When bloatware removal and troubleshooting don’t work, a factory reset might be needed. It’s good for slow phones, malware, or before selling. Think of it as a last resort after trying other fixes.

    When to Consider a Factory Reset

    Reset your phone if it crashes after removing apps or if it’s still slow. It’s also a good idea before selling. Techs might choose it if the phone’s system is corrupted.

    How to Backup Your Data

    Backup your Samsung data before resetting. Use Samsung Cloud for contacts and settings. Google Backup works for apps and settings.

    For a full backup, try Smart Switch on PC or mobile. It keeps messages, photos, and app data safe. Techs should use local Smart Switch for quicker and safer restores.

    Media needs extra care. Move photos and videos to Google Photos or a computer. Save WhatsApp chats in Google Drive. Export SMS before resetting. Remember, some login details will be lost.

    Steps to Perform a Factory Reset

    To reset, go to Settings > General management > Reset > Factory data reset. Confirm and let it wipe the device. This works if the phone boots up.

    If it won’t start, use recovery mode. The key combo varies by model. For recent Galaxy phones, it’s Power + Volume Up. Some older models need Bixby.

    Be careful with Samsung secret codes in the dialer. Some can wipe data without asking. Only use them if you plan a full reset.

    After resetting, restore from backups. Reinstall only needed apps to avoid bloatware. Re-enable settings and sign in to accounts.

    For resale, reset the phone and remove Find My Mobile and Google account. This prevents activation lock and protects the next owner.

    Keeping the Device Clean Post-Removal

    After removing unwanted apps, we take small steps to keep our device running smoothly. Regular checks, careful tracking, and timely updates protect our device and data.

    Regular Maintenance Tips

    We suggest checking Settings > Storage and Settings > Battery monthly. This helps us spot large or power-hungry apps. Clearing an app cache can quickly free up space when an app gets too big.

    Uninstalling unused apps reduces background activity. If we notice odd behavior, we run malware scans with trusted antivirus tools. We avoid aggressive cleaners that promise too much.

    Android manages memory well. Too many “boosters” can harm battery and background tasks.

    Tracking App Installations

    To track app installs, Samsung owners should enable Play Store notifications. Reviewing Play Store > My apps & games > Installed helps too. We also set Google Play to require authentication for purchases to prevent unwanted installs.

    For a deeper audit, a package viewer or installed apps log shows package names and install dates. This helps us track app installs Samsung-wide and spot any unexpected additions quickly.

    Updating Your Device

    We keep Android, One UI, and apps current via Settings > Software update and the Galaxy Store or Play Store. Firmware updates often improve performance and security.

    Carrier-branded phones may get updates later than unlocked models. We watch for updates that reintroduce carrier apps and remove or disable them if needed.

    Using Diagnostic Tools

    If we suspect hardware issues after changes, we run the Samsung diagnostic menu and secret codes such as *#0*#. Diagnostics confirm sensors, touch, camera, and connectivity status. This helps us isolate software from hardware faults.

    Automation and Technician Best Practices

    We use trusted cleanup apps sparingly and avoid ones that promise permanent speed gains. For clients, technicians should document every removal and give a recovery list of disabled or uninstalled apps. Clear records help restore setups or troubleshoot later.

    Benefits of a Bloatware-free Device

    We remove unwanted apps to make Samsung phones work better. This makes a big difference in how they perform.

    benefits bloatware-free Samsung

    Improved Performance and Speed

    Removing background apps makes Samsung phones faster. This means apps open quicker and animations are smoother. Tests show cold boot times can drop by seconds.

    After removing unnecessary apps, benchmarks become more consistent. This leads to fewer stutters during games and videos. Overall, the phone feels more responsive.

    Increased Storage Space

    By uninstalling carrier apps and trial games, we free up storage. The amount of space we gain varies, but it’s significant.

    Uninstalling an app gives us more space than just removing updates. Updates only free up the update itself. Full uninstalls give us the whole package and its data, saving the most space.

    Enhanced Battery Life

    We extend battery life by stopping apps from syncing and sending notifications in the background. This cuts down on CPU usage and network activity. This means our phones last longer on screen and in standby.

    With fewer apps running, the system works better. This means our phones use less power when idle. Daily battery life becomes more consistent.

    Privacy, Security, and Maintenance

    Removing apps that ask for too much access helps protect our privacy. Fewer apps mean fewer risks and less data sharing.

    For tech support, a clean Samsung phone is easier to fix. This leads to fewer support calls and a more stable user experience.

    Caveats and Selective Retention

    Some apps, like Samsung Pay, are important for certain features. Removing them might disable useful functions.

    We should keep apps that are truly useful. A careful approach is best. We can always go back to how things were with a simple #0# code.

    Benefit What We Gain Typical Impact
    Performance Reduced background load Faster app switching, smoother UI
    Storage Uninstalled packages freed Hundreds of MB to multiple GB
    Battery Fewer wakelocks and syncs Longer screen-on and standby times
    Privacy & Security Fewer permissions and telemetry Lower attack surface
    Maintenance Simpler troubleshooting Reduced support calls

    Addressing Common Concerns About Bloatware

    We guide readers on safety, reversibility, and recovery. This helps them make smart choices. Removing apps can save space and speed up your device. We explain the risks and how to fix issues without using hard tech terms.

    Is it safe to remove these apps? Most of the time, removing apps we installed is safe and can be undone. Disabling system apps through Settings is usually safe. But, removing some system packages can mess with features like syncing or Samsung Pay.

    We suggest checking package dependencies before removing them. Useful resources include Samsung developer documentation and forums like XDA Developers. If a package name seems important, be careful and check its impact before uninstalling.

    What if we change our mind? Most actions can be easily reversed. To re-enable apps, go to Settings > Apps, open the Disabled list, and tap Enable. If we removed an app from Google Play or the Galaxy Store, we can reinstall it from there.

    If we used adb to uninstall an app, we can restore it with adb shell cmd package install-existing package.name. A factory reset will bring back all original system apps. But, this will erase personal data unless we back up first.

    Reinstalling removed bloatware: To get Samsung apps back, search the Galaxy Store or Google Play and install them as usual. For some system apps removed with advanced methods, we might need to flash stock firmware with Odin or restore a full backup using Smart Switch.

    Flashing firmware and changing system partitions is for experts. Doing this without knowledge can harm your device.

    Warranty and support: Disabling or uninstalling apps via the standard UI won’t void warranty or affect Samsung support. But, rooting, installing custom ROMs, or altering system partitions can void warranty and make official repairs harder.

    Troubleshooting broken features: If a feature stops working, we try these steps:

    • Re-enable the related app in Settings > Apps.
    • Clear cache and data for dependent services in Settings.
    • Sign back into our Samsung account if a Samsung service is affected.
    • Perform a soft restart to refresh system processes.
    • Use Smart Switch to restore from a backup or perform a factory reset as a last resort.
    Issue Quick Fix Advanced Recovery
    Missing Samsung app features Re-enable app or reinstall from Galaxy Store Use adb to install-existing or flash stock firmware with Odin
    Broken notifications or sync Clear cache/data of Samsung services, sign in again Restore full backup via Smart Switch or factory reset
    Accidental ADB uninstall adb shell cmd package install-existing package.name Factory reset or reflash firmware for complete restoration
    Warranty concerns Use standard Settings options; warranties typically remain intact Avoid rooting or system partition changes; seek professional service

    Some users look for Samsung secret codes to explore hidden menus. Secret codes can show diagnostics and settings. But, using undocumented codes without knowing their effect can change how your device works. We suggest learning a code’s purpose before using it and prefer safer methods for troubleshooting.

    Tips for Buying a Samsung Device with Minimal Bloatware

    We all want devices that run smoothly and stay fast. To get a Samsung with less bloatware, we need to pick the right model and shop smart. This way, we can control the apps installed from the start.

    Choosing the Right Model

    Flagship Galaxy S and Galaxy Note/Ultra models are best for a clean software experience. They get regular One UI updates and have fewer preloads than older or budget phones.

    Some Galaxy A models also come with lighter preloads. We look at recent reviews and One UI versions to find models where we can easily remove unwanted apps.

    Carrier vs. Unlocked Devices

    When deciding between carrier and unlocked Samsung phones, we consider the pros and cons. Carrier phones often have more apps and services that are hard to remove.

    Unlocked phones bought from Samsung.com or major retailers usually have less extra software. We weigh carrier financing and exclusive features against the extra apps carriers add.

    Researching Pre-Installed Apps Before Purchase

    We check unboxing videos, Reddit, and XDA Developers for info on pre-installed apps. We also look at Samsung’s US site and carrier pages for bundled services and apps.

    When possible, we test devices during the return window to see the bloatware level. This helps us understand how to disable or remove unwanted apps.

    Buying Strategies and Alternatives

    For businesses and tech experts, we prefer unlocked wholesale units to avoid carrier bloat. If carrier preloads are a problem, we suggest buying direct from Samsung or trusted retailers.

    For refurbished phones, we make sure the seller didn’t add extra apps or management profiles after refurbishment.

    Long-term Support and Maintenance

    We consider update frequency and support lifespan when choosing a model. Phones with longer support get more security patches and One UI updates, which can reduce bloat over time.

    We also think about the Samsung diagnostic menu. It’s useful for troubleshooting and checking system apps if we suspect hidden services or performance issues.

    Conclusion: Enjoying a Streamlined Samsung Experience

    We’ve shown you how to make your Samsung device run better without rooting. We talked about finding and removing bloatware, using Settings to manage apps, and booting into Safe Mode for fixes. We also covered using ADB for more advanced app removals.

    We discussed managing app permissions, backing up your data, and when to use a factory reset. This approach helps keep your phone running smoothly.

    H3: The Ongoing Need for Maintenance

    Keeping your phone clean is a continuous task. After big updates, check your apps and permissions. Use Samsung’s diagnostic menu and secret codes to find and fix issues early.

    H3: Your Device, Your Rules

    You decide what stays on your phone, but be careful. Removing apps might affect vendor or carrier features. Start by disabling apps, document their names, and test before uninstalling. If unsure, seek help from Samsung support or online forums.

    H3: Final Thoughts on Bloatware Removal

    Follow a simple plan: backup, note app names, disable nonessential apps, and uninstall safely. Start by checking your apps in Settings, then disable unnecessary ones. Use Samsung’s diagnostic tools to check your device while you make changes. Regular checks and careful actions will keep your phone fast, free of clutter, and enjoyable to use.

    FAQ

    What is bloatware on Samsung phones and why should we remove it?

    Bloatware are apps Samsung, carriers, or third parties install on phones. They’re not essential for basic phone functions. Removing them frees up space, saves battery, and reduces data use.

    Some apps, like Samsung Pay, are useful. So, we should check each app before removing it.

    Can we safely remove or disable Samsung pre-installed apps without rooting?

    Yes, most methods are safe and keep the warranty intact. We can disable or uninstall apps through Settings > Apps. ADB (Android Debug Bridge) helps uninstall packages without root.

    But, we should avoid rooting or flashing unofficial firmware. It risks our warranty and security.

    How do we identify which apps are bloatware on our Samsung device?

    Open Settings > Apps to see all installed apps. Use search and sort by size or last used. Enable Show system apps to find hidden packages.

    Apps like Package Name Viewer help identify package IDs. We also check online resources like XDA Developers to confirm an app’s role before removing it.

    What are Samsung secret codes and can they help with bloatware issues?

    Samsung secret codes open diagnostic menus and test utilities. For example, *#0*# launches the Samsung diagnostic menu to test hardware. These codes help us identify software or hardware problems.

    But, they can’t uninstall apps. Some codes might be disabled on carrier-locked phones or change with One UI updates. So, we use them carefully.

    How do we disable an app versus uninstalling it, and when should we choose each?

    Disabling stops an app from running and removes it from the app drawer. It prevents background activity but keeps the app in system storage. Uninstalling removes a user-installable app entirely.

    We disable system apps when full removal isn’t available or when we want a reversible option. Uninstall user apps when we no longer need them and are sure no dependent services will break.

    What is the ADB method for removing bloatware and is it safe for non-technicians?

    ADB allows us to remove packages for the current user without root. It requires enabling Developer Options and USB debugging, and installing ADB on a PC. It’s powerful and generally reversible, but removing critical packages can break functionality.

    We recommend technicians or confident users follow exact package-name steps and document changes.

    Can Safe Mode help us remove problematic bloatware?

    Yes. Safe Mode boots the device with only system apps active, disabling third-party apps. It helps isolate problematic third-party bloat and makes uninstalling those apps easier. System-level OEM or carrier apps usually remain in Safe Mode, so it’s most useful for diagnosing and removing recently installed third-party apps.

    What permission management should we do instead of removing an app?

    If we don’t want to uninstall an app, we can limit its permissions. Use Settings > Apps > [App] > Permissions or Settings > Privacy > Permission manager. Set permissions to “Allow only while using app” or deny unnecessary access (location, microphone, camera) to reduce privacy risks and background behavior without removing the app.

    What precautions should we take before disabling or uninstalling apps?

    Back up important data (Samsung Cloud, Google Backup, Smart Switch) before making changes. Note package names or take screenshots of app info. Disable rather than uninstall system apps first to test impact.

    After changes, reboot and test device features. If something breaks, re-enable apps or restore from backup. Documenting changes helps reverse steps if needed.

    When is a factory reset necessary and how does it relate to bloatware removal?

    A factory reset is a last resort for persistent instability, malware, or when preparing a device for resale. It restores stock system state, which can reintroduce preinstalled apps. We back up data before resetting and selectively reinstall only desired apps afterward to avoid reintroducing bloat.

    Can we reinstall removed Samsung or carrier apps if we change our mind?

    Yes. For apps removed via Settings or Play/Galaxy Store, we reinstall from those stores. If uninstalled using ADB for the current user, we can restore using adb shell cmd package install-existing package.name or perform a factory reset. Some system apps removed at the partition level require flashing stock firmware (Odin/Smart Switch) and are advanced recovery options.

    Will removing bloatware void the device warranty?

    Disabling or uninstalling apps via the standard system UI or using ADB for the current user typically does not void warranty. Rooting, installing custom ROMs, or modifying system partitions can void warranty and introduce security risks. We always follow manufacturer and carrier terms when working on client devices.

    How can technicians document and maintain a bloatware-free device for clients?

    Keep a change log listing disabled or uninstalled package names, backup copies via Smart Switch, and testing notes. Provide clients with a simple restore checklist and recovery steps. Periodic maintenance—checking Storage, Battery, and running diagnostic tests (including the Samsung diagnostic menu and relevant secret codes like *#0*#)—helps sustain a lean device.

    What should we look for when buying a Samsung device to minimize bloatware?

    Prefer unlocked devices purchased from Samsung or reputable retailers, as carrier-branded phones often include extra preloads. Research model-specific threads on XDA Developers, Reddit, and product unboxing videos to see preinstalled apps. Use return windows to evaluate and choose devices with cleaner software and a better update cadence.

  • Is It Safe to Manually Update Samsung Firmware via PC?

    Is It Safe to Manually Update Samsung Firmware via PC?

    Many people wonder if it’s safe to update Samsung firmware manually using a PC. Samsung sends official updates to most Galaxy devices. But, some users want more control over their updates.

    Power users and tech experts use tools like Odin or Samsung Smart Switch. They use these tools to flash firmware, go back to an older version, or downgrade Android. This is often done when a new update causes problems or removes important features.

    When you manually update Samsung firmware, you face some risks. On one side, you can pick specific updates, fix issues from previous updates, or go back to an older version of One UI. But, on the other side, there’s a chance of losing data, triggering a factory reset, or even bricking your device.

    Carrier-locked and region-locked firmware can also limit your options. This means you might not be able to downgrade as you wish.

    In this guide, we’ll show you how to do it safely. We’ll cover the best practices, the tools you need, and how to download and flash firmware. We’ll also talk about troubleshooting and how to check if the update was successful.

    We’ll explain why downgrading Samsung Android can be tricky. And why it’s crucial to back up your data completely. This is because some rollback procedures might require resets or could cause data issues.

    Key Takeaways

    • Manual updates offer control but carry real risks to device stability and data.
    • We recommend a full backup before any attempt to downgrade Samsung Android.
    • Odin and Samsung Smart Switch are the primary tools for manual firmware work.
    • Rollback Samsung update may be blocked by carrier or region restrictions.
    • Follow step-by-step procedures and vendor documentation to improve manual Samsung firmware update safety.

    Understanding Samsung Firmware Updates

    We start with a simple explanation so you can understand the technical stuff. Knowing about Samsung firmware helps us know when and how to update our devices. We’ll cover the basics, why updates are important, and the different types you’ll see.

    What is Samsung Firmware?

    Firmware is a mix of the Android OS, Samsung’s One UI, and other software. It’s made for each model and region. It lets hardware and software talk to each other.

    Build numbers and CSC codes show where and for whom the firmware is made. These codes are key when updating or downgrading your Samsung Android. The wrong code can remove important features or break services.

    Why Update Your Firmware?

    Updates are important for many reasons. They fix security issues, bugs, and improve performance. They also add new features and make sure your device works well with carriers and Google Play.

    Some updates focus on battery life, camera quality, and wireless connection. It’s good to think about these benefits before trying to update manually, which can be risky.

    Types of Firmware Updates

    There are three main ways to get updates. OTA updates come automatically through Settings. Recovery updates need the stock recovery partition. Manual updates use Samsung Smart Switch or Odin for more control.

    Official firmware is different from custom ROMs. Official files have special protections like Android Verified Boot (AVB) and Samsung Knox Secure Boot. These prevent downgrading to older versions on newer devices.

    Firmware can vary by region and carrier. This affects what features you get and when. Firmware filenames and version codes help you choose the right update.

    We use Samsung’s official resources and sites like SamMobile and XDA Developers for the latest information. They help us find the right update for our device.

    The Benefits of Manual Updates

    Choosing to manually update Samsung firmware via a PC has its perks. Manual updates can fix issues that automatic updates sometimes miss. This control can make our phones run smoother and faster.

    https://www.youtube.com/watch?v=iOZA66_T_jk

    Installing stock firmware can boost our device’s performance. Manual flashing removes corrupted files and OTA leftovers that slow our Galaxy phones. It brings back the phone’s speed and fixes hidden problems that updates can’t solve.

    Manual updates also let us get new features early. Enthusiasts and pros can try out new One UI or Android features before they’re widely available. We can also go back to older firmware if a new update makes our phone less useful.

    Quickly updating for security is another big plus. If our carrier is slow to roll out updates, we can apply security patches right away. But, be careful when downgrading as it can remove important security updates.

    There are more benefits too. We can change our phone’s CSC or region firmware for carrier features or to remove unwanted apps. This can also help when we need to sell our phone or get warranty service.

    But, we must be careful. We need to match the firmware to our model and region exactly. Wrong files or sloppy steps can cause problems and undo the good of manual updates.

    Benefit What We Gain Notes and Cautions
    Improved device performance Cleaner system state, fewer crashes, restored responsiveness Requires correct stock firmware and a reliable PC connection
    Access to new features Early One UI or Android features, region switches for carrier functions Check compatibility and local regulations before changing CSC
    Enhanced security Immediate application of security patches when OTAs lag Avoid downgrading to versions missing critical patches
    Flash older firmware Restore legacy UI behavior or support older apps May remove recent security fixes; backup first
    Rollback Samsung update Return to a stable prior build after problematic upgrades Keep exact model and build numbers to prevent bricking

    Risks of Manual Firmware Updates

    Before we start, let’s look at the good and bad sides of manual updates. They can fix bugs and add new features. But, they can also damage your device, lose service, or break features if done wrong. Here are the main dangers to know.

    Potential for Bricking Your Device

    Flashing the wrong file or stopping a flash can brick your phone. A soft-brick means your phone gets stuck in a loop or recovery mode. It might be fixed by re-flashing the right firmware with Odin or download mode.

    A hard-brick makes your phone dead, needing JTAG repair or Samsung service, which is expensive.

    Wrong bootloader versions and damaged partitions raise the risk of bricking. Community tools might help, but success is not sure.

    Loss of Warranty

    Changing the bootloader, using unofficial tools, or flashing custom ROMs can void warranty. Once the warranty bit is tripped, warranty and Secure Boot protections may be lost forever. Carriers and Samsung often deny coverage if the Knox counter is set or if the device is unlocked.

    Official updates with Samsung Smart Switch usually keep warranty intact, as long as we don’t unlock or change the bootloader. But, flashing unofficial firmware or downgrading Android risks losing warranty.

    Compatibility Issues

    Flashing the wrong firmware can mess up phone calls, mobile data, or biometrics. Network bands or carrier features might not work if the region code doesn’t match the hardware or SIM.

    Be careful when downgrading Samsung Android. Android Verified Boot, AVB checks, and newer bootloader protections can block older images. Downgrades can also corrupt encrypted data and trigger AVB failures, making some features unusable.

    Other Risks to Consider

    • Data corruption or loss if backups are incomplete.
    • Disabled Knox-based security features that break Samsung Pay or secure folders.
    • Loss of future OEM updates if security flags change after flashing.

    Preparing for a Manual Update

    Before we start a manual firmware flash, we take steps to reduce risk and protect data. A short checklist helps us prepare for manual update tasks. This is true whether we plan to apply an official release or downgrade One UI to a prior build.

    Check Your Device Model

    We must confirm the exact model number in Settings > About phone. We note the build number and record the CSC or region code. Matching firmware to the model is critical when you download a package to rollback or downgrade One UI. Flashing the wrong model firmware can corrupt partitions and brick the phone.

    We recommend copying model info into a plain text file. Verify it against the firmware listing before any transfer. This reduces the chance of mismatch and ensures the files we use are compatible.

    Backup Your Data

    We always back up before any major change. Use Samsung Smart Switch to create a full device backup to a PC. Sync contacts and calendar with our Google account. Export photos to Google Photos or a local drive.

    For SMS and call logs, we use reputable third-party tools when needed. Some downgrade paths force a factory reset or break encrypted storage, so we make both cloud and local copies. A thorough backup strategy lets us restore if downgrade One UI attempts wipe data or encryption prevents access after flashing.

    Ensure Sufficient Battery Life

    We recommend a minimum of 60–70% battery before starting a flash, with a stronger preference for a full charge. If possible, keep the device plugged into a reliable power source for the entire process. Power loss during flashing can corrupt partitions and render the phone unusable.

    To be safe, we check charger and cable condition. Confirm the PC battery or power stability. Close apps that could interrupt transfers.

    Additional Prep Steps

    We enable USB debugging and OEM unlocking only when required, aware of the security implications. We install official Samsung USB drivers on our PC. Disable antivirus or firewall rules that may block Odin or Smart Switch connections.

    We download firmware from reputable sources and verify checksums when available. Trusted tools like Frija and SamMobile help ensure file integrity before we proceed with any attempt to backup before downgrade Samsung Android or to flash an older build.

    Tools You Need for the Update

    Before we start a manual firmware update, we collect the necessary tools. These tools are for both simple updates and more complex flashing. We make sure the steps are easy to follow, so everyone can find the right method for their needs.

    Samsung Smart Switch

    Samsung Smart Switch is Samsung’s official app for backups, updates, and device transfers. It’s easy to use and keeps your data safe during updates. It also helps restore backups after an update.

    Smart Switch handles updates from Samsung and moves data between phones. But, it doesn’t let us flash random firmware files or downgrade to older Android versions.

    Odin tool

    Odin tool is a community-used Samsung flashing utility for Windows. It flashes official Samsung firmware files. We use it to update AP, BL, CP, and CSC images and set repartition options.

    Odin tool is not officially supported by Samsung. Using it wrong or flashing unofficial files can damage Knox and void the warranty. Always check the packages before flashing.

    Computer requirements

    Odin only works on Windows. So, we need a Windows 7, 8, 10, or 11 computer, admin rights, and the latest Samsung USB drivers.

    We need a stable USB cable, preferably the original, and enough disk space for big firmware packages. Make sure sleep mode is off and the internet is stable for downloads. Frija and SamFirm can fetch firmware automatically if we want.

    Additional utilities

    • Heimdall — an open-source, cross-platform alternative for macOS and Linux users who can’t run Odin natively.
    • Checksum utilities — check firmware integrity before flashing to avoid corrupted installs.
    • ADB — useful for advanced troubleshooting, pulling logs, and reboot commands when device access is limited.

    We use Samsung Smart Switch for routine updates and backups, Odin tool for targeted flashing, and Heimdall for non-Windows environments. Meeting the computer requirements helps keep the process smooth and reduces the need to flash older firmware.

    Steps to Manually Update Samsung Firmware

    We guide you through safe manual update steps for your Samsung device. The process involves three main steps: finding the right firmware, using Smart Switch for updates, and Odin for advanced flashing. Make sure to match files to your exact model and carrier to avoid problems.

    manual update steps

    Downloading the Firmware

    Start by looking for firmware on trusted sites like SamMobile, Frija, or your carrier’s support page. Ensure the files match your model number and CSC code. Check the file names for Android version, PDA/AP, CP, CSC, and build date. Use MD5 or SHA checksums to check file integrity and avoid corrupted downloads.

    Using Samsung Smart Switch

    Smart Switch is a safe choice for official updates. Install it on a Windows or macOS computer, then connect your device via USB. Follow the prompts to update your software or recover your device.

    Smart Switch only offers official updates and prevents downgrades between major Android versions. It also restores backups, which is great for keeping your data safe.

    Initiating the Update with Odin

    Odin is for advanced users who need to flash older firmware or fix specific issues. First, install Samsung USB drivers and run Odin as an administrator. Reboot your phone into Download Mode using the right key combo for your model.

    Load the firmware files into Odin’s AP, BL, CP, and CSC slots. Use HOME_CSC to keep your data when possible, or regular CSC for a factory reset. Do not re-partition unless the firmware tells you to. Start the flash and wait; Odin will show PASS when it’s done.

    If Odin can’t flash an older Android, bootloader or rollback protection might block it. Some devices reset to factory settings even with HOME_CSC. Always check community threads and device guides on XDA Developers before downgrading or flashing older firmware.

    Be thorough in your preparation and follow each step carefully. Use Smart Switch for official updates, Odin for advanced flashing, and accept that some downgrades might be blocked or require a full reset.

    Troubleshooting Common Issues

    When an update doesn’t go as planned, we follow clear steps to fix Samsung phones. We do careful checks and take methodical actions. This reduces risk and helps us decide when to flash again or seek professional repair.

    Device Won’t Power On

    First, we check basic power and cable health. A low battery or faulty USB cable can seem like serious faults. Try a known-good charger and different cable, then hold Power for 20 seconds.

    If that fails, press Power + Volume Down or Power + Volume Up for the forced reboot sequence. Next, we try Download Mode or Recovery Mode to see if the bootloader responds. If the device enters Download Mode, we can use Odin to reflash stock firmware from a PC.

    If hardware faults persist or the phone never reaches Download or Recovery, we contact a Samsung service center for battery or board-level diagnostics. Avoid repeated blind flashes if the device shows no signs of life.

    Stuck in Boot Loop

    A boot loop can arise from incompatible firmware, a corrupted system partition, or mismatched encryption after a downgrade. We start by booting into Recovery Mode and wiping the cache partition to remove transient data that may block booting.

    If the loop continues, we try Safe Mode to test for app-level conflicts. Reflashing correct stock firmware via Odin is the next step. Use the CSC file rather than HOME_CSC when a clean system install is required.

    If reflashing fails, a factory reset can clear persistent errors, but it will erase user data. We warn users about that trade-off before proceeding.

    Failed Update Notifications

    Common messages include “Software update failed,” “Signature verification failed,” or “Firmware downgrade blocked.” For signature errors, we verify firmware integrity and confirm the file matches the exact model and CSC code. Corrupted downloads or wrong region builds cause many signature failures.

    Downgrade blocks often result from locked bootloaders or AVB (Android Verified Boot) protections. In those cases, a rollback Samsung update may not be possible without official tools or carrier authorization. We recommend checking Samsung support and reading device-specific threads on XDA for any model-specific workarounds.

    Additional Recovery Tips

    When Odin is not an option, Heimdall offers an open-source alternative for flashing on certain models. We consult device-specific guides on XDA and manufacturer documentation before proceeding with unfamiliar steps.

    We urge patience and careful log review. Repeated attempts with incompatible firmware increase the chance of bricking. If hardware failure is suspected, contact Samsung support or a certified repair shop rather than continuing forced flashes.

    Verifying the Update was Successful

    After installing firmware manually, we must check if our device is running the right build. We also need to make sure everything works as it should. This quick check helps us avoid problems later on.

    verify Samsung firmware update

    Checking Firmware Version

    To see if the firmware is installed correctly, go to Settings > About phone > Software information. Look at the Android version, One UI version, and build number. Make sure these match the firmware file we used.

    Also, note down the modem and bootloader details. This is useful when comparing with release notes or carrier-specific files.

    Functionality Tests

    First, test basic features like making and receiving calls, sending texts, and using mobile data. Also, check Wi‑Fi and Bluetooth connections.

    Open the Camera app to take a photo and a short video. Try unlocking with fingerprint and Face Unlock, if your device supports it. Check NFC and Samsung Pay, and make sure GPS and basic sensors work.

    It’s also important to check if carrier services work after updating. If messages, MMS, or VoLTE don’t work, save any error messages for support.

    Monitoring Performance Changes

    Watch how your battery lasts, how apps perform, and how the system responds over a few days. Use light benchmarking or built-in diagnostics for quick checks. But, use third-party tools carefully to avoid getting a wrong impression.

    Also, keep an eye on apps that need updates or show incompatibility after downgrading One UI. If you notice any problems, you might need to reflash another official build, restore from a backup, or even do a factory reset.

    Always note down any error messages, crashes, and when they happened. This information is helpful when you need to ask for help from Samsung support or forums. It makes it easier to decide if you need to update again or go back to a previous version.

    Maintaining Your Device Post-Update

    After updating our phone, we focus on keeping it running smoothly. Simple habits can prevent problems and make our device last longer. Here are some steps to maintain your Samsung after an update and keep it performing well.

    Regular software checks are key to catching updates from vendors or carriers. Go to Settings to look for system updates. Also, use Samsung Smart Switch on a PC for an extra check. Even if we decide to go back to an older version of Samsung Android, official patches can fix security issues or bugs.

    Keeping apps up to date helps avoid crashes and compatibility problems. Use Google Play to update apps after an update. Also, watch for apps that don’t work right. If an app freezes, try clearing its cache or reinstalling it. This often fixes issues after a firmware update.

    Good battery habits are important after any system change. Follow these tips to keep your battery healthy and avoid overheating. Check battery use in Settings to find apps that use a lot of power. Turn off apps you don’t use and enable Adaptive Battery when you can.

    If your battery readings seem off, calibrate it. Charge it to 100%, then let it discharge almost empty before charging again. Avoid charging your phone too much while using it heavily. Also, watch the battery temperature after making firmware changes. These steps help us find problems early.

    We keep our backups current with Smart Switch or cloud services. This way, we can quickly restore our phone if a later update causes issues. Always check Samsung Knox and warranty status after making manual changes. And avoid using unofficial mods too much, as they can reduce stability or support options.

    Here’s a simple checklist for maintenance:

    • Perform regular software checks via Settings and Smart Switch.
    • Prioritize updating apps post-update through Google Play.
    • Apply battery optimization tips: review usage, enable Adaptive Battery, disable rogue background apps.
    • Calibrate battery if readings drift and monitor temperature after firmware work.
    • Maintain backups and monitor Knox/warranty status if we decide to downgrade Samsung Android or use unofficial builds.

    Conclusion: Is Manual Updating Right for You?

    Manual firmware updates are a strong choice for a few users. They offer control and can help when official updates are slow. But, this control comes with big responsibilities and risks.

    Who Should Consider Manual Updates?

    Manual updates are best for tech-savvy users, developers, and technicians. They need to know about model numbers, CSC differences, and how to use tools like Samsung Smart Switch and Odin. Average users should avoid them to keep their warranty and security intact.

    Weighing Risks vs. Benefits

    Think carefully about the pros and cons. The benefits include getting specific updates and the chance to go back to older versions. But, there are risks like bricking, losing warranty, and security issues.

    Final Thoughts on Samsung Firmware Updates

    It’s best to use official updates whenever you can. If you must do manual updates, follow the right steps and use trusted sources. For help, check out XDA Developers and SamMobile. Always make backups and test your device after any changes.

    FAQ

    Is it safe to manually update or flash Samsung firmware via PC?

    Manual updates and flashing via PC give us control. We can install specific builds or rollback updates. But, there are risks involved.

    Using official tools like Samsung Smart Switch can help. Make sure to verify your model and CSC. Always make a full backup before starting.

    Flashing the wrong images can brick your device. It can also trip Knox and void your warranty. Be careful and only flash when necessary.

    What exactly is Samsung firmware and why do updates matter?

    Samsung firmware includes the Android OS and One UI customizations. It also has modem/baseband, drivers, and partition images. Updates bring security patches, bug fixes, and new features.

    Choosing the right firmware is key. It ensures compatibility and avoids network or hardware issues.

    What are the main benefits of performing a manual update or flashing firmware?

    Manual updates can fix software issues. They let us install firmware before it’s available OTA. Or, we can go back to an older One UI if a new update is not good.

    We can also switch CSC/region firmware. This removes carrier bloat or prepares a device for resale. For urgent security patches, flashing can be faster.

    What risks should we expect when flashing Samsung firmware ourselves?

    The main risks are bricking and voiding warranty. Data loss is also a concern. Compatibility problems can break calls, mobile data, or biometrics.

    Some devices may not allow downgrades due to bootloader protections. Android Verified Boot (AVB) can also block downgrades.

    How should we prepare before attempting a manual firmware update or downgrade?

    First, confirm your model number, build, and CSC. Make a full backup using Samsung Smart Switch and cloud services. Ensure your battery is charged well.

    Install Samsung USB drivers on your PC. Enable USB debugging only if needed. Download firmware from trusted sources and verify checksums when available.

    Which tools do we need to flash Samsung firmware or rollback an update?

    For safer updates, use Samsung Smart Switch. For manual flashing, Odin (Windows) is common. Heimdall is a cross-platform alternative.

    You’ll need a Windows PC or VM, Samsung USB drivers, a reliable USB cable, and Frija/SamFirm. Verify tools and firmware sources before use.

    How do we choose the correct firmware file for our Samsung device?

    Match the exact model number and regional CSC in the firmware filename. Firmware filenames encode important information. Selecting the wrong firmware risks bricking or losing network functions.

    Use trusted repositories like SamMobile or Frija. Confirm file integrity using MD5/SHA where possible.

    Can we downgrade One UI or flash older firmware without losing data?

    In some cases, we can preserve data using HOME_CSC files in Odin. However, many downgrades trigger factory resets or fail due to bootloader/AVB protections and encryption incompatibilities.

    We must treat data preservation as uncertain. Always perform a complete backup before attempting any downgrade.

    What are the basic steps to initiate an Odin flash safely?

    Prepare by installing drivers and backing up data. Reboot the phone into Download Mode, connect to the PC, and confirm Odin detects the COM port.

    Load the correct firmware files into AP, BL, CP, and CSC. Use HOME_CSC to try preserving data. Disable re-partition unless required. Start the flash and do not disconnect until Odin reports PASS and the device reboots.

    What should we do if the device gets stuck in a boot loop or won’t power on after flashing?

    Try forced reboot combinations and boot into Recovery Mode to wipe cache. If that fails, reflash the correct stock firmware in Download Mode using Odin.

    Sometimes switching from HOME_CSC to CSC (which performs a factory reset) resolves corruption. If the device remains hard-bricked, professional repair or Samsung service may be required. Preserve logs and error messages for community or official support.

    How can we verify that the firmware update or downgrade was successful?

    Check Settings > About phone for Android version, One UI version, and build number. Run functionality tests: calls, SMS, mobile data, Wi‑Fi, Bluetooth, camera, biometrics, NFC, and sensors.

    Monitor battery, stability, and heat over several days. If critical features fail, consider reflashing another official build or restoring backups.

    Will manual flashing affect Samsung Pay, Knox, or warranty status?

    Flashing unofficial or incompatible firmware can trip the Knox warranty bit. It can disable Knox-dependent features like Samsung Pay or secure folder. Using Smart Switch for official updates typically preserves warranty.

    Consult Samsung’s warranty terms and carrier policies before performing manual operations.

    Are there legal or carrier restrictions we should be aware of when changing firmware region or CSC?

    Region or carrier firmware may include specific network optimizations and features. Changing CSC or flashing firmware intended for a different carrier or region can affect carrier services.

    It may run afoul of local regulations or carrier policies. Verify compatibility and legal implications and prefer official channels when uncertain.

    Where can we find reliable guidance and firmware downloads for our Samsung device?

    Trusted sources include Samsung support and Smart Switch for official updates. SamMobile and Frija offer firmware downloads. XDA Developers provides device-specific tutorials and community-tested procedures.

    Always cross-check multiple sources, read device-specific threads, and verify firmware integrity before flashing.

    After flashing, how do we maintain the device and reduce future risks?

    Regularly check for official OTA updates via Settings and Smart Switch. Keep apps updated through Google Play. Monitor battery and performance, and maintain frequent backups.

    Avoid repeated unofficial modifications that may degrade stability or re-trigger warranty/security flags. If issues exceed our expertise, seek Samsung support or professional repair services.

  • How to Enter Download Mode and Recovery Mode on Any Samsung Phone

    How to Enter Download Mode and Recovery Mode on Any Samsung Phone

    This guide is for U.S. Samsung owners. It covers two important service areas: Samsung Download Mode and Samsung recovery mode. It doesn’t matter if you have a Galaxy S, Galaxy Note, Galaxy A, or an older model. We’ll show you how to get into download mode (also known as Odin mode Samsung) and how to use the Android recovery environment for upkeep and fixes.

    Download Mode, or Odin mode Samsung, is where Samsung accepts firmware and low-level software. You use tools like Odin here. Recovery Mode is the Android recovery console built into your phone. It’s for factory resets, cache wipes, and other system tasks.

    If you’re okay with using hardware key combinations and basic PC tools, this guide is for you. But remember, entering these modes and flashing firmware can risk your data and warranty if done wrong. Always back up your phone first and follow the steps carefully. See Section 9 for backup options.

    Key Takeaways

    • Samsung Download Mode (Odin mode) allows firmware flashing and device recovery.
    • Samsung recovery mode handles factory resets and cache maintenance.
    • We cover step-by-step methods for most Galaxy models and key combinations.
    • Back up data beforehand to avoid loss and check warranty implications.
    • We include troubleshooting, how to exit Download Mode, and Odin usage.

    What Is Download Mode on Samsung Devices?

    Download Mode is a special mode on Samsung phones. It lets us install official firmware and custom recovery images. It’s like a doorway between the phone and a PC for repairs and updates.

    We use Download Mode when normal booting doesn’t work. It gives us control over system files. This mode is key for using tools like Odin mode Samsung and other flashers.

    Purpose of Download Mode

    The main goal of download mode is to flash firmware and restore system partitions. It’s great for fixing devices with corrupted files or after failed updates. We can install factory firmware, go back to stock ROM, or apply carrier builds.

    At a technical level, download mode lets PC software upload images for AP, BL, CP, and CSC partitions. This access is crucial for fixing severe software errors or for controlled firmware changes.

    Benefits of Using Download Mode

    Using download mode offers controlled firmware installation. This helps fix specific problems without messing with other parts. We can update or downgrade AP, BL, CP, and CSC files to solve bootloops, network issues, or crashes.

    Another advantage is recovering from major failures. If a phone shows a black screen or keeps booting, this mode can fix it. It’s faster and more thorough than OTA recovery for serious problems.

    Developers and advanced users get more from download mode. It supports manual updates, testing firmware, and safe downgrades. But, using Odin mode Samsung or unofficial firmware can void warranties and trigger Knox security flags. Always be careful and use verified files to avoid bricking your device.

    How to Enter Download Mode on Most Samsung Phones

    We’ll show you how to get into download mode. This lets you flash firmware or use recovery tools. Make sure your phone is charged over 50% to avoid losing power.

    The steps work for many Galaxy models. But, they might change based on the year and model.

    Follow this basic sequence to enter Download Mode. If your model needs different steps, check the common key combinations below.

    Step-by-Step Instructions

    1. Turn off your phone completely. Use the power button to choose Power Off, or force shutdown if it’s unresponsive.

    2. You can connect a USB cable to your PC but not to the phone. This helps on some devices when you plug the cable in later.

    3. Press the required hardware key combination while plugging the USB cable into the phone, or press the combination while powering the device on.

    4. Wait for the Download Mode screen to appear. Look for a blue or black screen with Odin, a yellow triangle, or a message saying “Downloading… Do not turn off target.”

    5. If you see the Downloading message, your device is in Odin mode Samsung and ready for flashing tools like Odin.

    Common Key Combinations

    Devices can differ. Below we list the most common key combinations download mode uses by layout and generation.

    Model Group Typical Key Combination Notes
    Older Galaxy S / Note (with Home) Power + Home + Volume Down Hold all three while powering on; release when Downloading appears.
    Galaxy S8–S10 (with Bixby) Power + Bixby + Volume Down Press together while connecting USB or while powering up to reach Odin mode Samsung.
    Galaxy S20 and later, many A-series Power + Volume Down, or Volume Down + Volume Up while connecting USB Some models show a recovery/download selection screen; choose Download Mode to boot into download mode.
    USB-trigger method Hold Volume Up or Volume Down while connecting USB Useful when power or button combos fail; timing matters.

    If the key combinations don’t work, try different timing. Make sure the device is fully powered off. Remove and reinsert the battery if allowed. Try both the cable-connected method and the power-on method to increase success.

    How to Enter Recovery Mode on Samsung Smartphones

    We explore the purpose and steps for using the recovery environment on Samsung phones. Recovery mode on Samsung phones is a basic Android system. It’s used for tasks like factory reset, wiping cache partition, and applying OTA updates from ADB or an SD card. It also runs basic diagnostics for quick fixes.

    Recovery Mode Overview

    Recovery mode is used when a device needs repair without a full boot. It’s helpful for a factory reset when locked out, clearing cache for better performance, and sideloading updates via ADB. It’s different from download mode, which is for flashing firmware via a PC.

    Step-by-Step Instructions

    First, power off the device. For many Samsung models, press Volume Up and Power together until the Samsung logo appears. Then, release when the Recovery menu shows. On phones with a Bixby button, hold Volume Up, Power, and Bixby at the same time.

    Newer Galaxy devices without a physical Home or Bixby might use Volume Up plus Side (Power) or a specific Volume Up, Side, then Volume Up sequence. Some models need a USB cable during the process. If one method fails, try the variant for your exact model.

    Once in recovery, use the volume keys to navigate and the power button to select. Options include reboot system now, wipe data/factory reset, wipe cache partition, and apply update from ADB. Remember, wiping data/factory reset will erase all user data. Always back up important files before doing anything destructive.

    Differences Between Download Mode and Recovery Mode

    We explore how Samsung Download Mode and Samsung recovery mode differ. This helps us choose the right path for troubleshooting or reinstalling software on Galaxy devices.

    differences download mode and recovery mode

    We look at their core functions to see which mode is best for each task. Each mode has its own purpose, affecting the risk, outcome, and tools needed.

    Functionality comparison

    Aspect Download Mode (Odin mode Samsung) Recovery Mode (Samsung recovery mode)
    Primary purpose Firmware flashing and low-level writes via USB with Odin or compatible tools. Local system maintenance such as factory reset, cache wipe, and ADB sideload.
    How to access Hardware key sequence often combined with USB connection; device shows downloading status. Hardware key combo boots to a recovery menu on the device without a PC.
    Capabilities Write bootloader, modem, system images; full firmware reinstall possible. Wipe data, clear cache, apply updates from local storage or ADB sideload.
    Risk profile Higher risk: low-level writes can trip Knox and affect warranty; mistakes can brick device. Lower risk: operations are limited to the system partition and user data unless sideloaded packages alter software.
    Typical tools Odin mode Samsung requires Odin or equivalent PC-side flasher. Built-in recovery interface or ADB for sideloading packages from a computer.

    Use cases for each mode

    We explain when to use each mode based on the device’s state and goals. This helps avoid unnecessary risks and speeds up recovery.

    • When to use Download Mode: Use Samsung Download Mode if the device is bricked, stuck in a bootloop, or needs a full firmware reinstallation. It is the right choice for restoring stock firmware after custom ROMs or when downgrading firmware region.
    • When to use Recovery Mode: Use Samsung recovery mode for factory resets to fix software issues, clearing cache after an update, or applying official OTA packages with ADB sideload for smaller updates.

    We suggest trying recovery options first if the phone can boot to recovery and the issue seems software-level. If the device cannot boot or recovery is inaccessible, prepare to use Odin mode Samsung with caution and the correct firmware files.

    Troubleshooting Download Mode Issues

    Working with Download Mode on Samsung phones can sometimes be tricky. Here are steps to help you find and fix common problems. This ensures a smooth flashing or recovery process.

    • Device won’t enter Download Mode — First, make sure the phone is completely turned off. Try different key combinations for your model. If your phone has a removable battery, remove it for a few seconds before trying again. Connect the USB cable while holding the necessary keys if basic startup methods don’t work.

    • PC does not recognize the device — You need to install official Samsung USB drivers or Samsung Smart Switch drivers. Try using different USB ports and cables. Use the original or a high-quality cable and avoid using hubs or dongles.

    • Stuck on “Downloading… Do not turn off target.” — This could mean a flash is pending. If a flashing tool shows activity, let it complete. If nothing happens, a reboot by holding Power + Volume Down might help. But, be careful as interrupting a flash can brick your device.

    • Odin fails to detect device (no COM port) — Check your drivers in Windows Device Manager. Run Odin as an administrator. Close or uninstall Samsung Kies, Smart Switch, or other software that might block ports. Try a different USB port and cable.

    Tips for Entering Download Mode Successfully

    • Always charge your device fully before trying to enter Download Mode or flash. A low battery can interrupt the firmware transfer.

    • Use a reliable USB cable and plug directly into a PC port. Avoid using USB hubs and unpowered adapters.

    • Install official Samsung drivers and keep Odin up to date on Windows. This helps avoid common Samsung Download Mode issues and supports Odin mode Samsung troubleshooting.

    • Practice timing for key presses. Some Samsung models need keys held before connecting USB, while others require the cable connected first. If you face boot into download mode problems, try both methods.

    • Remember your device model and build number, and always back up before flashing. If unsure, check Samsung support pages or XDA Developers threads for model-specific advice.

    How to Exit Download Mode

    Leaving download mode is usually easy. A simple reboot can get things back to normal. If that doesn’t work, we take more steps to keep your data safe.

    Step-by-Step Guide

    Start with a soft exit. For many Samsung phones, hold Volume Down and Power for 7–10 seconds. This should restart your screen. On some phones, Power + Volume Down + Volume Up works too.

    If that doesn’t work and your phone has a removable battery, take it out. Wait a few seconds, then put it back in and turn it on. This can fix simple problems.

    When using Odin to flash firmware, wait for it to finish. Don’t disconnect the cable until it’s done. This way, you won’t need to force Odin mode exit.

    If your device still won’t budge, try reflashing the stock firmware with Odin. Use Samsung’s official drivers and the right ROM for your model. This lowers the risk of damage.

    Understanding Auto Exit Scenarios

    Most firmware flashes will reboot your phone automatically. After Odin finishes, your phone should exit download mode and start Android on its own.

    If a flash fails, your phone might stay in download mode or show an error. Then, follow the troubleshooting steps we mentioned earlier. Try the flash again or use recovery mode if you can.

    Flashes interrupted or power loss can cause problems. Always let a flash complete without interruption. If you interrupt, try again with the right firmware and stable power. A proper reflash can often fix your device.

    Be careful of Knox and bootloader locks. Some Samsung phones won’t boot normally after certain flashes because of security. If you hit this issue, you might need Samsung’s official tools or a service center to fix it.

    Using Odin in Download Mode

    We explain how Odin works with Samsung devices in Download Mode. We also cover what you need to do before flashing firmware. This guide helps you use the tool safely and confidently.

    What Is Odin?

    Odin is a tool for flashing firmware on Samsung phones. It’s used by service centers and advanced users. It works when a phone is in Download Mode.

    Odin can install system, bootloader, modem, and configuration files. It’s not available from Samsung directly. Instead, enthusiasts share it, while Samsung suggests using Smart Switch and Kies.

    Using Odin requires caution. It can change your device’s state, including warranty flags.

    How to Flash Firmware with Odin

    Before you start, prepare well. Download the right firmware from trusted sources. Install Samsung USB drivers on your PC. Back up your data.

    Make sure the firmware matches your model and region. This is crucial.

    • Launch Odin on a Windows PC as administrator.
    • Boot the phone into Download Mode following the device-specific steps in Section 3.
    • Connect the phone with a USB cable. Odin should show a COM port entry and highlight a blue field when the device is detected.
    • Load files into slots: BL, AP, CP, CSC. Use HOME_CSC to retain user data or CSC to perform a factory reset.
    • Ensure “Auto Reboot” and “F. Reset Time” are checked. Do not enable Re-Partition unless you have a correct PIT file and know the risks.
    • Click Start and wait for the PASS message. Do not disconnect until the process completes.

    After flashing, the device will reboot. The first boot may take a few minutes. This is while the system optimizes apps and settings.

    If Odin shows errors, check the log. Make sure the firmware matches your model. Try a different Odin version or check your USB drivers.

    Remember, flashing wrong firmware can brick your phone. It can also trip Knox and void warranties. Always back up your data and be cautious.

    Importance of Backup Before Using Download Mode

    Before we use download or recovery tools on a Samsung device, we stress the need to protect personal data. Flashing firmware, running a factory reset, or performing deep recovery steps can remove contacts, photos, messages, and app data. Some procedures, such as using CSC files in Odin or full wipes in recovery, will explicitly erase user content. Backups act as a safety net when unexpected failures or Knox security triggers limit restore options.

    Samsung Download Mode backup

    Why backing up data matters

    We should expect risks when we modify firmware. An unsuccessful flash can force a clean recovery that deletes everything. Even routine troubleshooting in recovery mode can remove installed apps and settings. By keeping a current Samsung recovery mode backup, we reduce downtime and avoid permanent loss.

    Knox and security flags matter for businesses and advanced users. Certain operations trip Knox counters and restrict what can be restored or replaced. A verified backup gives us options if a device becomes locked or limited after an operation.

    Recommended backup solutions for Samsung phones

    We recommend multiple layers of protection. Use Samsung Cloud for supported syncs and Smart Switch for full local backups to PC or Mac. Smart Switch creates a comprehensive archive that is ideal before flashing.

    Google Backup and Google Photos handle contacts, calendars, and media. We advise enabling account sync to preserve basic data and turning on Google Photos for photo backups prior to any major change.

    For manual control, copy important files to a computer over USB or move them to a microSD card if the phone supports it. This simple step can save irreplaceable photos and documents.

    Experienced users may use third-party apps like Titanium Backup for app-level exports. We caution that such tools often require root access and elevated permissions, so they suit only advanced users who understand the security trade-offs.

    Always verify backups. Check Smart Switch logs, confirm Samsung Download Mode backup files are complete, and attempt a test restore of a noncritical item. This ensures we can recover when we need to perform a backup before flashing Samsung or rely on an Odin mode Samsung backup.

    Backup Method What It Saves Best Use
    Smart Switch (PC/Mac) Full device image: apps, settings, messages, media Complete local backup before flashing or using Odin
    Samsung Cloud Contacts, calendar, select app data, settings Quick cloud sync for supported items and incremental saves
    Google Backup & Google Photos Contacts, calendar, app data (where supported), photos/videos Cross-device sync and media protection
    Manual PC/microSD copy Photos, documents, downloads, selected folders Fast, reliable copy of critical files before any risky step
    Titanium Backup (advanced) App data and system settings (root required) Deep app-level backups for power users who understand risks

    Frequently Asked Questions About Download Mode

    We answer common questions about Samsung download and recovery features. This FAQ covers safety, model compatibility, and where to find reliable guidance. It helps you before you try anything on your device.

    Is Download Mode safe?

    Entering Download Mode is safe and doesn’t harm your data. It prepares your phone for authorized updates without changing your files. But, using the wrong files or tools can be risky.

    Always use official firmware and tested tools. Wrong flashing can brick your device, void your warranty, or break Samsung Knox security. Always back up your files and consider professional help for complex tasks.

    Can I use Download Mode on any Samsung model?

    Most Samsung Galaxy phones and tablets have Download Mode, also known as Odin mode. But, how you enter it changes with each model and generation. For example, older Galaxy S series models are different from newer foldables like the Galaxy Z.

    Some devices, like carrier-locked or heavily modified ones, might not allow Download Mode. Enterprise-managed devices also have extra security. Always check your model number in Settings > About phone. Then, look up specific instructions from Samsung support, XDA Developers, or SamMobile before you start.

    If you’re unsure, reach out to Samsung Support or visit an authorized service center. They can guide you. When flashing firmware, be careful, choose the right firmware, and use verified tools to avoid damage.

    Our Samsung Download Mode FAQ and Samsung recovery mode FAQ sections help you decide when to use each mode. They also explain the safety steps to follow during each process.

    Conclusion: Navigating Samsung Download and Recovery Modes

    We’ve looked at the main differences between low-level flashing and local maintenance. The Samsung Download Mode summary explains that Odin mode Samsung is for full firmware restores and unbricking via a PC. On the other hand, Samsung recovery mode conclusion shows how to do local tasks like factory resets and cache wipes without a PC.

    Following key steps is important and easy to do. You need to use the hardware key combos in Section 3 to get into each mode. Then, follow the step-by-step recovery instructions in Section 4. If you’re flashing with Odin, check Section 8 first.

    Our review suggests installing official drivers and matching firmware. Also, test your backups before flashing to avoid Knox issues and permanent damage.

    It’s wise to start with non-destructive recovery options. Make sure to check Smart Switch or cloud backups before using Odin. For specific guides, use Samsung support, SamMobile, and XDA Developers. If you’re unsure, it’s best to get professional help instead of trying advanced procedures yourself.

    With the right preparation—correct drivers, verified backups, and careful steps—we can confidently use download and recovery modes for Samsung phones. The Odin mode Samsung recap and Samsung recovery mode conclusion give us a solid toolkit for keeping our devices in good shape.

    FAQ

    Is Download Mode (Odin mode Samsung) safe to use?

    Entering Download Mode is safe and doesn’t harm your device. But, flashing the wrong firmware or using the wrong tools can be risky. This can brick your device, trip Knox, or void your warranty.

    Always back up your data. Use the correct firmware for your model. Install official Samsung USB drivers. And be careful when using Download Mode.

    Can we use Download Mode on any Samsung model?

    Most Samsung Galaxy phones and tablets have Download Mode. But, how you enter it can vary. Some devices, especially those locked to a carrier or managed by a company, might not allow it.

    Check your model number in Settings > About phone. Then, look up specific guidance from Samsung, SamMobile, or XDA Developers before trying.

    How do we enter Download Mode on most Samsung phones?

    First, turn off your phone. Then, use a specific key combo while connecting USB or powering on. Older devices with a Home button use Power + Home + Volume Down.

    Models with Bixby use Power + Bixby + Volume Down. Newer phones often use Power + Volume Down. Hold Volume Up and Volume Down while plugging in USB for some.

    Wait for a screen that says “Downloading… Do not turn off target.” Make sure your battery is charged over 50%. If it fails, try again with different timing.

    How do we enter Recovery Mode on Samsung devices?

    Power off your device. Then, press and hold the right keys until you see the Recovery menu. For recent models, use Volume Up + Power (add Bixby if it has one).

    Release the keys when you see the Android Recovery menu. Use the volume keys to navigate and the power button to select. Recovery Mode lets you wipe cache, factory reset, or apply updates via ADB.

    What’s the difference between Download Mode and Recovery Mode?

    Download Mode is for low-level firmware flashing with Odin or compatible tools. It’s used to install bootloader, system, modem, and CSC files over USB. Recovery Mode is for factory resets, cache wipes, and ADB sideloads.

    Download Mode can write critical partitions and may trip Knox. Recovery Mode is safer for non-destructive fixes.

    What should we do if the phone won’t enter Download Mode?

    First, make sure your device is fully powered off and charged. Try different key combinations or timing. On removable-battery models, remove and reinsert the battery.

    If your PC doesn’t detect the device, install Samsung USB drivers or Smart Switch. Try different USB cables and ports. Avoid USB hubs.

    How do we exit Download Mode if the device is stuck?

    For most models, press and hold Volume Down + Power until it reboots. The combination might differ on some phones. For removable-battery models, remove and reinsert the battery.

    If it’s stuck after a failed flash, reflash the correct stock firmware using Odin. Or seek authorized service.

    What is Odin and when should we use it?

    Odin is Samsung’s Windows-based flashing utility. It installs official firmware components (BL, AP, CP, CSC) via Download Mode. We use Odin to unbrick devices, restore stock firmware, or apply region-specific builds.

    Use Odin with the exact firmware for your device model. Make sure you have the proper drivers installed and a reliable USB connection.

    Why must we back up data before using Download Mode or Recovery Mode?

    Flashing firmware, performing factory resets, or recovery operations often erase user data. Some Odin options (CSC) explicitly trigger full wipes. Even failed flashes can require data-wiping repairs.

    We recommend using Smart Switch, Samsung Cloud, Google Backup, or manual PC backups. This helps preserve contacts, photos, and app data before attempting these procedures.

    What are common Odin errors and how can we fix them?

    Common issues include Odin not detecting the device (no COM port), drivers missing or conflicting software like Kies running, and firmware mismatches triggering FAIL. Fixes include installing official Samsung USB drivers, running Odin as administrator, using a different USB cable/port, disabling Kies/Smart Switch during flashing, and verifying firmware matches the model and region.

    Can using Download Mode trigger Knox or void warranty?

    Flashing unofficial firmware or unlocking certain partitions can trip Samsung Knox and may void warranty protections. Official firmware flashed via authorized tools is less likely to cause issues. But, advanced operations that alter the bootloader or use non-official images carry risk.

    We advise checking warranty terms and using official firmware and support when possible.

    How do we choose the correct firmware for Odin?

    Identify the exact model number (Settings > About phone or the device packaging) and the current build/region. Download firmware from reputable sources like SamMobile, Samsung-Updates, or carrier repositories that match model and region. Using mismatched firmware can brick the device, so verify compatibility before flashing.

    If our device is bricked, which mode should we try first?

    If the device won’t boot or is in a bootloop and Recovery Mode is inaccessible, use Download Mode with Odin to restore stock firmware. If the device can boot to Recovery and the issue appears software-level, try non-destructive Recovery options first (wipe cache, reboot). Always back up data when possible before attempting recovery or flashing.

  • How to Downgrade Android Version on Samsung Without Losing Data

    How to Downgrade Android Version on Samsung Without Losing Data

    This guide is for U.S. Samsung users who face issues after a system update. If your phone shows Samsung apps force close messages or apps keep stopping Samsung, we have solutions. These will protect your personal data and fix the crashes.

    We focus on practical steps. We show you how to downgrade Samsung Android without losing data. We also explain when downgrading is needed versus simpler fixes. Many problems can be solved by clearing app data or fixing Android system webview.

    This article covers why you might want to revert an update. It also explains how to prepare and back up your device. You’ll learn about the tools you need—Samsung Smart Switch and Odin—and where to find official firmware. We provide a detailed downgrade procedure, troubleshooting for boot loops and data loss, and post-downgrade steps. We also discuss the risks like voiding warranty or bricking your phone.

    If you’re comfortable with intermediate-level device tasks, want to keep your files intact, or are troubleshooting persistent app crashes after an update, read on. We’ll explain how clearing app data and updating or reinstalling Android System WebView can often stop crashing apps without the need to downgrade your firmware.

    Key Takeaways

    • Downgrade Samsung Android is an option when updates cause instability, but it carries risks.
    • Try less invasive fixes first: clear app data and apply an Android system webview fix.
    • We cover preparation steps, backup methods, and essential tools like Smart Switch and Odin.
    • We provide firmware sourcing guidance and a detailed, data-safe downgrade walkthrough.
    • Expect troubleshooting tips for boot loops and guidance on restoring data after the process.

    Understanding the Need to Downgrade Samsung Android

    Users often face sudden instability after a system update. This can cause apps to stop working on Samsung devices or force close. We’ll look into why downgrading Samsung might be necessary and when it’s a good idea.

    Here are some common reasons for downgrading. Each reason is based on real problems and the trade-offs involved.

    Common Reasons for Downgrading

    After an update, devices can become unstable. This leads to apps stopping on Samsung devices or frequent force close alerts.

    Another issue is performance regression. New updates can slow down the UI, reduce battery life, and make apps less responsive on older Galaxy phones.

    App compatibility is also a concern. Some apps may not work with newer versions due to changes in APIs or WebView. This can cause crashes, making it necessary to fix Android system webview before downgrading.

    Businesses and users may need specific Android builds for work or personal reasons. Some people prefer older interfaces or features that were removed in later updates.

    Benefits of Specific Android Versions

    Going back to an older version can improve performance on older devices. It can also reduce the number of times Samsung apps force close during regular use.

    Older Android versions can also make apps work better and crash less often. This is especially true when recent updates change APIs or WebView.

    Fixing Android System WebView can be a simpler solution. In some cases, fixing WebView issues can prevent app crashes without needing a full downgrade.

    Issue Typical Symptom Why an Older Version Helps
    Post-update instability Apps crash, system lag, frequent reboots Proven build with fewer regressions on the same device model
    Performance regression Slower UI, worse battery life Less resource-hungry framework and tuned optimizations
    App compatibility Legacy apps fail or display errors Older APIs remain supported; fewer WebView changes
    Enterprise requirements MDM or corporate apps flag incompatibility Aligns device firmware with company standards
    User preference Missing features or UI changes Restores familiar behavior and layout

    Preparing for the Downgrade Process

    Before we start, we take a few careful steps to protect our data and confirm the device is ready. Downgrading can simplify performance troubles or restore a preferred build, yet it can fail without proper preparation. We cover backups, storage, and compatibility so the process runs as smoothly as possible.

    We start by backing up everything that matters. A complete backup reduces the chance of permanent loss if something goes wrong during the downgrade.

    Full device backup with Samsung Smart Switch

    We use Samsung Smart Switch to back up contacts, messages, photos, and supported app data to a PC or external drive. Smart Switch preserves many settings and synced items, so we make a local copy before proceeding.

    Google services and manual backups

    We enable Google Backup for contacts, Drive, and Photos to keep cloud copies. For app data not covered by these tools, we export SMS with reputable utilities and copy the DCIM and Documents folders to our computer. We recommend exporting any app-specific files manually to avoid surprises.

    Verify backups

    We check the backups by opening a few photos, documents, and contacts to ensure files are intact and restorable. Confirmation saves time and anxiety if we must restore later.

    We also clear app data where appropriate before downgrading to avoid conflicts. Clearing caches and deciding which apps to reinstall helps if apps keep stopping Samsung after a version change.

    Next, we confirm device compatibility to prevent flashing the wrong firmware.

    Model, carrier, and firmware matching

    We check the precise model number in Settings > About phone and note carrier variants. Firmware is model-specific. Installing firmware for the wrong variant risks a brick or boot loop.

    Security, unlock, and Knox

    We inspect bootloader and Knox status. Some steps trip Knox and affect Samsung Pay and secure features. If the method requires OEM unlock or developer options, we enable them only after understanding the risks.

    Battery, storage, and cables

    We charge the device above 60% and free enough internal storage for temporary files. We use a reliable USB cable and port to avoid disconnects during flashing.

    Carrier locks and policies

    We confirm whether the carrier locks or policies restrict downgrading. Locked devices can refuse older firmware or require unlocking that may void protections.

    Preparation Step Why It Matters Quick Action
    Smart Switch backup Saves contacts, messages, photos, supported app data, and settings Back up to PC or external drive and verify files
    Google Backup Cloud sync for contacts, Drive documents, and photos Enable in Settings and confirm recent sync
    Manual export Preserves SMS and app-specific files not covered by other tools Export SMS, copy DCIM and Documents folders to computer
    Model and carrier check Prevents flashing incompatible firmware Note model number from Settings > About phone and match firmware
    Knox and bootloader status Impacts Samsung Pay and secure features if tripped Confirm status and understand consequences before unlocking
    Battery, storage, cable Reduces risk of interruptions during downgrade Charge >60%, free storage, use reliable USB cable
    Clear app data Helps prevent post-downgrade crashes and issues Clear caches and selective app data for problem apps
    Post-downgrade checks Addresses issues like apps keep stopping Samsung or webview faults Plan to update WebView and system apps; have Android system webview fix steps ready

    Essential Tools for Downgrading Samsung Android

    We explain the tools needed to downgrade a Samsung device safely. This includes official recovery options, advanced flashing tools, and finding the right firmware. Each tool has a specific role, so it’s important to follow steps carefully. This helps avoid issues like apps crashing after a restore.

    Samsung Smart Switch

    Samsung Smart Switch backup is our first choice. It creates full backups and moves contacts, messages, and media without rooting.

    It’s great for emergency software fixes and restoring data after a reinstall. Using it helps avoid manual file handling and reduces the chance of app crashes.

    Odin Tool Overview

    Odin Samsung is a Windows tool for flashing firmware in download mode. It’s used by technicians for full firmware installations and more.

    Odin can fix bricked devices if used right. It needs the correct Odin, Samsung drivers, and firmware files. Wrong use can brick the phone or trip Knox, so check versions first.

    Finding the Right Firmware

    We guide on finding firmware by model and region to avoid errors. Official firmware includes BL, AP, CP, and CSC files. Choosing HOME_CSC helps keep data when possible.

    Be careful with CSC choices for carrier features. Always check checksums and download from trusted sources. Make sure to confirm your device’s region and model before searching for firmware.

    Tool Primary Use Key Requirement Risk
    Samsung Smart Switch Backup and restore user data, emergency recovery Desktop client and USB cable Limited firmware flashing capability
    Odin (Windows) Flash full firmware, recovery, AP/BL/CP, CSC Correct Odin version, Samsung USB drivers, firmware files Bricking device, tripping Knox if used improperly
    Firmware download tools (Frija, official archives) Locate and verify official firmware by model/region Model number, region/CSC, checksum verification Wrong CSC can cause network or feature issues

    Downloading the Correct Firmware

    Choosing the right firmware is crucial before we start. The correct file helps avoid risks and keeps our data safe. Always use trusted sources and check if it’s compatible to prevent issues like apps stopping on Samsung after a failed flash.

    download Samsung firmware

    Sources for Official Firmware

    It’s best to get firmware directly from Samsung servers for authenticity. Tools like Frija and SamFirm do this, ensuring the files are genuine.

    For specific region and model packages, check sites like SamMobile and Updato. Always verify the file details and read user feedback before downloading.

    Carrier portals also offer firmware for locked models. Use these if the carrier code matches your device. But, avoid untrusted sources and custom ROMs unless you know the risks.

    Checking Firmware Version Compatibility

    Make sure the model number and region or carrier code match. A mismatch can prevent the flash or cause stability issues and apps force close errors.

    Also, check the bootloader version and rollback protections. Many recent bootloaders block older firmware. Check if your model allows downgrades before proceeding.

    Choose HOME_CSC when available to keep user data safe. CSC often means a full wipe. Confirm the Android build number and security patch level to ensure the downgrade is correct.

    Always check checksums and verify file integrity to avoid corrupted flashes. A bad firmware can cause boot loops or apps stopping Samsung, requiring fixes like an Android system webview fix.

    Source What It Provides When to Use
    Frija / SamFirm Direct firmware pulls from Samsung servers, checksum data Best for authentic, up-to-date firmware and integrity checks
    SamMobile / Updato Region- and model-specific firmware archives, user notes Useful when server tools cannot find a region build; verify reviews
    Carrier Portals Carrier-branded firmware builds with network optimizations Use for carrier-locked phones to ensure compatibility
    Custom ROM Mirrors Modified or community firmware, varied support Only for experienced users who accept the risks and troubleshooting

    Step-by-Step Guide to Downgrade Android on Samsung

    We show two ways to safely downgrade Samsung Android. Each method has its own benefits and drawbacks. Always make a full backup before starting.

    Using Odin: A Detailed Walkthrough

    First, install Samsung USB drivers on your PC. Then, download and extract the right Odin version and firmware files. This step helps avoid driver issues and makes detection easier.

    Next, turn off your device and enter Download Mode. Use the right key combo for your model. For older phones, it’s Volume Down + Power + Home. Newer models use Volume Down + Bixby + Power.

    Connect your phone via USB and check if it shows up in Odin’s ID:COM section. Launch Odin as an administrator and load the firmware into the correct slots: BL, AP, CP, and CSC.

    If you want to keep your data, use HOME_CSC if it’s available. This option helps avoid a factory reset.

    Click Start to start the flash. Watch the progress bar and log window closely. Never disconnect or interrupt the process. A green “PASS” means success and an automatic reboot.

    After flashing, the first boot may take longer. Check the system version and test basic functions. If it hangs, try a recovery wipe only as a last resort.

    Be careful with Odin guide Samsung. Flashing wrong firmware or interrupting a flash can brick your phone. Tripping Knox may void your warranty and disable secure features. Use caution.

    Using Samsung Smart Switch: A Guide

    Smart Switch is better when your PC client recognizes your device and offers emergency recovery. It uses official channels and is safer.

    First, install Smart Switch on your Windows or macOS system. Connect your phone and open the app. Choose More, then Emergency software recovery and initialization. Follow the prompts to reinstall official firmware or restore a backup.

    Using Samsung Smart Switch can reset your device, depending on the operation. Always back up your data before proceeding.

    Smart Switch’s main benefits are lower risk and official support for certain models. However, it’s not universal and only handles recognized recoveries.

    Step Odin Smart Switch
    Preparation Install USB drivers, download Odin, extract firmware Install Smart Switch on PC, backup data via app
    Risk Level Higher if wrong firmware used; can trip Knox Lower for supported recoveries; official method
    Data Preservation Use HOME_CSC to retain data when available May reset device; backup recommended
    When to Use When specific firmware is required to downgrade Samsung Android When restoring official firmware or repairing software recognized by the client
    Troubleshooting Monitor logs, avoid disconnects, recovery wipe as last resort Follow prompts, re-run recovery or contact Samsung support
    Common Issues Device not detected, wrong firmware, Samsung apps force close after flash Operation may force reset, clear app data required after reinstall

    Troubleshooting Common Issues During Downgrade

    We explore common problems when downgrading a Samsung device. Often, small steps can quickly fix issues. If problems continue, follow these steps to minimize damage and get your device working again.

    Samsung boot loop fix

    Boot loop problems

    When a phone keeps showing the logo and won’t go to the home screen, try a force reboot. Hold Power plus Volume keys for 10–20 seconds. If that doesn’t work, use Recovery Mode with the model-specific combo (usually Volume Up + Power + Bixby).

    In Recovery Mode, wiping the cache partition is recommended. It clears temporary system files without losing user data. If wiping the cache doesn’t solve the problem, re-flashing the correct stock firmware with Odin is next. Make sure the model and region match the firmware file to avoid worsening the issue.

    If all else fails, a factory reset from Recovery Mode will stop the loop but erase user data. Always back up your data before doing this. These steps offer the best chance at fixing a Samsung boot loop without losing too much.

    Data loss concerns

    Data loss can happen from flashing the wrong CSC, interrupted flashes, or unexpected factory resets. To avoid this, always back up with Samsung Smart Switch and Google backups before downgrading.

    Using HOME_CSC helps keep user data safe. Also, ensure a stable USB connection and full battery before flashing. These precautions help prevent data loss Samsung users face during risky operations.

    If data is lost despite precautions, start by restoring Smart Switch or Google backups. Third-party backups can also help recover media and documents. For advanced recovery after a flash, professional data recovery services can help when storage has not been overwritten.

    App stability after downgrade

    After downgrading, apps may act strangely and keep stopping. Clearing app data for the crashing apps can help. This removes corrupted app state without reinstalling everything.

    Crashes can also come from the Android System WebView component. Fixing WebView by updating or reinstalling it via the Play Store or sideloading a compatible version can help. This is especially useful when the Play Store update path is not available.

    If clearing app data and fixing WebView don’t stop crashes, reinstalling apps usually solves the problem. We document which apps failed so users can restore settings selectively from backups.

    Post-Downgrade Steps to Consider

    After rolling back the firmware, we take a few steps to get our phone ready for daily use. We focus on restoring data, checking core services, and applying updates for security and stability.

    Restoring Your Data

    We start by using Samsung Smart Switch on a PC to restore contacts, messages, and app settings. This method gives the most complete restore for device-specific settings and media.

    Then, we sign into our Google account to recover contacts, the app list, Drive files, and synced photos. This step fills gaps left by other backup methods.

    When reinstalling apps from Google Play, some apps may not work right. If apps keep stopping Samsung after reinstall, we clear app data and test the app again. Clearing app data often fixes corrupted caches and restores expected behavior.

    We validate restored content by checking contacts, messages, and photos. Critical apps like banking or VPN require re-login and may need re-registration if Knox was affected during the downgrade.

    Installing Necessary Updates

    We check for security patches next. A downgrade can remove recent fixes, so we look for incremental official updates that match the older Android release while restoring essential patches.

    App updates come from Google Play. We update apps to versions that work with the downgraded Android to reduce crashes. If Android System WebView caused crashes before, we apply an Android system webview fix by installing a compatible WebView build or updating Google Chrome, which can act as the WebView implementation.

    We run a final pass to confirm stability. This includes testing common apps, confirming that apps keep stopping Samsung no longer occurs, and rechecking Knox-protected services for any remaining restrictions.

    Safety and Risks Involved in Downgrading

    Before we try to downgrade a Samsung device, we think about the risks. Flashing older firmware can solve some problems, but it’s not without danger. We suggest trying simpler fixes like clearing app data or fixing Android system webview first.

    Unofficial flashing can trigger Samsung Knox eFuse, which can permanently mark the device. This might make Samsung Pay and Secure Folder unavailable. It’s important to check your service agreement to see if software changes affect your warranty.

    Using official tools like Samsung Smart Switch can help keep your warranty intact. But, third-party methods like Odin flashes might be seen as unofficial. If Samsung apps crash after a change, it could hurt your warranty claim.

    Risk of bricking your device

    Bricking can be soft or hard. A soft brick means your phone gets stuck in a loop and might be fixed. A hard brick makes your phone dead and can’t be fixed by most people.

    Things like the wrong firmware, interrupted flashes, or hardware issues can cause bricking. To avoid this, we make sure the firmware matches, keep the battery charged, and use a reliable USB connection. We also follow trusted guides.

    We always have recovery tools like Odin and official firmware packages ready. If apps crash, we try clearing data and reinstalling. For web issues, we might fix Android system webview or reinstall it.

    If your device is hard-bricked, we suggest contacting Samsung or a professional repair service. The warranty situation can vary, so it’s good to document everything before seeking help.

    Conclusion: Weighing the Pros and Cons of Downgrading

    Deciding if we should downgrade Samsung involves looking at both the benefits and risks. Downgrading can stop apps from crashing and fix issues after updates. But, older versions might lack security updates and new features.

    Before we decide, we need to check if the firmware is compatible. We should also back up our data fully. Using tools like Odin or Samsung Smart Switch can help avoid damaging our device.

    It’s important to think if the benefits of downgrading are worth the loss of security updates and features. There are other ways to fix problems before considering a downgrade.

    Clearing app data and cache can help when apps crash. Updating or reinstalling Android System WebView can also fix issues. For single-app crashes, try force stopping, clearing data, uninstalling updates, and reinstalling from Google Play.

    If these steps don’t work, we should contact Samsung Support or our carrier. Only try downgrading if simpler fixes don’t work. Make sure to back up data and choose the right firmware.

    FAQ

    What are the most common reasons Samsung users consider downgrading Android?

    Users often think about downgrading after a big system update. This can cause problems like apps crashing a lot. They might also see “apps keep stopping Samsung” messages, or the phone might not work as well as before.

    Some people also downgrade because they don’t like the new look or features. But, many issues can be fixed without downgrading. Clearing app data or fixing Android System WebView problems can help.

    Can we downgrade without losing personal data?

    Yes, you can downgrade and keep your data if you do it right. Use the correct firmware package (HOME_CSC) and follow some important steps. Always make a full backup first.

    Using the wrong CSC or having an interrupted flash can cause a factory reset. So, be careful and make sure you have everything backed up.

    Which tools do we need to perform a downgrade on a Samsung device?

    You’ll need Samsung Smart Switch for backups and Odin for flashing firmware. Also, Samsung USB drivers, the right firmware files, and a good USB cable are essential.

    For getting firmware, Frija or SamMobile are good choices. Make sure to download from trusted sources and check that the model and region match.

    Where can we find the correct firmware for our Samsung model?

    Look for firmware on official Samsung sites or reputable places like SamMobile. Use Frija or SamFirm to get firmware directly from Samsung. Make sure the model number and CSC/carrier code match.

    Use HOME_CSC to keep your data safe when you can. Always check the checksums to avoid corrupted files.

    How do we use Odin to downgrade, and what are the risks?

    First, install the USB drivers. Then, extract the firmware and put your phone in Download Mode. Load the firmware into Odin’s slots and connect your device.

    Click Start and be careful not to interrupt. Flashing the wrong files can brick your phone or trip Knox. This can void your warranty and disable secure features. Always follow the guide for your model and keep your battery and connection stable.

    Can Samsung Smart Switch downgrade Android safely?

    Smart Switch is mainly for backups and official software recovery. It can reinstall firmware for some cases. It’s generally safer than Odin.

    But, Smart Switch might reset your device. So, always back up before using it.

    What should we check before attempting a downgrade?

    Make sure you know your exact model number and carrier. Check your battery level (it should be over 60%). Also, check if your bootloader and Knox are okay.

    Ensure you have enough space for temporary files. Verify that the firmware fits your bootloader version. Downgrade protection might block flashing, so check that too. And, have a stable Windows PC ready if using Odin.

    How can we avoid a boot loop after downgrading?

    If your device boots into a loop, try a force reboot. Hold the power and volume keys together. Then, boot into Recovery Mode and wipe the cache partition.

    If that doesn’t work, re-flash the correct firmware with Odin. Make sure the model and region match. A factory reset can fix boot loops but will erase your data, so use it only after backing up.

    What causes data loss when downgrading and how can we prevent it?

    Data loss can happen from using the wrong CSC, an interrupted flash, or wrong firmware. It can also happen from manual factory resets. To avoid loss, make multiple backups.

    Use HOME_CSC when possible, keep your USB connections stable, and have enough battery. If data is lost, you can try to recover it from your backups.

    Are there less risky alternatives to downgrading for fixing app crashes?

    Yes, there are safer ways to fix app crashes. Clearing an app’s cache and data can often solve the problem. Updating or reinstalling Android System WebView can also help.

    Try force stopping and reinstalling apps that crash. Booting into Safe Mode can help find third-party conflicts. Using Smart Switch’s emergency recovery is another option before a full firmware flash.

    How do Android System WebView issues relate to app stability after an update?

    Many app crashes come from WebView problems after updates. Updating or reinstalling Android System WebView can fix these issues. This can often restore app stability without needing to downgrade.

    What post-downgrade steps should we take to restore full functionality?

    After downgrading, restore your data with Smart Switch. Sign into Google to get back contacts and synced files. Reinstall apps from Google Play and update them to work with the new Android.

    If WebView crashes were a problem, install a compatible version or update Chrome. Check if Knox was tripped—if so, some secure services might need reactivation or stay disabled.

    Does downgrading void our Samsung warranty or risk bricking the device?

    Downgrading can trip Knox and limit warranty services. Hard bricking (device not recognized) is rare but possible if flashing goes wrong. Soft bricks (boot loops) are often fixable.

    We recommend trying less invasive fixes first. If unsure, seek help from Samsung or your carrier.

    If we lose data, what recovery options are available?

    You can restore data from Smart Switch backups, Google backups, or other backups you made before flashing. If no backups exist, professional data recovery services might help.

    Success depends on whether the storage was overwritten. Encrypted data and Knox-protected content can be harder or impossible to recover after certain operations.

    Who should attempt a downgrade and who should seek professional help?

    Intermediate-to-advanced users should try downgrading themselves. They should be comfortable with flashing and firmware selection. Users relying on Knox-secured services or unsure about downgrading should contact Samsung support or a certified technician.

    Before downgrading, try targeted fixes like clearing app data, reinstalling WebView, or Safe Mode troubleshooting. This can often solve problems without a full downgrade.

  • Essential Samsung Secret Codes Every Technician and User Should Know

    Essential Samsung Secret Codes Every Technician and User Should Know

    This guide is for tech experts, power users, and regular owners. It shows how to quickly check a device’s status using Samsung secret codes. We explain how Samsung’s UI history has made these codes more accessible.

    These codes can show device info, network details, or run tests. They can also reset your phone or do advanced tasks. But, remember, some codes might not work on all phones or in all situations.

    We cover useful categories like diagnostics, info, network, reset, and advanced commands. Be careful with some codes as they can reset your phone or change settings. We used Samsung’s developer guides, forums like XDA Developers, and Samsung service manuals for our info.

    Key Takeaways

    • Samsung secret codes provide quick access to diagnostics and device info.
    • Code behavior changed as Samsung moved from TouchWiz history to Samsung Experience UI and One UI evolution.
    • Compatibility varies across Galaxy S, Note, and A series and by carrier locks.
    • Some service codes can reset or alter network settings; proceed with care.
    • Reference official Samsung documentation and trusted forums for model-specific details.

    Introduction to Samsung Secret Codes

    Secret dialer codes are special strings that unlock hidden features on phones. They look like *#0*# and more. These codes have been around since the early days of Android and Samsung’s TouchWiz.

    They are used by tech experts and power users. These codes can show diagnostics, hidden menus, and more. They are a key part of a tech expert’s toolkit.

    What Are Secret Codes?

    Secret dialer codes are entered in the phone app to access special menus. They can show device info like firmware and hardware tests. A simple example is a code that opens a touchscreen test screen.

    These codes are divided into two types. One type follows standard Android and carrier rules. The other is specific to Samsung and offers advanced features. The way these codes work has changed over time with updates to Samsung’s UI.

    How to Use Secret Codes Safely

    Using secret codes safely is important. Always back up your device first. Test read-only codes to see how your model reacts.

    Enter codes through the phone dialer. Some codes work automatically without needing to press the call key. Never add extra digits or characters unless it’s safe to do so. Avoid codes that reset your device unless a tech expert is there to guide you.

    It’s important to be careful with different versions of Samsung phones. As Samsung’s UI has evolved, so have the security measures. Codes that worked on older phones might not work on newer ones. Always check official Samsung support pages and Android security advisories for safe use.

    Topic Typical Use Risk Level
    Read-only diagnostic codes View sensor status, firmware, and hardware tests Low
    Service and configuration codes Access service menus, calibrate components Medium
    Write or reset codes Factory reset, FRP, or partition writes High
    Carrier and network MMI codes Network status, IMS, and SIM-related checks Low to Medium

    Commonly Used Secret Codes for Samsung Devices

    We explore the top Samsung secret codes list for tech experts and power users. These codes unlock hidden menus on Galaxy phones. But, their availability changes with TouchWiz, Samsung Experience UI, and One UI updates.

    Accessing Hidden Features

    Some codes are key for hardware tests and service options. Dialing *#0*# opens a hardware test menu on many Samsung phones. This menu includes display, sensor, touchscreen, and camera tests.

    Entering *#1234# shows firmware or build details on some units. Older phones use *#0808# to access USB settings for debugging and tethering. The location and appearance of these options vary with UI updates.

    Checking Device Information

    Device info codes quickly reveal identifiers and software data. The code *#06# gives the IMEI. Codes like *#12580*369# and *#1234# show detailed software, bootloader, and hardware info on many Samsung phones.

    One UI evolution has moved some details to Settings > About Phone. This makes codes less necessary for casual users. But, professionals still use them when Settings is limited or locked by carriers.

    Network Information Codes

    Android and Samsung-specific codes check radio and network stats. The Android code *#*#4636#*#* shows phone and network info on some builds. Samsung devices have service menus that show band, signal, and radio status in TouchWiz menus.

    These tools help identify carrier locking, active frequency bands, and APN or USB tethering states. Be aware that carriers sometimes block service codes. Newer One UI evolution tends to hide many network details in system settings or a protected service menu.

    Purpose Common Code What It Shows Notes
    Hardware Test *#0*# Display, touch, sensors, camera checks Works on many Samsung models; layout differs by UI generation
    Firmware/Build Info *#1234# Build, PDA, CSC, firmware version Useful for OST and repairs; some carriers hide results
    USB Settings *#0808# USB configuration and tethering options Common on older models; modern One UI may move these to Settings
    IMEI *#06# Device IMEI number Universal Android code; essential for warranty and carrier checks
    Full Software/Hardware Info *#12580*369# Detailed software, hardware, and build timestamps Valuable for technicians diagnosing firmware mismatches
    Network & Radio *#*#4636#*#* Phone info, battery, usage stats, network metrics Works on some Android builds; may be limited on Samsung variants

    Diagnostic Codes to Troubleshoot Your Samsung Phone

    We guide techs and users through hidden tools for quick hardware checks. Using diagnostic codes, Samsung techs can find screen, audio, and charging issues fast. We follow steps to check the service menu and understand the results.

    Testing display and touchscreen

    By dialing *#0*# on many models, we see color fills and touch grids. Solid colors show dead pixels and backlight issues. Touch grids help us check if the screen works right.

    Proximity and ambient light sensors are also tested from this menu. They help find problems with the screen’s sensors.

    Older TouchWiz layouts have simpler icons. Samsung Experience UI diagnostics and One UI troubleshooting show differences. One UI groups tests and labels them clearly.

    Sound and vibration tests

    Hidden menus test speakers, earpieces, microphones, and vibration motors. We check if sounds are clear or distorted. Microphones are tested by speaking into them.

    Vibration tests check if the phone vibrates right. If there’s distortion, we update the software and test again. If it still doesn’t work, we might need to replace parts.

    Battery and charging tests

    Service menus show battery stats like cycle counts and voltage. We check voltage against expected levels. Some One UI models show detailed battery analytics in Settings.

    Charging port diagnostics check for loose pins. Battery health values help decide if we need to replace the battery or fix the board.

    Troubleshooting workflow and documentation

    We check visually, then for audio and charging issues. This order helps avoid repeated steps. We document each test, firmware version, and error codes.

    This record helps with warranty claims and passing on information to other techs. Our methods follow Samsung service manuals and repair community standards.

    Codes for Factory Reset and Reboot

    We explore how to reset a Samsung phone to its original settings and how to reboot it safely. Some older phones have reset options in the dialer, but newer ones block these actions with a simple code. We discuss which dialer codes still work, how to use recovery mode, and what to do before resetting.

    factory reset codes Samsung

    How to Perform a Factory Reset

    Older factory reset codes for Samsung phones might show service menus or prompts. But, current firmware often needs confirmation and won’t wipe everything with a dialer code alone. We suggest viewing dialer strings as informational, not a sure reset method.

    If a code doesn’t work, Recovery Mode is a reliable reset option. First, turn off the device. Then, press the right hardware button combo for your model. For Galaxy S and Note phones with a Bixby button, use Power + Volume Up + Bixby. For older phones without Bixby, use Power + Volume Up + Home.

    Hold until the recovery menu shows up. Then, select “wipe data/factory reset” with the volume keys and confirm with Power.

    Always back up your data before resetting. Remove your Google account to disable Factory Reset Protection (FRP) if you plan to give the device to someone else. Follow Samsung’s official guidance and Google’s FRP documentation for account removal and reactivation steps.

    After resetting, expect to set up your device with the current skin. Devices that moved from TouchWiz to Samsung Experience to One UI may have different welcome flows. Know the Samsung Experience UI reset prompts for older models and One UI reset procedures for recent phones when guiding users through setup.

    Safe Mode Activation

    Safe Mode lets us disable third-party apps without deleting data. Use Safe Mode to find out if an app is causing crashes or battery drain before a full reset.

    To enter Safe Mode on most One UI phones, long-press the Power menu, then touch and hold Power Off until the Safe Mode prompt appears. On older devices influenced by TouchWiz, a hardware sequence may be needed: reboot and hold Volume Down while booting until Safe Mode shows up. Some models accept a hardware button method: power on while holding Volume Down.

    Safe Mode is a quick test. If problems go away in Safe Mode, we remove or update the app instead of resetting the phone. If issues still exist, a full wipe via recovery might be needed.

    Be careful. Using reboot codes or other dialer strings to bypass protections can have legal or warranty consequences. Avoid unlocking bootloaders or running unofficial firmware without explicit permission. When unsure, consult Samsung support or authorized service centers before taking actions that affect warranties or device security.

    Unlocking Hidden Menus and Features

    We show how to unlock deeper controls on Samsung phones. These steps let techs and advanced users access hidden settings. Be careful, as some options are for service centers only and need official tools.

    Accessing the Service Menu

    The service menu is for advanced settings used by repair centers. You can get into it by dialing special codes, using hardware keys, or apps for certified techs.

    These menus let you change things like radio settings and sensor adjustments. They look different in TouchWiz, Samsung Experience UI, and One UI. Always follow the instructions to avoid problems.

    Unlocking Developer Options

    Here’s how to turn on Developer Options on Samsung phones. Go to Settings > About phone > Build number and tap seven times. This opens a menu with useful settings for techs and app makers.

    Settings like USB debugging and OEM unlocking are useful. Older versions of TouchWiz had fewer options. Samsung Experience UI made things clearer. One UI made it even easier to find what you need.

    Remember, use these features wisely. Keep track of changes and reset to default after service. Always use Samsung Knox-aware workflows for security. Some settings are locked by Knox, so official tools are safest.

    Secret Codes for Security and Privacy

    We start with steps to check if a device is real and protect personal info. Secret menus and dialer codes let us access important identifiers and services. We show how to use these tools and what to look for to trust a Samsung phone.

    IMEI check code

    Checking IMEI Number

    The IMEI check code *#06# shows the device ID right away. It works on most Samsung phones and versions. Checking the IMEI is key for unlocking, warranty checks, and finding a stolen phone.

    Over time, Samsung changed how they show the IMEI. In the past, it was in old menus. Now, it’s in newer settings and service menus.

    Fixing a phone or replacing the motherboard can change the IMEI. We suggest checking the IMEI on the box, under the battery, and with *#06#. If they don’t match, it might have been repaired or cloned before.

    Verifying Installed Applications

    We explain how to check apps and services from secret menus and developer options. These menus show running processes and system apps not seen in the app drawer.

    To find unwanted apps, we compare names with known Samsung and Google apps. Features like Play Protect warn about harmful apps. Samsung Knox adds extra security for business users.

    One UI makes it easier to control app permissions. We use these controls to remove unnecessary permissions. This includes access to SMS, call logs, or device admin features.

    Secret menus help us find third-party apps running as services. If we find something unexpected, we disable admin privileges and uninstall the app. We also suggest keeping Find My Mobile and Google Find My Device on to help recover or lock the device.

    We advise regular checks with the IMEI code and Samsung app verification. This keeps your device safe from harm. Regular checks also help after repairs or when selling the device.

    Codes for Network Diagnostics

    We explore useful codes and steps for fixing wireless radios and cellular links on Samsung phones. These methods combine old TouchWiz techniques with new One UI tools. This helps techs and advanced users follow a clear testing process.

    Bluetooth and Wi-Fi Diagnostics

    Specific USSD-style entries and service menu items help us get radio reports. A common Bluetooth test code shows module status and pairing logs. For Wi-Fi, codes reveal RSSI, noise floor, and packet loss counters.

    Steps to check Bluetooth and Wi-Fi:

    • Open the service menu entry linked to the Bluetooth test code and note module status and error counters.
    • Run a pairing sequence with a known-good accessory while watching RSSI and retransmit rates.
    • Use Wi-Fi diagnostics to log throughput, packet loss, and antennal diversity results across 2.4 GHz and 5 GHz bands.
    • Compare readings with the One UI network tools panel when service menus are restricted by firmware or carriers.

    We suggest repeating tests after toggling airplane mode and testing with a verified router. Packet loss above 1–2% or fluctuating RSSI often points to antenna or interference issues rather than app faults.

    LTE and Network Signal Testing

    We access radio information screens via network codes Samsung to view cellular metrics. These entries show LTE test Samsung data like RSRP, RSRQ, RSSI, and SINR for LTE and 5G-capable handsets.

    How we interpret key metrics:

    Metric Typical Good Range What a Low Value Suggests
    RSRP -80 to -95 dBm Poor signal strength, possible distance or obstruction
    RSRQ -10 to -3 dB High congestion or poor antenna tuning
    RSSI -65 to -85 dBm Interference or weak carrier aggregation
    SINR 10 dB and above Noisy channel, interference affecting throughput

    Practical checks we perform before hardware replacement:

    • Run the LTE test Samsung entry to confirm band and carrier provisioning.
    • Swap in a known-good SIM from a used carrier to rule out SIM or account issues.
    • Note whether band selection menus are present; carriers or firmware builds sometimes lock these options.

    We advise technicians to consult Samsung service guides for platform-specific commands and to cross-check readings with carrier diagnostics. Proper use of network codes Samsung and One UI network tools reduces unnecessary parts replacement and speeds accurate troubleshooting.

    Advanced Secret Codes for Technicians

    We look into advanced Samsung codes that techs use for complex issues and part checks. These codes give deep device info and help in making quick repair decisions. We’ll cover the main sequences, what they show, and how to document before making changes.

    Technicians use a hardware version code to check board revisions and more. The right codes show firmware details needed for part checks. The software version code reveals build numbers and carrier customizations that impact features and updates.

    TouchWiz-era firmware has its own naming style, different from Samsung Experience UI and One UI. We compare board IDs and firmware suffixes to ensure correct parts. CSC codes show available features and update timing, so we note them before flashing.

    Resetting network settings

    We explain the reset network settings code and how to use it for odd connection issues. The standard reset via Settings > General Management > Reset > Reset network settings clears settings. Service-menu commands can also reset in repair situations.

    A reset clears Wi‑Fi SSIDs, Bluetooth pairings, and more. Use this code for issues after SIM swaps or carrier changes. After resetting, we re-add networks and confirm APN settings for the carrier.

    Recommended technician workflows

    We document hardware and software version codes before any changes. Tools like Smart Switch help with backups and firmware management. In service settings, Odin can flash firmware with caution, but watch for Knox and warranty flags.

    We keep detailed logs of version codes and pre-change backups. This helps in quick troubleshooting and meets customer expectations. Regular use of advanced Samsung codes and detailed documentation reduce repeat visits and ensure correct parts and firmware.

    Conclusion: Using Samsung Secret Codes Wisely

    Secret codes are key for both tech experts and users. They help us fix problems fast and get important device info. Knowing these codes is crucial, especially with Samsung’s UI changes over the years.

    Importance of Knowing These Codes

    Secret codes make our work more efficient. They help us find issues quickly and make smart repair choices. For users, they offer a deeper understanding of their devices.

    Reminder on Code Caution and Usage

    Always use secret codes with care. Back up your data first and only use codes you’re sure about. This keeps your device safe and warranty intact.

    For tough problems, go to official Samsung services. They offer the best help and keep your device in top shape.

    One UI shows how Samsung balances user needs with tech power. By knowing Samsung’s history and using codes wisely, we ensure devices work well and are easy to use.

    FAQ

    What are Samsung secret codes and why should technicians and advanced users know them?

    Samsung secret codes are special dialer sequences that open hidden screens. They help us run tests, read data, and perform resets. Knowing these codes helps us fix problems faster and decide if we need to repair or update the software.

    These codes are important because they show how to test different parts of the phone. They help us understand the phone’s history and how to fix it right.

    Are secret codes safe to use on my Samsung phone?

    Many codes are safe and only read information. But some can reset your phone or change important settings. Always back up your data first and be careful with codes that can change your phone’s settings.

    Modern phones might not let you access all codes for security reasons. Carriers might also block some codes.

    How do I enter a secret code correctly?

    To enter a code, type it in the phone’s dialer exactly as shown. Some codes open automatically, while others need you to press Call. Never add extra numbers or characters.

    If a code does something you didn’t want, your phone might ask for confirmation. But don’t count on it. Some phones need special steps or tools to access service mode.

    Which common codes reveal device and firmware information?

    Common codes include *#06# for your IMEI and device info. Samsung-specific codes like *#0*# open the hardware test menu. Codes like *#1234# or *#12580*369# show software and hardware build info on some phones.

    One UI makes it easy to find this info under Settings > About Phone. But service menus give more detailed information that technicians need.

    Can I use secret codes to test the display, touch, sound, and battery?

    Yes, you can use codes like *#0*# to test the display, touch, sound, and battery. These tests are available on many Samsung phones. But the way they appear can change with different firmware versions.

    How do I perform a factory reset safely if I can’t use a dialer code?

    If you can’t use a dialer code, you can reset your phone in Recovery Mode or through Settings. The steps vary by model and firmware version. Always back up your data and remove Google accounts to avoid FRP issues.

    Make sure you know the warranty or Knox consequences before resetting your phone.

    What should technicians know about service menus and developer options?

    Service menus offer advanced access to radio calibration and diagnostics. They are for authorized service centers only. Misusing them can damage your device.

    Developer Options provide tools like USB debugging and OEM unlocking. Always log any changes and restore defaults after service. Use official Samsung tools for firmware tasks.

    How can secret codes help with security and privacy checks?

    Secret codes can reveal IMEI, installed packages, and running services. Developer and service menus show apps with device admin privileges. These views help detect suspicious software or unauthorized changes.

    Combining secret-code checks with Samsung Knox and Google Play Protect gives a complete security picture.

    Are there codes for network, Wi‑Fi, Bluetooth, LTE, and 5G diagnostics?

    Yes, there are codes for network, Wi-Fi, Bluetooth, LTE, and 5G diagnostics. Some Android-standard codes and Samsung service entries show radio status and band information. Carrier firmware or One UI updates might restrict some tests, so test with a known-good SIM.

    Always check the carrier/service guides before replacing hardware.

    Do secret codes vary by Samsung model, carrier, or firmware version?

    Absolutely. Codes’ availability and behavior depend on model series, Android version, Samsung firmware, and carrier locks. Carrier-branded models often limit or hide service menus. Always verify compatibility before using advanced commands.

    Where do we find authoritative sources and references for these codes?

    Reliable sources include Samsung developer documentation and official service manuals. Community resources like XDA Developers and Android Forums are also good. For technician-level procedures, official Samsung service training materials are preferred.

    What are the best practices for technicians when using advanced secret codes?

    Document current firmware, CSC, IMEI, and hardware revisions before making any changes. Use non-destructive diagnostics first and back up user data. Always get customer authorization for resets or firmware flashes.

    Prefer official Samsung tools and be mindful of Knox/warranty flags when flashing or modifying firmware.

    Can using secret codes affect warranty or trigger Knox?

    Certain operations can trip Knox or void warranty. Read warranty terms and Samsung’s service policies. Using read-only diagnostics usually doesn’t affect warranty, but destructive or service-level modifications might.

  • How to Safely Backup Your Data Before Flashing a Samsung Phone

    How to Safely Backup Your Data Before Flashing a Samsung Phone

    Flashing a Samsung device can fix software issues or add custom firmware. But, it can also erase your personal data. It’s crucial to backup your Samsung phone before flashing. This way, your photos, messages, contacts, app data, and settings stay safe.

    We’ll show you how to use Samsung cloud backup, Smart Switch backup, Google Drive, and manual USB transfer. These methods help you save your data before flashing.

    By “backup,” we mean making a copy of your important files and settings. “Flashing” means installing or reinstalling firmware or a custom ROM. This process can erase your internal storage.

    Common places for backups include cloud services like Samsung Cloud and Google Drive. You can also use Samsung Smart Switch or transfer data manually via USB. Samsung’s official advice is to back up data before making big system changes.

    This guide is for U.S. smartphone users with Samsung Galaxy S and A series, Note series, Fold/Flip models, and other Galaxy devices. If you plan to flash for updates, repairs, or customization, this is for you. Some steps might differ by model or Android version, but the main ideas are the same.

    We’ll talk about why backups are important, the main methods, and how to prepare. You’ll learn how to backup step-by-step, check if it worked, and avoid common issues. Our goal is to make sure you lose as little data as possible.

    Key Takeaways

    • Always backup Samsung phone data before flashing to prevent permanent loss.
    • Use Samsung cloud backup or Smart Switch backup for full device copies when possible.
    • Google Drive is a convenient alternative for contacts, photos, and app settings.
    • Manual USB transfer gives direct control over which files to save.
    • Check storage, battery, and account access before starting any backup.

    Why You Should Backup Your Samsung Phone Data

    Flashing a Samsung device changes its core software. This can affect everything stored on the phone. Before making any changes, it’s wise to backup your Samsung phone data. Saving data before flash helps reduce stress and speeds up recovery if something goes wrong.

    Importance of Data Preservation

    Modern Samsung phones hold many important items. These include contacts, messages, call logs, photos, videos, documents, app settings, and two-factor authentication tokens. Losing these can disrupt work, harm personal finances, or create security issues. Backups help restore these items quickly and maintain stability.

    Potential Risks of Flashing

    Flashing can cause serious problems. A factory reset can erase all user data. Software incompatibilities may prevent the phone from booting, and corrupted partitions can make files inaccessible.

    Some apps store data only on the device, not in cloud accounts. If that app data isn’t synced, it can be lost after a wipe. Improper flashing can void the manufacturer’s warranty or brick the device. A reliable backup makes these outcomes reversible or less damaging.

    What Happens During the Flashing Process

    The flashing process includes unlocking the bootloader and installing new firmware. It overwrites system and user data partitions. Some ROM packages require wiping userdata to avoid conflicts.

    Tools used for flashing overwrite files at a low level. This makes it easy to lose data permanently unless we save data before flash. Knowing which partitions will be replaced helps us choose the right backup approach.

    We will use this risk awareness to guide the next sections. Smart Switch, Google Drive, and manual backups each help with data preservation in different ways. Samsung cloud backup handles synced items, Smart Switch captures broader device state, and manual methods secure personal files not covered by cloud services.

    Backup Method What It Preserves Best Use
    Samsung Smart Switch Contacts, messages, app data, settings, media Full-device restore to another Samsung phone
    Google Drive Contacts, calendar, app data linked to Google, photos via Google Photos Cloud-based continuity and cross-device sync
    Manual USB Backup Photos, videos, documents, app files Selective file preservation and offline archive
    Samsung Cloud Backup Settings, some app data, synced media Quick cloud restore for Samsung accounts

    Methods to Backup Samsung Phone Data

    Before we flash a device, we need clear options to save data before flash. We outline three reliable methods so you can choose the one that fits your needs and time.

    Using Samsung Smart Switch

    Samsung Smart Switch is the official tool for Backup Samsung phone data. It runs on Windows and macOS with a desktop app and appears on many Galaxy phones as a built-in option. Smart Switch backup can create near-complete device snapshots that include contacts, messages, call logs, app data where allowed, system settings, and photos. We can save a full image to a PC or Mac, move data between devices, and restore quickly when the flash finishes.

    For desktop use, we connect the phone with a USB cable and follow on-screen prompts. Smart Switch backup handles most items automatically, making it a strong choice when we want an easy restore path.

    Utilizing Google Drive

    Google Drive backup offers cloud convenience and ties into Android and Google services. It backs up app data, call history, synced contacts, device settings, and SMS on supported phones. Photos can sync through Google Photos, keeping media off the device but accessible after a restore.

    Automatic scheduled backups reduce manual work and let us save data before flash without a computer. Be mindful of Google account storage limits, since backups share the same quota as other Drive files.

    Manual Backup using USB

    Manual backup using USB suits users who want direct control over files. We connect the phone to a computer in MTP or File Transfer mode and copy folders such as DCIM, Downloads, Documents, and other media. This method is fast for large photo or video libraries and lets us keep copies locally or on an external drive for redundancy.

    Manual backup using USB will not capture certain app data or system settings unless an app includes its own export. We recommend combining this approach with either a Smart Switch backup or Google Drive backup to ensure nothing critical is missing.

    Method What It Backs Up Pros Cons
    Smart Switch backup Contacts, SMS, call logs, app data where allowed, settings, photos Near-full backups, easy restore, desktop and device support Requires PC/Mac for full local backup; app data limits apply
    Google Drive backup App data, call history, contacts (when synced), device settings, SMS (supported), photos via Google Photos Automatic scheduling, cloud access, no cable needed Storage caps tied to Google account; may omit some items
    manual backup using USB User-accessible files: DCIM, Downloads, Documents, media Fast for large media, granular control, easy external drive copy Doesn’t capture system or many app data; hands-on process

    Weighing the options helps us protect important files and save data before flash. Combining methods—for example, Smart Switch backup plus a manual copy of the DCIM folder—gives layered protection and reduces the chance of losing vital content.

    Preparing Your Samsung Phone for Backup

    Before we start, we take a few quick steps to prepare phone for backup. These steps ensure the process runs smoothly. They help us backup Samsung phone data without interruptions.

    We check storage on the device and in the cloud. Big photo and video libraries can fill storage fast. We look at internal free space and cloud backup quota.

    If space is low, we clear unused apps, buy extra cloud storage, or move media to a PC or external drive.

    Low storage can cause backups to fail. We recommend freeing enough room for Smart Switch backup and Samsung cloud backup. This allows for temporary files and version data.

    We verify the phone runs a stable Android build and that backup apps are up to date. Outdated Android releases may limit backup features. Updating the operating system and apps improves compatibility and reliability.

    We make sure the phone has ample battery before beginning. Backups and flashing can take a long time. We aim for 50–80% battery at minimum, with the charger connected when possible.

    For Smart Switch backup to a desktop, we keep the phone plugged in and the computer awake. This avoids disconnections.

    We adjust a few settings that can block access temporarily. We disable screen locks only while backing up if an app requires unlocked access, then re-enable protection afterward. We enable USB debugging when a PC connection needs it and close background apps that may interfere with file transfers.

    • Check internal and cloud storage and act if space is low.
    • Update Android and backup apps before running backups.
    • Charge the device or keep it connected during Smart Switch backup.
    • Temporarily disable locks or enable USB debugging when required.
    Prep Task Why It Matters Quick Action
    Storage check Prevents backup interruptions and incomplete Smart Switch backup files Free space, buy cloud storage, or copy to PC
    OS and app updates Improves compatibility with Samsung cloud backup and Google services Install official updates from Settings and Play Store
    Battery and power Reduces risk of mid-backup shutdown during save data before flash Charge device to 50–80% or keep plugged in
    Access settings Prevents permission blocks during PC-based backups Disable locks temporarily, enable USB debugging if needed

    Once these steps are complete, we are ready to run a full Smart Switch backup or use Samsung cloud backup. This preparation makes it much easier to backup Samsung phone content and to save data before flash without surprises.

    Step-by-Step Guide for Samsung Smart Switch

    We will show you how to safely save your data before you flash your phone. This guide covers getting the software, connecting your devices, picking what to save, and confirming the backup. Follow these steps to back up your Samsung phone content.

    Smart Switch backup

    First, download Smart Switch for your computer or use the app on your phone. For Windows and macOS, go to Samsung’s official download area and pick the right installer. You’ll need Windows 7 or later and macOS 10.13 or later, with at least 500 MB free disk space. On many Galaxy phones, the Smart Switch app is already installed under Settings > Accounts and backup.

    Next, connect your device to the computer or get ready for a wireless transfer. Use a good USB cable and a direct PC port for a stable transfer. On your phone, accept the prompt to allow File Transfer/MTP or tap Trust this computer. For wireless transfers, use Wi‑Fi Direct in the app and keep both phones close.

    After connecting, open the Smart Switch desktop app and choose Backup. The app shows what data is being backed up: contacts, messages, call logs, app list, system settings, home screen layout, photos, and videos. Remember, some app-specific data might not be backed up due to Android restrictions. So, export those items separately when needed.

    While the backup runs, don’t disconnect your phone. The time it takes depends on how much data you have. Small backups might take minutes, while big media libraries take longer. Once it’s done, check the backup status in the app and find the saved files on your PC. For extra safety, copy the Smart Switch PC backup folder to an external drive to keep your data safe.

    Here’s a quick reference to compare common transfer methods and what you can expect.

    Step Action What It Protects
    Download download Smart Switch from Samsung for Windows or macOS Enables Smart Switch backup and PC tools
    Connect Plug phone via USB or use Wi‑Fi Direct between phones Contacts, messages, media, settings
    Select Open app, tap Backup, review data categories Apps list, home layout, call logs, photos
    Verify Wait for completion, confirm in app, locate files Local Smart Switch PC backup folder for restore
    Secure Copy backup folder to external storage Extra copy to further save data before flash

    How to Backup with Google Drive

    Before we start, make sure you know which Google account to use for backup. This ensures your apps, settings, and messages are saved to the right account. This step is crucial to avoid any issues when restoring your phone after flashing.

    Signing into Your Google Account

    First, open Settings and go to Accounts and backup > Accounts. Make sure your device is signed into the Google account you want to use for backup. If you have multiple accounts, choose the one with enough space in Google Drive.

    Check the storage space under Google Drive or Google One to avoid running out of room during the backup.

    Choosing What to Back Up

    Next, go to Settings > Accounts and backup > Backup and restore, then select Back up to Google Drive. Look over the list of items to be backed up. This includes app data, call history, device settings, and SMS on supported devices.

    For photos and videos, open Google Photos and turn on Backup & sync. Choose the upload quality. Original keeps the full resolution, while High quality reduces size to save space. Pick the right option based on your Google account’s storage capacity.

    Initiating the Backup Process

    To start the backup, go to Settings > Accounts and backup > Backup and restore and tap Back up now. You can also open the Google Drive app, tap Backups, and start a backup from there. Backups usually run automatically when the phone is idle, charging, and connected to Wi-Fi.

    Remember, free Google Drive space is limited. If you need more for a full backup or to complement a Samsung cloud backup, consider Google One. Always download important photos and documents to another location before flashing.

    To check and manage your backups, open Google Drive and look at the Backups section. Review the timestamps, delete old backups to free up space, and make sure recent items match what you expected to save. This helps avoid surprises when restoring your phone after flashing.

    Manual Backup Process via USB

    Before flashing a Samsung device, we suggest a simple manual backup via USB. This method lets us manage files directly. It’s a good Smart Switch backup alternative for those who like hands-on control.

    Begin by connecting the phone to a computer with the original or certified USB cable. On the phone, pick File Transfer (MTP) from the USB menu. If asked to allow USB debugging, agree so the computer can see your device’s storage. Using the right cables helps avoid connection issues and speeds up file transfers.

    On Windows, open File Explorer and find the Samsung device under This PC. For macOS, use Android File Transfer or a trusted app, then open Finder to see your device’s storage. Look through folders to find the data you want to save before flashing.

    Focus on these key folders when copying files from Samsung:

    • DCIM for camera photos and videos
    • Pictures and Videos for other images and recordings
    • Downloads and Documents for important files
    • WhatsApp, Telegram, Signal media folders for message attachments
    • Any app-specific export folders created by productivity apps

    Move chosen folders to a named, dated folder on your computer. Then, make a copy of this folder to an external hard drive or NAS for extra safety. For contacts and calendars, check Google sync or export contacts as a VCF from the Contacts app. SMS might need third-party tools or Smart Switch backup alternatives, while WhatsApp chats are easiest backed up to Google Drive via WhatsApp > Settings > Chats > Chat backup.

    After transferring, check file counts and sizes on both the phone and computer. Keep backups tidy with dated folders and notes. For private files, encrypt them before moving to external storage to keep your data safe.

    Finally, test access to a few random files to make sure you can restore them. This manual backup method ensures a clear copy of your files and gives you peace of mind before flashing your Samsung device.

    Verifying Your Backup is Successful

    Before we flash a Samsung device, we ensure the backup is complete and accessible. A quick check saves time and prevents data loss. Below, we explain how to find backups, test data, and create a backup confirmation record.

    We first check where backups are stored. For Smart Switch backups on Windows, look in Documents\Samsung\SmartSwitch\backup for folders named by date. For cloud backups, sign into Google Drive and go to Backups at drive.google.com to check entries. Manual copies might be on an external drive or a specific folder on our PC. Knowing the exact path helps us verify backup Samsung files before we proceed.

    Checking Backup Location

    We find Smart Switch backup files in Documents\Samsung\SmartSwitch\backup and note the most recent timestamp and folder size. For Google cloud saves, we check Google Drive > Backups and confirm the device entry, last backup time, and total size. For manual backups, we open the external drive folder and compare file counts and sizes to the phone.

    Testing for Data Integrity

    We spot-check a selection of critical items. Open several photos to ensure they display correctly. Import or open exported contacts (VCF) to confirm entries are legible. View a few messages or call log entries if present. When possible, we perform a partial restore to a spare device or emulator to confirm apps, contacts, and media restore as expected.

    For Smart Switch backup verification, we use the app’s Restore preview to inspect included items before restoring. For Google Drive, we confirm the last backup timestamp and listed size. If any file seems corrupt or missing, we redo the backup or copy the affected files to a secondary location.

    Creating a Backup Confirmation Document

    We keep a simple confirmation record for each backup. The document lists the date and time, backup methods used, exact storage locations, and the types of data included. We note file sizes, folder names, and any encryption passphrases or keys. Passwords and keys are stored securely, separate from the confirmation file.

    To reduce risk, we maintain at least two copies of critical backups. For example, we keep one in the cloud and one on an external drive. This redundancy lowers the chance of a single-point failure and strengthens our backup confirmation process.

    Check Where to Look What to Record
    Smart Switch backup Documents\Samsung\SmartSwitch\backup Folder name, date/time, folder size, included items list
    Google Drive backup drive.google.com > Backups Device entry, last backup timestamp, backup size
    Manual copy External drive or PC folder File list, total size, checksum or sample file checks
    Integrity test Spare device or emulator Partial restore results, sample photos, VCF import success
    Backup confirmation Local secure folder or encrypted note Date/time, methods, locations, passwords stored securely

    Best Practices for Data Management

    We keep data safe by following clear routines and smart choices. A short plan cuts the chance of loss when we flash a Samsung phone. These steps help us balance convenience, security, and storage use.

    best practices backup Samsung phone

    Regular Backup Schedule

    We set a regular backup schedule to make backups automatic and worry-free. For heavy photo users, we recommend daily photo sync. A weekly full device archive covers apps and settings. Always run a backup before system changes like flashing.

    Use built-in tools such as Samsung cloud backup and Smart Switch backup to enable automatic saves. Toggle scheduled backups where available so we do not rely on memory alone.

    Keeping Multiple Backup Copies

    We follow a mobile-friendly 3-2-1 approach: three copies, two media types, one offsite. That means a local Smart Switch backup, a copy on an external drive, and a cloud archive with Samsung cloud backup or Google Drive.

    Having multiple backup copies reduces risk from theft, corruption, or accidental deletion. We keep at least one encrypted local copy for sensitive files.

    Reviewing What Data Is Important

    We audit our data regularly to prioritize contacts, 2FA recovery codes, photos, documents, and message histories. Pruning old files saves space and speeds restores.

    We disable backups for unnecessary caches and adjust app permissions. Strong account passwords and two-factor authentication protect cloud backups and Smart Switch backup exports.

    Troubleshooting Common Backup Issues

    Before we flash a Samsung phone, we need reliable backups and a quick plan for common failures. Below we cover frequent causes and fixes so you can save data before flash with confidence.

    Connection Problems with Smart Switch

    Smart Switch connection problems often come from a faulty USB cable, a blocked USB driver on Windows, or the phone being set to charge only. Try a different cable and USB port first. On Windows, install the latest Samsung USB drivers and update the Smart Switch desktop app. For macOS, use the Smart Switch Mac app and ensure Android File Transfer isn’t interfering. Also enable File Transfer/MTP on the phone, unlock the screen, turn on USB debugging if needed, update the phone OS, and restart both devices.

    Errors During Google Drive Backup

    Google Drive backup errors typically stem from low Google storage, unstable Wi‑Fi, background data restrictions, or outdated Google Play Services. Free up space or upgrade Google One, connect to a stable Wi‑Fi network, and disable battery saver or background data limits for backup services. Update Google Play Services and the Google Drive app, then trigger a manual backup to confirm the issue is resolved.

    What to Do if Files Are Missing

    If we cannot find files after a backup, we first check backup logs and timestamps and search cloud trash folders like Google Drive Trash. Inspect any alternate Google or Samsung accounts and look in Smart Switch backup folders on the PC. For recently deleted local files, consider trusted file recovery tools as a last resort. If app‑specific data such as WhatsApp chats are missing, use the app’s official backup or export feature and consult vendor support when needed. When critical information remains inaccessible, contact Samsung Support, visit an authorized service center, or engage professional data recovery—advanced DIY recovery can further jeopardize data, so we recommend professionals for severe cases.

    FAQ

    Why must we back up our Samsung phone before flashing?

    Flashing can erase your data. Backups keep your contacts, photos, and apps safe. This way, you can restore your device if flashing fails.

    What is the difference between a backup and flashing?

    A backup saves your data and settings. Flashing installs new firmware or ROM. Backups protect your data from being lost during flashing.

    Which backup methods should we consider before flashing?

    Use Samsung Smart Switch for full backups to PC or Mac. Google Drive and Google Photos are good for cloud backups. Manual USB transfers are also useful for copying files to a computer or drive.

    How do we use Samsung Smart Switch to back up our phone?

    Download Smart Switch from Samsung’s site or use the app on your phone. Connect your phone with a good USB cable. Run Smart Switch, choose Backup, and wait for it to finish. Then, copy the backup to an external drive for safety.

    Can Google Drive back up everything on our Samsung device?

    Google Drive backs up some data like app settings and photos. But, it might miss some app data and system settings. It also depends on your Google account’s storage.

    How do we perform a manual USB backup?

    Connect your phone via USB and choose File Transfer/MTP. Use File Explorer on Windows or Android File Transfer on macOS to copy important folders. Store another copy on an external drive for extra safety.

    What preparations should we make before starting a backup?

    Check your storage space and update your Android and backup apps. Make sure your battery is 50–80% full or plugged in. Disable screen locks if needed and enable USB debugging for PC connections. Close any apps you don’t need.

    How can we verify our backup is complete and usable?

    Check the backup location, like the Smart Switch folder on your PC or Google Drive. Look at timestamps and file sizes. Spot-check files and, if possible, restore a small set to a spare device. Record your backup details in a document.

    What common issues occur with Smart Switch and how do we fix them?

    Problems include bad USB cables, outdated software, wrong USB mode, and locked phones. Try a different cable, update your software, and choose the right USB mode. Restart both devices. On macOS, use the Smart Switch Mac app and avoid Android File Transfer conflicts.

    What should we do if Google Drive backup shows an error?

    Check your Google account’s storage and internet connection. Turn off battery saver and background data restrictions. Update Google Play Services and Google Drive. If you’re out of space, buy Google One or move big files to local storage.

    How do we handle missing files after a backup?

    Check your backup logs and timestamps. Look in cloud trash folders and make sure you used the right account. For missing app data, use the app’s export function. If you still can’t find something, consider professional data recovery.

    How often should we back up our Samsung phone?

    Back up daily or weekly with automatic cloud backups. Do a full backup with Smart Switch weekly or when you add a lot of new data. Always back up before making system changes.

    Do we need to encrypt backups or take extra security steps?

    Yes. Encrypt your local backups and use strong passwords and two-factor authentication. Store at least two copies of your backups. Keep your encryption keys and recovery codes safe.

    Will flashing void our Samsung warranty or brick the phone?

    Flashing can void warranties and brick your device if done wrong. Backups help, but check your warranty and follow official advice. For risky actions, consider professional help or official tools.

    Where does Smart Switch store backups on a Windows PC?

    Smart Switch saves backups in Documents\Samsung\SmartSwitch\backup on your PC. Copy this folder to an external drive for safety. Note the backup date in your confirmation document.

    Can we restore selective data instead of a full restore after flashing?

    Smart Switch lets you restore certain data types. Google Drive restore applies settings and app data as a package. For more control, export specific items and restore them individually.

    What tools help back up messages and app-specific data not covered by Smart Switch or Google?

    Many messaging apps have backup features (WhatsApp to Google Drive, Signal and Telegram export). Desktop tools can also export SMS and app data. But, prefer vendor-supported methods for safety.

    How do we keep backups organized and easy to find later?

    Use date-stamped folders and a confirmation document with backup details. Keep at least two copies on different media. Label external drives and keep a list of what each backup contains.

    If we plan to flash a Samsung Galaxy Fold/Flip or Note, are steps different?

    The main backup steps are the same for all Galaxy models. Minor UI or Android version changes might affect menu locations. Always check device-specific guidance when available.

    Where can we get official help if backups or flashing go wrong?

    Contact Samsung Support or visit an authorized service center for help. For Google/Drive issues, use Google Account help resources. Professional help can prevent further data loss.

  • How to Check Your Exact Samsung Firmware Version to Avoid Scams

    How to Check Your Exact Samsung Firmware Version to Avoid Scams

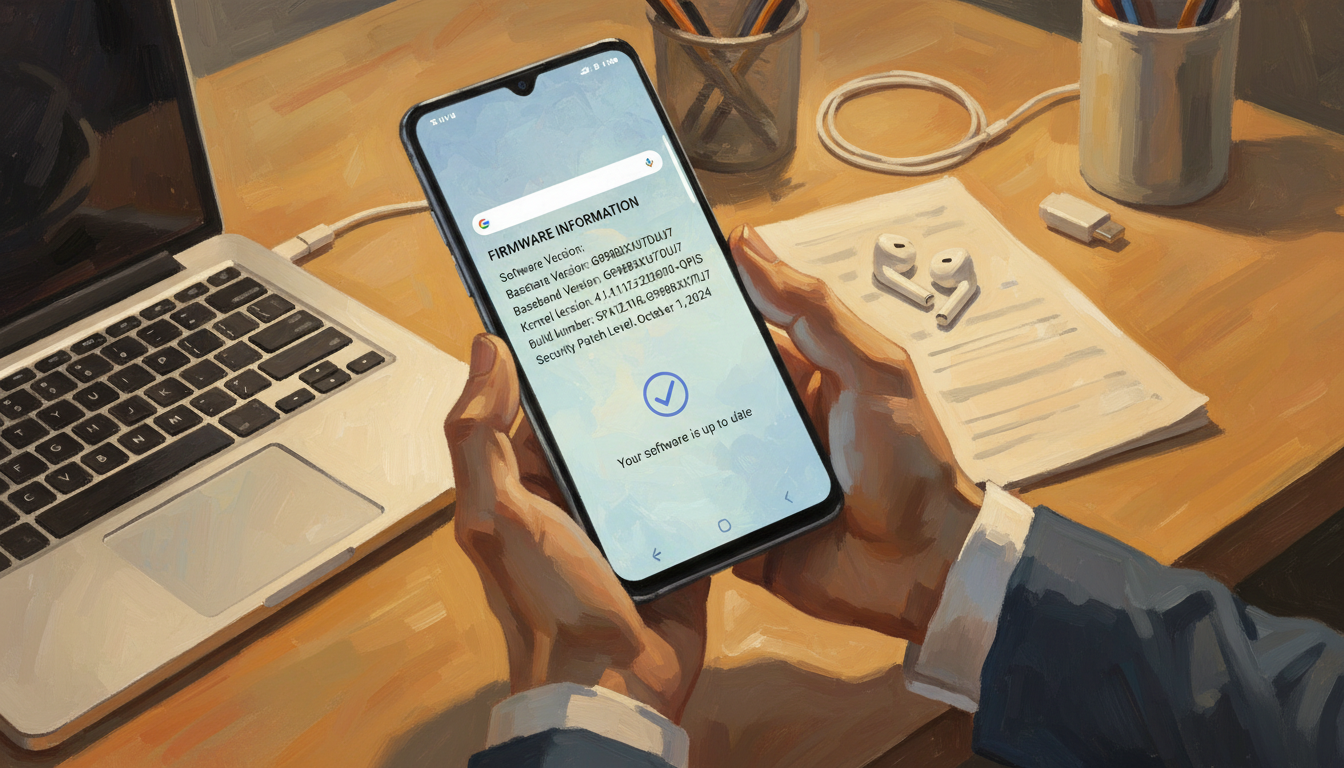
    This guide is for Samsung users in the United States. It helps you check your device’s integrity and avoid scams. Firmware controls a device’s hardware and is the base for Android and Samsung’s One UI.

    Knowing how to check your Samsung firmware is key. It ensures your device runs original Samsung firmware, not a modified version that could be risky.

    In this article, we’ll show you how to find your device model number and check firmware and baseband details. We’ll also use official Samsung resources like the Samsung Support app and Smart Switch. You’ll learn about firmware updates, common features, basic troubleshooting, and how to spot scams.

    Incorrect or tampered firmware can be a big problem. It can create security risks, void warranties, and disable important features. We focus on credible sources and practical checks to help you verify authenticity with confidence.

    Key Takeaways

    • We will teach you how to check Samsung firmware and check baseband version on-device.
    • We emphasize verifying original Samsung firmware using official tools like Smart Switch and the Support app.
    • Knowing your Samsung firmware version helps prevent scams, protect data, and preserve warranty coverage.
    • We will include steps to find the device model number before checking firmware details.
    • Follow verified Samsung resources and avoid untrusted update prompts or third-party firmware offers.

    Why It’s Important to Know Your Samsung Firmware Version

    Firmware is the software that connects hardware and the operating system of a device. Knowing how to check Samsung firmware helps us understand the code that starts the device. It also runs radios and connects different parts together.

    Understanding Firmware Basics

    Firmware is the software that starts the device and connects hardware and apps. On Samsung phones, it includes the bootloader, modem, recovery, and system build. The system build shows a build number and security patch level.

    We make it clear what each term means. The build number is a specific system image. The Android version is the OS level. The security patch level shows monthly fixes. The baseband or modem version handles radio and cellular stacks.

    Original Samsung firmware is digitally signed and verified by Samsung. If firmware is not properly signed, it can cause problems. Unofficial or modified images can disable secure payments and block warranty service.

    The Risks of Outdated Firmware

    Running old firmware can lead to several risks. Security vulnerabilities in kernels or modem code can expose devices to exploits. App compatibility and carrier features may also degrade without updates.

    Outdated firmware can also harm battery life and performance. New builds often include fixes that improve stability and efficiency. Missing updates can cause slowdowns and unexpected reboots.

    There is also a risk of fraud targeting outdated systems. Attackers may claim a device needs a paid update or push fake packages that install malware. Regular checks for original Samsung firmware and baseband versions can reduce these risks.

    We advise against installing unofficial firmware or unlocking the bootloader. This can void warranty and trip Knox. It may affect repairs or trade-in value. We recommend routine checks for firmware security and current patches to keep devices safe and supported.

    How to Find Your Device Model Number

    Before we check Samsung firmware, we need the exact device model number. Knowing the model number helps us find the right firmware. This avoids installing the wrong build. Below, we explain how to find your Samsung model number on your phone and from the original packaging.

    Using the Settings App

    Open Settings and tap About phone or About device. In many One UI versions, the model number is clearly labeled: Model number or Model.

    Some phones list model info under About phone > Legal information or About phone > Status. If it’s not there, check those submenus.

    Common formats include consumer lines like SM-G99x for Galaxy S, SM-Axxy for Galaxy A, and SM-Nxxy for Galaxy Note or Tab. Copy the exact string, including any letters after model code SM- when checking Samsung firmware on Samsung’s site or in firmware databases.

    Note other useful identifiers in Settings: IMEI, serial number, build number, and baseband version. We will use these later to verify the correct firmware build for your device.

    Checking the Device Back or Box

    Older Samsung phones often list the model on the rear cover. Modern glass designs may omit this detail. If the phone lacks a rear label, look under the SIM tray on some Galaxy models.

    The retail box usually shows clear label fields: model number, model code SM- entry, and region or carrier variant. Read the label to find whether the unit is US unlocked or tied to a carrier.

    Keep the box or jot the model number before you attempt firmware checks or downloads. An exact match prevents us from installing incompatible or unofficial firmware. It helps us confidently check Samsung firmware for updates or restores.

    Location What to Look For Why It Matters
    Settings > About phone Model number, build number, IMEI, baseband Provides exact device model number for firmware searches and verification
    About phone > Legal/Status Alternate placement of model and regulatory info Helps when main About screen omits full model string
    Back of device or under SIM tray Printed model number or regulatory labels Quick physical check when device powers off or is locked
    Original retail box Model number, model code SM- entry, region/carrier Confirms variant and region for correct firmware downloads

    Accessing the Firmware Information on Your Device

    Before we dive in, let’s get a quick overview. The Settings app is where you find the firmware details. This includes the build number and baseband entries. These steps work for most Samsung Galaxy models, including tablets.

    To get to the firmware info, go to Settings. Look for About phone or About device. On many phones, it’s Settings > About phone > Software information. For older Androids, it’s Settings > System > About phone.

    Use Settings search for “About” if you can’t find it. This will take you directly to the right screen.

    We’ll cover the fields in Software information and why they’re important. You’ll see Android version, One UI version, build number, security patch level, and baseband version. Each field helps when matching your device to official firmware or troubleshooting.

    The build number is crucial for matching firmware. It shows the exact build. Android version and One UI version tell you the software generation and Samsung’s interface layer.

    The security patch level shows the latest security updates. The baseband version controls the cellular radios. We often check this when troubleshooting connectivity issues.

    It’s a good idea to save these values for later. Take a screenshot or write them down. A screenshot makes checking with Samsung’s firmware pages easier.

    Watch out for signs of modified firmware. If entries are off or show tampering, the device might not be original. Always confirm the build number and baseband version before asking for help or downloading software.

    Using the Samsung Support App

    The Samsung Support app is key for getting device details and official advice. It helps us check Samsung firmware and see if our phone has original Samsung firmware. Just follow a few easy steps to get the app and see your device’s info.

    To get the app, open Google Play Store or Galaxy Store and search for “Samsung Members” or “Samsung Support.” Some Galaxy phones come with Samsung Members already installed. First, check your apps. Tap Install, then sign in with a Samsung account to use all the app’s features.

    When setting up, we see privacy and permissions. The app needs device info to offer custom diagnostics, warranty checks, and updates. Giving permissions lets the app know your device and suggest the right firmware.

    Downloading and Installing the App

    Search for Samsung Members or Samsung Support in the store and install it. Sign in with your Samsung account to access all device tools and support chat.

    Locating Firmware Details in the Support App

    Open Samsung Members, then tap Support or My device. You’ll see your model number, software version, and security patch level. This makes it easy to find your Samsung model number and check the firmware.

    Use the app’s diagnostics to check for updates, run hardware tests, and see update suggestions. If the firmware looks off or an update fails, you can schedule service at a Samsung center or contact support from the app.

    The app gets data from Samsung services, making it a reliable way to check firmware. It helps avoid scams from third-party sources.

    Steps to Check Firmware via Samsung’s Website

    Before we start, it’s best to use official Samsung sites like Samsung.com or the Samsung Support pages. These sites have the latest firmware and security updates for different regions and carriers. They help us make sure we’re using the right firmware for our device.

    Visiting the Samsung Support Site

    First, open Samsung Support in your browser. Type in your device’s model number in the search box. This will take you to the exact product page. The page for major models lists security patches and firmware history that we can trust.

    Official pages offer downloads, changelogs, and tips on when to use Smart Switch. It’s important to use these sources to check firmware and avoid unknown downloads.

    Finding Your Device Model on the Support Page

    Here’s how to find your model and firmware:

    1. Go to Samsung Support and search for your model number.
    2. Choose the exact model and variant from the list to get to its support page.
    3. Look in the Downloads, Manuals, or Software updates section for firmware files and notes.

    On the model page, compare the build number and security patch level from Samsung’s site with your device’s. If they match, your device has the official firmware.

    Don’t download firmware from unofficial sites. Using Samsung’s site or authorized partners keeps our devices safe from counterfeit or malicious firmware.

    Action Where to Look What to Verify
    Search model Samsung Support search box Exact model and variant match the device
    Open support page Downloads / Software updates Published build numbers and security patch dates
    Compare values Device Settings > Software information Build number equals listed release; patch level matches
    Download firmware Official Samsung or Smart Switch only Only download when directed by Samsung or via Smart Switch

    Verifying Your Firmware Version with Smart Switch

    Smart Switch is a safe way to check firmware on Samsung phones. It handles data transfer, backups, updates, and recovery. It connects to Samsung servers to get official info.

    Smart Switch firmware

    What is this tool and why it helps

    Smart Switch is Samsung’s app for Windows, macOS, and Android. It makes backups and updates easy. It gets updates from Samsung, so we know they are real.

    Steps to use the app to view firmware details

    Here’s how to check baseband info and more:

    • Download Smart Switch for PC or Mac from Samsung’s site and install it on our computer.
    • Open Smart Switch and connect the Samsung device with its original USB cable.
    • Allow the device to trust the computer and grant required permissions on the phone.
    • In Smart Switch, select the option to check for software updates; the program will display current version, build number, and any available Smart Switch firmware.
    • Use the backup feature before applying updates so our data stays safe.

    Want to check baseband version? The app shows build number and more. If an update is offered, it’s real Samsung firmware.

    Be careful with third-party tools. Avoid unofficial Odin packages unless you’re an expert. Smart Switch is safer for most users.

    Task Action Result
    Install Smart Switch Download from Samsung and run installer Ready to connect device and check firmware
    Connect device Use original USB cable, grant permissions Device recognized, communication with servers enabled
    Check updates Select software update in the app Displays current build, available Smart Switch firmware
    Verify baseband View device details in the app or phone settings Shows check baseband version and related info
    Backup before update Use Smart Switch backup feature Protects data prior to installing original Samsung firmware

    Understanding Firmware Updates and Their Benefits

    We keep our devices secure and smooth by paying attention to firmware updates. These updates from Samsung and carriers fix issues and add new features. It’s important to know what to expect and how to spot an official update.

    Let’s look at the main benefits of firmware updates. They close security holes and stop malware. This protects our personal data. They also make our devices more stable and perform better, reducing crashes and app freezes.

    Battery life often gets better with these updates. Bug fixes solve problems that slow or drain the phone. Updates also let new apps work on older models. Carrier and regional updates improve network performance.

    Benefits of Keeping Firmware Up to Date

    It’s wise to check your device regularly for updates. This keeps your device safe from known threats. It makes mobile banking, email, and messaging safer.

    • Security: monthly or quarterly patches that fix kernel and protocol flaws.
    • Stability: fewer crashes and smoother multitasking.
    • Battery: targeted optimizations that extend daily runtime.
    • Compatibility: support for new apps and services, plus carrier features.

    Carrier and regional updates can add special features. They might include network improvements tied to baseband updates. Reading the release notes helps us understand if a build is carrier-specific or from Samsung.

    Common Features in New Firmware Releases

    We look for several key improvements in updates. Major Android upgrades bring new UI changes and features. Minor releases often focus on camera improvements, gesture tweaks, and accessibility enhancements.

    • One UI refinements: visual polish and usability tweaks for Samsung phones.
    • Camera updates: better processing, low-light shots, and stabilization.
    • Modem and baseband: signal quality and call reliability improvements.
    • Security fixes: kernel patches and hardening for Bluetooth and Wi‑Fi stacks.

    We suggest reading Samsung’s release notes on support pages or inside Smart Switch. These notes tell us about the update’s nature and how it might change our device.

    Update Type Typical Contents Why It Matters
    Security Patch Kernel fixes, protocol hardening, Bluetooth/Wi‑Fi fixes Reduces risk from exploits and scams
    Maintenance Release Bug fixes, battery optimizations, stability improvements Improves daily reliability and performance
    Feature Update One UI changes, camera algorithms, new gestures Adds functionality and refines user experience
    Carrier/Regional Build VoLTE/VoWiFi tweaks, network tuning, provider apps Ensures optimal network performance for specific carriers

    Troubleshooting Firmware Issues

    Firmware problems can range from small issues to major system problems. We’ll cover common symptoms, how to spot them, and basic troubleshooting steps. This is before you reach out for support.

    check Samsung firmware

    Identifying common problems

    Look out for unexpected reboots, boot loops, or trouble installing updates. Issues like missing carrier features or poor call quality often point to baseband problems. If your phone shows an incorrect build number or Knox flag changes, it might have been tampered with or has unofficial software.

    Check the build and baseband details in Settings > About phone. We also run Samsung Members diagnostics for logs. Checking Knox and warranty status can show if the device has been tampered with, affecting repair eligibility.

    Simple on-device steps

    Try rebooting into Safe Mode to find app conflicts. Clearing the system cache can fix some errors on certain models. Make sure you have enough storage, as low space can block updates. Use a stable Wi-Fi or USB connection for downloads to avoid corrupted files.

    When to seek professional help

    Call Samsung support or an authorized service center for ongoing boot issues or update failures. If Knox is tripped, or if you find tampered or unofficial firmware, seek official repair. This will restore your device to its original state and protect your warranty.

    Before calling for support, have your model number, IMEI, current build number, and a list of steps you’ve tried ready. Back up your data if possible. Avoid unauthorized repair shops for firmware flashing, as they can void warranties and leave your device on unofficial software.

    How to Identify Scams Related to Firmware Updates

    Scammers often target phone owners during update cycles. They use urgency and lack of tech knowledge to push fake files or charge for free services. Being alert helps protect our devices, data, and money.

    Red Flags to Watch Out For

    Be wary of unsolicited emails, texts, or calls claiming your firmware is at risk. They might ask for remote access or payment. Always confirm the person is from Samsung through official channels before giving them control.

    Be cautious of websites selling “official” updates or pop-ups asking for downloads from non-Samsung sources. These can install fake firmware, breaking Knox protections or removing security features.

    Messages asking you to disable security settings or install apps with too many permissions are red flags. Scammers might pretend to be carriers, third-party techs, or “Samsung Support.” They aim to lead victims to unofficial tools or payment pages.

    Tips for Ensuring Official Updates

    Always update through built-in paths: Settings > Software update, Samsung Members app, Smart Switch, or Samsung’s official support pages. These methods ensure you get genuine updates and avoid scams.

    Before downloading, verify the source. Check URLs and sender addresses, match your device model and region, and compare build numbers and update notes on Samsung’s site. Regularly check your baseband version and software details to ensure authenticity.

    If unsure, contact Samsung Support through the app or Samsung.com. Use multi-factor verification and only grant remote access if Samsung’s official process confirms it. Keep records of update dates and build numbers. Refuse any unverified third-party update offers to avoid fake Samsung firmware.

    Final Thoughts on Checking Samsung Firmware

    We’ve covered how to check Samsung firmware and keep our devices safe from bad updates. First, find your Samsung model number in Settings or on the box. Then, open Software information to see the build number, Android or One UI version, security patch level, and baseband version before making any changes.

    To confirm these details, use Samsung Members, Smart Switch, or the official Samsung support pages. Smart Switch helps with official updates and recovery. Samsung Members offers diagnostics. Always avoid unofficial firmware sources and document your firmware details before seeking help or installing updates.

    Staying informed helps us avoid scams and vulnerabilities. Regularly check for updates, subscribe to Samsung security bulletins, and keep backups to prevent data loss during troubleshooting. If an update seems suspicious in the United States, contact Samsung Support through official channels. Provide your model number, build, and baseband for quick, accurate help.

    FAQ

    What exactly is firmware on a Samsung phone or tablet?

    Firmware is the software that starts up your device’s hardware. It’s the base for Android and Samsung’s One UI. It includes the bootloader, recovery, and system builds. It also has modem/baseband firmware and other parts that control how your device works.

    Original Samsung firmware is checked and verified. But, unofficial or changed firmware might disable security, trip Knox, or mess with carrier functions.

    How do we find our Samsung model number on the device?

    Open Settings > About phone or About device. Look for “Model number.” On some One UI versions, the model might be under Status or Legal information.

    You can also check the original retail box. Or look at the label under the SIM tray on some models. The model code and region are listed there too.

    Where can we locate firmware and baseband versions on-device?

    Go to Settings > About phone > Software information. There, you’ll see Android version, One UI version, and build number. You’ll also see the security patch level and baseband version.

    The build number shows the exact firmware build. The baseband version shows the modem firmware, which affects cellular connectivity.

    Can we use the Samsung Support or Samsung Members app to verify firmware authenticity?

    Yes. Install Samsung Members or Samsung Support from the Google Play Store or Galaxy Store. Sign in with a Samsung account and open Support > My device or Device diagnostics.

    The app shows model and software details. It recommends updates and runs diagnostics. It’s a reliable way to confirm original Samsung firmware because it talks to Samsung services.

    How does Smart Switch help us check or restore firmware?

    Smart Switch (desktop version for Windows/macOS) connects your device to Samsung servers. It checks for official updates, backs up data, and recovers devices that won’t boot.

    Install Smart Switch from Samsung.com, connect via USB, and allow permissions. Use “Check for software update” to get any firmware offered by Smart Switch. It’s an official, model- and region-matched Samsung release.

    Where on Samsung’s website can we compare build numbers and update notes?

    Visit Samsung.com (Support) and enter your exact model number in the search box. On the model support page, look for “Downloads,” “Software updates,” or “Manuals.”

    These pages list official firmware builds, security patch notes, and region/carrier specifics. Compare the build number and security patch level shown on-device with Samsung’s published values to verify authenticity.

    What are the risks of running outdated or unofficial firmware?

    Outdated firmware can expose your device to security risks. It can cause compatibility and performance issues. It might reduce battery efficiency and prevent carrier features like VoLTE.

    Unofficial or tampered firmware may lack proper signatures. It can trip Knox (voiding warranty or repair options), disable secure features, and open the device to scams or malware.

    How can we spot firmware-related scams and suspicious update offers?

    Watch for unsolicited emails, texts, calls, or pop-ups demanding payment or remote access to install an “official” update. Avoid downloads from unknown sites, apps that request excessive permissions, or instructions to bypass Knox or disable security settings.

    Always accept updates only via Settings > Software update, Samsung Members, Smart Switch, or Samsung’s official website. Verify sender addresses and URLs.

    What basic troubleshooting steps should we try if an update fails or the device behaves oddly after an update?

    Reboot the device, boot into safe mode to rule out app conflicts. Check free storage and ensure stable Wi‑Fi or USB when updating. Use Samsung Members diagnostics.

    If needed, connect to Smart Switch and try recovery. Document the model number, build number, and baseband version before seeking support.

    When should we contact Samsung support or an authorized service center?

    Contact Samsung support if your device has persistent boot loops, repeated update failures, or evidence of tampered or unofficial firmware. If Knox is tripped or there are hardware issues after firmware changes, reach out too.

    Prepare model number, IMEI, current build and baseband versions, and the steps you’ve already tried. Use Samsung-authorized centers to restore original Samsung firmware and preserve warranty where applicable.

  • Stock ROM vs. Custom ROM: Which is Better for Your Samsung Device?

    Stock ROM vs. Custom ROM: Which is Better for Your Samsung Device?

    Many people wonder if they should choose a Stock ROM or a Custom ROM for their Galaxy device. We’ll look at official Samsung ROMs and custom firmware from third parties. This will help U.S. buyers make a decision. Devices like the Galaxy S, Note, A, and Z series are available on carriers like Verizon, AT&T, and T-Mobile.

    Our guide is a quick list that covers the basics, pros and cons, and how each affects your device. We’ll talk about performance, customization, and security. We’ll also discuss popular custom ROMs like LineageOS, Paranoid Android, and Resurrection Remix. Plus, we’ll explore the benefits of rooting your Samsung device.

    But remember, custom firmware can void your warranty and may break carrier rules. Rooting can also disable Samsung Knox and Secure Folder. We’ll explain these risks so you can make a smart choice.

    Key Takeaways

    • Stock ROM (official Samsung ROM) prioritizes stability and carrier support.
    • Custom ROMs offer customization and potential performance gains but carry warranty and security risks.
    • Carrier-locked Galaxy models may limit Samsung custom firmware options and updates.
    • Root Samsung benefits include deeper control but can disable Knox and affect banking or secure apps.
    • We’ll compare installation steps, compatibility, and leading custom ROMs to help you choose.

    Understanding the Basics of Stock ROM and Custom ROM

    Let’s start with what firmware does for Samsung phones and tablets. Knowing what Stock ROM is helps us see why manufacturers add certain features. This introduction prepares us for the next sections.

    Defining Stock ROM

    Stock ROM is the official Samsung ROM found on Galaxy devices. It includes One UI, carrier apps, drivers, and signed binaries for secure boot and Knox. Manufacturers and carriers update it regularly with security patches and OTA updates for certain models.

    Stock firmware ensures hardware works right. It’s key for services like Samsung Pay, biometric authentication, and carrier features. These need the official Samsung ROM to work smoothly.

    Defining Custom ROM

    Custom ROMs are Android builds made by independent developers and communities. Projects like LineageOS show how they can remove bloatware, offer different interfaces, and extend update lifecycles beyond official support.

    Installing a custom ROM means unlocking the bootloader and using a custom recovery. Root access is optional but common for advanced tweaks. We get more flexibility but lose some integrated features and vendor support.

    Key Differences Between Stock and Custom ROM

    Updates are a big difference. Stock ROMs get OTA packages signed by Samsung. Custom ROMs rely on maintainers and manual flashes or recovery-based installers.

    Security and signing also vary. Stock images include Knox and other protections. Custom ROMs can disable or trigger Knox, changing warranty and security.

    Customization and performance tradeoffs are important for users. Custom ROMs let us tweak UI and system performance. Stock ROMs focus on stability, carrier compatibility, and manufacturer support.

    Warranty and support also differ. Staying on official Samsung ROM keeps warranty and carrier troubleshooting paths open. Choosing custom firmware or third-party builds may void warranty and make service visits harder.

    Pros and Cons of Stock ROM

    We explore the good and bad of Samsung’s stock firmware. Knowing the perks of official Samsung ROM helps users choose. A comparison with custom firmware shows the trade-offs.

    Benefits of Stock ROM

    Official Samsung firmware ensures stability and hardware support. Samsung tests ROMs for camera, sensor, and radio module performance.

    Many models get seamless OTA updates. This keeps security patches and Android upgrades current without manual effort. It also keeps warranty valid and makes repairs easier.

    Stock ROM supports Samsung services like Samsung Pay, Secure Folder, and Knox. These features rely on official, signed code for security and device integrity.

    Drawbacks of Stock ROM

    Carrier and manufacturer apps can add bloatware. These apps use storage and run tasks that may harm battery life or performance.

    Carrier-branded units get updates slower because of testing and certification. This delay is a key point in debates about Stock ROM vs Custom ROM.

    One UI offers limited customization without rooting. Custom ROMs provide kernel tweaks and advanced privacy controls. This is important in any Samsung custom firmware comparison.

    End-of-life support is another consideration. Samsung stops updates for older models, leading users to custom firmware despite its drawbacks.

    Pros and Cons of Custom ROM

    We look into what custom firmware offers for Samsung phones and the trade-offs. Users who consider the benefits and drawbacks make informed choices for daily use and long-term ownership.

    Custom ROMs attract power users and those seeking more control. They can extend a device’s life. Many community builds offer newer Android versions and security patches for unsupported models.

    Custom ROMs can be lightweight and free from unnecessary apps. Removing carrier bloatware and Samsung apps can improve performance. This is especially true for older phones.

    Custom ROMs offer deep customization. Users can change themes, adjust performance, and more. Rooting is often possible, giving access to advanced system settings.

    Privacy and control are improved with custom ROMs. Some ROMs have stricter permission controls and optional microG support. Community support means new features are tested quickly.

    However, there are drawbacks and risks. Custom ROMs can be unstable. Bugs can affect camera, modem, or biometric functions.

    Security and update concerns exist. Updates depend on maintainers. Without official signing and testing, vulnerabilities may not be fixed as quickly as on stock ROMs.

    Vendor service loss is a risk. Installing a custom ROM can disable Samsung Knox and other services. This affects warranty and service eligibility.

    Warranty and complexity are also issues. Flashing a custom ROM can void the warranty. It may also affect trade-in eligibility. Always back up your data and follow guides to avoid risks.

    User Experience: Stock ROM vs. Custom ROM

    We look at how daily life changes with factory software versus community builds. We focus on speed, looks, and reliability. This helps users choose the right software for them.

    Performance and Speed

    Stock ROM vs Custom ROM performance changes with each device and build. Samsung’s stock firmware balances kernel, modem, and camera ISP for good results. It might win in camera tasks or network stability.

    Custom ROMs can cut down on unnecessary apps and tweak the kernel for faster performance. Rooting Samsung can unlock more speed by adjusting governors or removing resource-draining services.

    Interface Customization

    Custom ROMs are better for those who love deep theming or modular features. They offer system-level theme engines, status bar tweaks, and alternative navigation options not found in One UI.

    One UI, however, keeps a polished look across Samsung phones. Samsung’s custom firmware UX supports Good Lock modules and Bixby routines on certain models. This is great for users who want a refined, integrated system without big changes.

    Stability and Reliability

    Official Samsung ROMs are usually the safest choice for important tasks. Samsung’s QA and certified drivers lower the chance of random reboots, sensor failures, or modem issues.

    Custom ROMs can be stable on well-supported devices, but it depends on the maintainer and driver support. We suggest testing custom builds on a secondary device for daily use.

    Compatibility Issues with Custom ROM

    We explore how hardware and update paths affect Samsung custom firmware. Not all Galaxy models get the same developer attention. The Galaxy S and Note series usually get updates quickly.

    But, lower-end Galaxy A models and carrier-locked phones might not get updates or support.

    Device Compatibility

    When testing custom ROMs, we check hardware drivers. Camera ISP, modem firmware, and fingerprint sensors often need closed-source blobs. These blobs come from Samsung or Qualcomm, leading to imperfect features on custom builds.

    Before flashing, we check the bootloader status. Carrier-locked models can block custom images. This can cause bricked devices or missing radios if we ignore carrier firmware differences.

    Software Updates

    We compare Stock ROM vs Custom ROM updates. Samsung and carriers push verified OTA updates for security. Custom ROMs rely on maintainers and community for updates.

    Projects like LineageOS publish monthly security builds and migration notes. Other projects update sporadically. This can lead to delayed fixes and root Samsung update issues if a device stays on an outdated custom build.

    We suggest checking XDA Developers threads and GitHub repositories for build status and updates. Backing up firmware and knowing how to downgrade is crucial. Restoring stock often requires full re-flashing and modem/baseband changes.

    The Installation Process: Stock vs. Custom ROM

    We explain how to install firmware on Samsung devices. Installing official Samsung ROM is different from installing custom firmware. Each method has its own steps and risks.

    Installing official Samsung ROM

    Installing Stock ROM

    It’s best to use Samsung Smart Switch or the device’s updater. These methods are safe and avoid many problems of manual flashing.

    For manual installs, we use Odin on Windows. We need USB drivers, Odin, and a PC. Wrong firmware or drivers can brick the phone, so we follow Samsung’s instructions.

    We reinstall stock to fix issues or prepare for resale. It can also re-enable Knox protections. Make sure to get the right PIT and firmware files.

    Installing Custom ROM

    We start by unlocking the bootloader if allowed. Unlocking may wipe data and trip Knox. Then, we install TWRP and make a full Nandroid backup.

    The flash sequence is: unlock bootloader → install custom recovery → flash ROM ZIP and GApps or microG → flash kernel or Magisk → wipe caches and reboot. We follow the ROM maintainer’s instructions closely.

    We use XDA Developers and GitHub for device-specific help. Flashing the wrong ROM can brick a phone, so we check device codes and vendor images before flashing.

    Post‑installation Checks and Troubleshooting

    We test key functions after flashing: camera, Wi-Fi, LTE/5G, Bluetooth, NFC, biometrics, and mobile payments. If problems arise, we check firmware, recovery, and kernel versions against the ROM thread or wiki.

    Task Stock ROM Custom ROM
    Primary Tool Samsung Smart Switch or Odin Custom recovery (TWRP) and fastboot/OEM tools
    Prerequisites Model‑matched firmware, USB drivers, PC Unlocked bootloader, custom recovery, Nandroid backup
    Data Wipe Risk Low when using OTA; none if update applies cleanly High; unlocking bootloader typically erases data
    Warranty & Knox May restore warranty state and Knox if not tripped May trip Knox and void warranty
    Complexity Low to moderate Moderate to high
    Recovery Options Official service or Odin restore Return to stock requires correct PIT and firmware
    When to Use Fix system faults, restore original state Customize UI, remove bloat, or gain advanced features
    Keywords Covered Installing official Samsung ROM; Stock ROM vs Custom ROM flashing Samsung custom firmware installation; root Samsung installation steps

    Security Considerations for Stock and Custom ROM

    We look at how security changes with official firmware versus custom builds. This is important for both everyday users and businesses that need secure Samsung devices. We’ll talk about the security in stock releases and the risks of third-party firmware and rooting.

    Security Features of Stock ROM

    Official Samsung ROMs are secure because they include Knox, secure boot, and verified boot. Knox provides hardware isolation for businesses and Secure Folder for personal data. Updates and kernels are signed, stopping unauthorized firmware.

    Working with carriers and Google’s Android team, Samsung ensures updates work across many devices. This means timely security patches for supported models.

    Security Risks of Custom ROM

    Before unlocking a bootloader, we must consider Samsung custom firmware risks. Unlocking can disable Knox, affecting enterprise trust and some apps. Third-party builds lack Samsung’s signature, introducing vulnerabilities.

    Update frequency is another concern. Small ROM projects might not get security patches quickly. Rooting adds complexity, increasing the attack surface if not managed well. Tools like Magisk can help but need careful setup.

    To reduce risks, choose reputable ROMs and verify their integrity. Limit root apps and use safe modules. For businesses or heavy banking users, sticking to stock ROMs is safer for compliance and protection.

    Aspect Stock ROM Custom ROM
    Integrity checks Signed OTA and vendor kernels Often unsigned or signed by third parties
    Hardware security Knox, secure boot, hardware-backed keys Unlocking can disable Knox protections
    Update frequency Regular security patches from Samsung and partners Varies by project; some delays common
    Root risk Limited without rooting; lower attack surface Root access can elevate threats if mismanaged
    Trust model Vendor trust and enterprise compliance Community trust required; verify sources

    Popular Custom ROMs for Samsung Devices

    We look at the top custom ROMs for Samsung phones. This helps readers choose the best firmware for their needs. Each ROM has its strengths, trade-offs, and supported devices.

    LineageOS Samsung

    LineageOS

    LineageOS is great for a stock Android feel with some privacy tweaks. It supports many Samsung devices, offers regular security updates, and has clear instructions. These builds are stable, perfect for daily use.

    Not all Galaxy phones have official LineageOS builds. Some need community ports, which might not fully support cameras or modems. Always check GApps and proprietary blobs before flashing.

    Paranoid Android

    Choose Paranoid Android for a polished interface. Its Samsung ports focus on a refined user experience, adaptive mode, and privacy. They keep features simple to ensure reliability.

    Paranoid Android is smaller than LineageOS, so it supports fewer devices. Check XDA and GitHub for updates on Samsung support.

    Resurrection Remix

    Resurrection Remix is for those who love customization. It combines features from LineageOS, OmniROM, and more. This ROM offers many UI and performance tweaks for power users.

    This ROM has a lot of features, which can lead to maintenance issues and occasional bugs. It might be too much for those who prefer minimal changes. Make sure your model has camera blobs and modem firmware before installing.

    For specific features or looks, consider crDroid and Pixel Experience ports. Always check community pages and official GitHub repositories for device-specific tips and updates.

    Choosing between stock ROMs and custom ROMs depends on what you value most: stability, features, or hardware support. Always do your research, back up your data, and check GApps and proprietary blobs to avoid losing functionality on Samsung devices.

    Tips for Choosing Between Stock ROM and Custom ROM

    First, let’s figure out what’s most important to us. If you need banking apps or Samsung Pay, sticking with the official Samsung ROM might be best. On the other hand, if you want to tweak your phone’s performance or get updates for older phones, a custom ROM could be the way to go.

    It’s a good idea to make a checklist to see if you’re ready for a custom ROM. You’ll need patience, basic command-line skills, and the ability to troubleshoot. If you’re short on time or not sure, sticking with stock ROM is safer. For older Samsung phones, custom ROMs might be the only way to get the latest Android.

    Assessing Your Needs

    Let’s match our needs with the features of each ROM type. If security and warranty are key, go with stock ROM. But if you want more control and updates, custom ROMs might be better. Think about how you use your phone: gaming or business. Each use case has its own best ROM.

    Also, consider your phone’s age and how long it will be supported. Newer Samsung phones get regular updates. Older models might get a second life with custom ROMs. Always test the ROM’s camera, modem, and biometrics before you decide.

    Researching Available Options

    When choosing a ROM, check out trusted communities. Look at XDA Developers, official GitHub repositories, and Reddit for build reports and bug lists. Find out who maintains the ROM and how often they update it.

    Make sure the ROM supports your phone’s hardware, like the camera and fingerprint scanner. A ROM without Samsung Pay or broken biometrics can be a hassle. Always make a full backup and test on a spare device if you can.

    Consider using tools like Magisk for a mix of custom and stock features. Magisk can add modules and root access without losing official services. But be careful, as unlocking your bootloader or rooting can affect your warranty.

    Sum up your findings in a table to see the differences clearly. Look for active maintainers, regular updates, and clear hardware support notes. Read user reports about bugs and fixes before making your choice.

    Conclusion: Which Should You Choose?

    When deciding between Stock ROM and Custom ROM, it’s all about what matters most to you. Stock firmware from Samsung is reliable, keeps your device secure, and gets updates regularly. It also has support from the vendor.

    On the other hand, custom firmware lets you customize your device deeply. It’s great for extending your device’s life and removing unwanted apps. But, it might void your warranty and could break some features.

    Final Thoughts on Stock vs. Custom ROM

    If you use banking apps, Samsung Pay, or need enterprise features, go with the official Samsung ROM. It’s safer and keeps your security intact. Rooting or installing custom firmware means you might face instability and lose some features.

    Your Decision Based on Usage Preferences

    For those who want safety and easy updates, stick with stock ROM. If you enjoy tweaking and want the latest Android on older devices, custom ROMs are for you. It’s wise to research, back up, and test custom ROMs on a secondary device first.

    Also, in the U.S., check your carrier’s bootloader policies and Samsung’s support resources. This way, you avoid any unexpected issues.

    FAQ

    What is the difference between a stock ROM (official Samsung ROM) and a custom ROM (Samsung custom firmware)?

    A stock ROM is the official firmware from Samsung or the carrier. It includes One UI and Samsung apps. It also has signed kernels and OTA updates that keep Knox and vendor services working.

    Custom ROMs are third-party Android builds. They offer different interfaces and extended Android updates. They require unlocking the bootloader and may disable Knox and other vendor features.

    Which Samsung models in the United States get the most custom ROM support?

    Flagship Galaxy S and Note series get the most attention. This is because of developer interest and available vendor blobs. Foldable Z series and unlocked models also attract developers.

    Lower-end A series and carrier-branded variants often lack full custom ROM support. This is due to locked bootloaders and fewer drivers.

    Will installing a custom ROM void my warranty or affect Samsung Knox and Secure Folder?

    Unlocking the bootloader and flashing a custom ROM can trip Knox. This may void warranty coverage or limit service options. Knox hardware flags are often irreversible, disabling enterprise features and Secure Folder.

    We recommend checking your carrier and Samsung warranty terms before proceeding.

    What are the main benefits of staying on stock ROM (official Samsung ROM)?

    Stock ROM offers tested hardware compatibility and regular OTA security updates. It also supports seamless carrier services and full support for Samsung Pay, Secure Folder, and biometric authentication.

    It preserves warranty and minimizes the risk of bricking or breaking features tied to signed firmware.

    What advantages do custom ROMs provide for Samsung devices?

    Custom ROMs can extend a device’s useful life by delivering newer Android versions and security patches. They remove bloatware and enable deep UI customization.

    They also allow performance or battery optimizations through custom kernels and governors. Some ROMs prioritize privacy and give users granular control over permissions and services.

    Are there significant security risks with custom ROMs compared to stock firmware?

    Yes. Custom ROMs are not Samsung-signed and may lack verified boot protections. Unlocking the bootloader and rooting can increase attack surface.

    Security updates depend on maintainer activity, so patches may be delayed. We advise using reputable projects, verifying builds (checksums, GitHub sources), and limiting root privileges to trusted apps.

    How difficult is it to install a custom ROM on a Samsung phone? What tools are needed?

    Installing a custom ROM requires technical steps. You need to unlock the bootloader (if permitted), install a custom recovery like TWRP, and make a full backup (Nandroid).

    You also need to flash the ROM and optional GApps or microG packages. Tools include Odin for Samsung firmware restores, ADB/fastboot, device-specific USB drivers, and ROM ZIPs from trusted sources. The process can wipe data and carries risk of bricking if instructions aren’t followed precisely.

    Can custom ROMs break critical features like the camera, modem, or biometrics?

    Yes, they can. Many Samsung hardware components use closed-source drivers (vendor blobs). If a custom ROM lacks proper vendor support or compatible blobs, camera quality, modem connectivity (LTE/5G), fingerprint sensors, NFC, and other features may be impaired or nonfunctional.

    Always check device threads on XDA, GitHub, and ROM release notes for known issues before flashing.

    Which custom ROMs are most recommended for Samsung devices?

    LineageOS is a widely trusted, near-stock option with active community support. Paranoid Android focuses on polished UX and selective features. Resurrection Remix offers an extensive feature set for power users.

    Other alternatives include crDroid and Pixel Experience ports. Our recommendation is to choose ROMs with active maintainers and documented device support.

    How do updates differ between stock ROM and custom ROMs?

    Stock ROMs receive signed OTAs from Samsung and carriers. They have a predictable update cadence for supported models. Custom ROM updates rely on community maintainers and must often be flashed manually or via custom recovery.

    Some projects provide regular nightly or monthly builds, while others are sporadic. Timeliness and security patch frequency vary by project.

    Is it possible to return a Samsung device to stock ROM after installing a custom ROM? What should we expect?

    Returning to stock is usually possible but may be complex. Reinstalling official firmware often requires the correct model- and carrier-specific firmware, Odin (on Windows), and possibly PIT partition files.

    Some state changes, like a tripped Knox flag, may be irreversible. Always back up data and document your steps so you can restore stock if needed.

    Can we root a Samsung phone and still keep some stock features? What are the root Samsung benefits?

    Rooting with tools like Magisk can grant system-level control while preserving some functionality. It allows modules for customization. Benefits include ad blocking, granular app permissions, advanced backups, and performance tweaks.

    However, root access frequently trips Knox and can disable banking apps and Samsung Pay. Weigh the benefits against potential loss of vendor services and warranty implications.

    For a user focused on banking, enterprise, or Samsung ecosystem services, which should we choose?

    For enterprise or banking needs, we recommend staying on the official Samsung ROM. Stock firmware preserves Knox, Secure Folder, Samsung Pay, and provides the predictable security posture organizations and financial apps require.

    Custom ROMs carry risks that often conflict with compliance and secure app requirements.

    For an older Samsung device no longer receiving official updates, is a custom ROM a good option?

    Yes, custom ROMs are a compelling option to revive older devices. They provide modern Android versions and security fixes. They also de-bloat and can improve performance.

    Verify that the ROM has reliable camera and modem support for your model, and accept that some vendor features may be lost.

    Where should we look for reliable device-specific information and installation guides?

    Trusted sources include XDA Developers device forums, official ROM GitHub repositories, and active Reddit communities (for example, r/LineageOS or device-specific subreddits). Official maintainers typically publish installation instructions and changelogs.

    Verify checksums for downloads and read user reports for known regressions before proceeding.

  • Odin Flash Failed: Understanding Error Messages and How to Fix Them

    Odin Flash Failed: Understanding Error Messages and How to Fix Them

    Many Samsung Odin users face a problem when a firmware install fails. This can happen to anyone, whether you’re a tech expert or just a fan updating your Galaxy device. Seeing error messages like WRITE FAIL or PARTITION ERROR can be really frustrating.

    In this article, we’ll help you understand common Odin error messages. We’ll also show you how to fix issues like Odin getting stuck on setup connection. Our aim is to make sure you can safely update your device without losing important data or voiding your warranty.

    We’ll cover what Odin error messages mean, how to spot them, and what might cause them. We’ll also talk about how to prepare for flashing, basic and advanced troubleshooting, and how to fix major errors. You’ll find resources like Samsung’s official support and community forums to help you.

    Remember, some problems might need a pro to fix, like hardware issues or locked bootloaders. Always back up your data, think about warranty issues, and be careful. Flashing firmware can be risky if you don’t follow the right steps.

    Key Takeaways

    • Odin flash fail is a common issue when installing firmware on Samsung devices.
    • We will explain Odin error messages and steps to troubleshoot Odin safely.
    • Prepare your device with backups and proper drivers before flashing.
    • Some problems need professional repair or official Samsung support.
    • Following preventive practices reduces the chance of recurring failures.

    What is Odin Flash and Its Purpose?

    Odin is a tool made by Samsung for service centers. It’s now used by the public too. It writes firmware to Samsung phones when they’re in Download Mode. This tool is key for fixing serious problems with devices.

    We’ll talk about Odin’s main features and why it’s trusted by experts. It handles different types of files like AP, BL, CP, and CSC. It needs a phone in Download Mode to work.

    Overview of Odin Flash Tool

    Odin connects a PC to Samsung’s firmware flash process. It’s made for Windows and moves big files fast. When everything matches, it works quicker than other methods.

    Benefits of Using Odin Flash

    Odin has many benefits for both tech experts and fans. It can fix soft-bricked devices, restore firmware after updates fail, and go back to stable ROMs from beta ones. It also helps with modem updates and installing recovery images for deeper maintenance.

    Common Use Cases

    Odin is useful in many situations. It helps fix bootloops, remove software bugs, and change firmware versions. It’s mainly for Samsung phones and needs special permissions for some tasks.

    Use Case File Types Typical Outcome
    Unbricking after soft-brick AP, BL, CP Device boots to system, data may remain intact
    Restoring stock after failed OTA AP, CSC Factory image restored, OTA issues resolved
    Reverting from beta ROM AP, BL, CSC Stable firmware reinstalled, increased reliability
    Flashing modem or baseband CP Improved network connectivity and call stability
    Preparing device for development AP, Custom recovery images Bootloader access and recovery tools installed

    Using Odin can sometimes fail or get stuck. This can happen if the drivers are wrong, the firmware is incorrect, or if the carrier is locked. But, when used right, Odin is a solid choice for Samsung firmware and advanced maintenance.

    Understanding Flash Fail Errors

    Flash fail errors happen when Odin can’t write firmware or the device acts strangely after flashing. This section explains what flash failed means, shows common signs, and lists possible causes. This helps us fix Odin problems better.

    What Does “Flash Failed” Mean?

    Odin says “flash failed” when it can’t finish writing firmware. This message is vague, so we need to check Odin logs and the device’s actions to find the problem.

    It’s important to tell apart write errors from issues that happen after flashing. For example, a bootloop after flashing shows a PASS status. Each problem needs a different fix.

    Common Indicators of Flash Fail

    Odin shows messages like “FAILED!: Write Fail” or “All threads completed. (succeed 0 / failed 1)”. If Odin can’t find a COM port or gets stuck, it’s a sign of trouble.

    Problems on the device are just as important. If a phone won’t start, gets stuck in Download Mode, or keeps restarting, the flash didn’t work right.

    Why Flash Failures Occur

    Many things can cause Odin to fail. A bad or wrong firmware file for your Samsung model or carrier often stops the write process.

    USB issues or old Samsung USB drivers can also mess up transfers. Security like a locked bootloader or wrong partition settings without a PIT file also fails.

    Hardware problems like failing storage or a power loss during flashing can look like the same issue. Mistakes by the user, like wrong partition settings or the wrong firmware, are common. So, we need to be careful when using Odin.

    Key Error Messages in Odin Flash

    We explain the common messages Odin shows when it has trouble. Each error tells us what’s wrong, why, and where to find the problem in the log. This helps us fix Odin when flashing fails.

    Failed: Write Fail

    Failed: Write Fail means Odin can’t write to the device’s storage. It might be due to bad firmware files, a weak USB, or storage issues on the phone.

    Odin logs will point to the failed file, like AP or CP. Check the files with checksums and use original firmware from trusted sites like SamMobile or Samsung Firmware before trying again.

    Partition Error Odin

    Partition Error Odin means the firmware’s layout doesn’t match the device’s. This can happen with the wrong PIT file, choosing Re-Partition wrong, or using firmware for a different carrier or region.

    Changing partitions can brick a device. Be careful with PIT files and avoid Re-Partition unless you’re sure it’s right for your model and region.

    Other Common Error Messages

    We see many other messages that point to specific problems. These include “Get PIT for mapping”, “SECURE CHECK FAIL”, “AUTH”, “NAND write failure”, “All threads completed (succeed/failed)”, and “COM Port not Found”.

    “Odin stuck on setup connection” often means Odin can’t find the device. It could be due to missing drivers, a bad cable, or the phone not being in Download Mode.

    Always check Odin’s message box and the detailed log for file names and error codes. These help us figure out what to do next when troubleshooting Odin.

    Factors Contributing to Flash Failures

    When an Odin flash fails, several common causes are often to blame. Small errors or hardware issues can prevent a successful flash. This can leave a device in a broken or unstable state. Let’s look at the main reasons in detail to help us fix the problem.

    Odin flash fail

    Incorrect firmware version

    It’s crucial to match the firmware model number, CSC region code, and binary version before flashing. Using the wrong firmware can cause immediate failures or strange behavior. Carrier differences, like Verizon and AT&T, can also affect the flash process.

    USB connection issues

    USB problems with Odin can lead to issues like intermittent transfers or write fails. These issues might stem from damaged cables, USB hubs, or laptop ports. Windows power settings can also suspend USB devices, causing problems.

    Bootloader and device compatibility

    Bootloader and device compatibility are key. Samsung Knox and Secure Boot checks can block unauthorized firmware. Newer phones have OEM fuses and Knox flags that prevent some flashes. Hardware issues like failing NAND or degraded UFS storage can also cause write errors.

    Factor Typical Symptom What to Check
    Incorrect firmware version Failed write, boot loop, missing radios Confirm SM-G model, CSC region, binary version, carrier locks
    USB connection issues Odin stuck on setup connection, intermittent disconnects Use OEM cable, avoid hubs, try different ports, disable USB power save
    Bootloader compatibility Rejected flashes, verification errors, Knox trip Verify bootloader unlock state, check Secure Boot/AP checks, review OEM protections
    Hardware storage faults Repeated WRITE FAIL, corrupt partitions Test NAND/UFS health, consider board-level repair or authorized service

    Preparing Your Device for Flashing

    Before we start flashing firmware, we need to get ready. This includes preparing the device and the PC. It’s important to back up data, check the battery, and have the right drivers and software.

    Backup Your Data

    First, we make a full backup. Flashing can erase contacts, photos, messages, and app data. Use Samsung Cloud, Google Backup, Smart Switch, or other tools to save your files. Make sure to export important files and check your backups before we begin.

    Ensuring Battery Life

    We charge the phone to 50–80% battery, aiming for over 70%. A sudden power loss can brick the device. For long operations, keep the phone on a charger. Try to use a charger that doesn’t draw power from the PC’s USB port.

    Required Drivers and Software

    We install the latest Odin version and the official Samsung USB drivers. The Samsung USB Driver for Mobile Phones helps avoid connection issues. Tools like Samsung Kies or Smart Switch may also be helpful.

    We get firmware from trusted sources like SamMobile, Frija, or Samsung’s official site. Run Odin as Administrator on Windows. If needed, disable antivirus or firewall to avoid blocking Odin. Also, check the PC’s USB ports and ensure power-saving settings don’t disable them.

    Troubleshooting Steps for Flash Failures

    When Odin flash fails, we have a clear plan to fix it. We check USB drivers, restart, and try different ports and cables. These steps help when Odin gets stuck or when you need to fix it.

    First, we make sure the PC sees the phone in Download Mode. Open Windows Device Manager and look for Samsung or a COM port. If it’s not there, you need to install Samsung USB drivers again. Also, close Samsung Kies and Smart Switch to avoid driver problems.

    Then, we remove old drivers. Uninstall any old Android drivers, reboot, and install the latest Samsung drivers. Use Zadig only if you need a specific driver. Make sure the COM port number in Odin matches the Device Manager to avoid errors.

    For a clean start, close Odin, disconnect the device, and reboot your PC. Restart the phone, go back to Download Mode, and start Odin as an Administrator. This often fixes temporary issues that make Odin stuck.

    Try different cables and ports if problems continue. Use a Samsung USB cable or a good data cable. Avoid USB hubs and front-panel ports. Use a rear motherboard USB port instead. Try USB 2.0 ports first because they are more stable with Odin.

    If changing ports or cables doesn’t work, test on another PC. This helps find if the problem is with your PC. After changing something, restart Odin and reconnect the device. This way, we can fix Odin problems and avoid future failures.

    Fixing Specific Error Codes

    When Odin flash fails, we look at the error code in Odin’s log. This helps us take the right steps to fix Odin and avoid more damage.

    Fixing WRITE FAIL errors starts with checking files and hardware. We check firmware integrity by comparing checksums. If they don’t match, we redownload the firmware.

    We make sure the firmware fits the device’s model and CSC. Then, we swap cables and USB ports, reinstall Samsung USB drivers, and try another PC if needed.

    If storage health can be checked, we run diagnostics on eMMC or UFS. If WRITE FAIL Odin still happens, we flash single partitions first. For example, BL then AP. We avoid Re-Partition unless we have a matching PIT file.

    For hardware write fails that point to bad storage, we recommend professional repair. Replacing faulty eMMC or UFS modules is a job for trained technicians. It may be needed when software steps fail.

    Handling PARTITION ERROR cases needs care with partition maps. We do not check Re-Partition in Odin unless we have an exact PIT file for that model. If a partition map was altered and caused PARTITION ERROR Odin, we restore the original PIT or flash a stock complete firmware package designed for re-partitioning.

    We get PIT files and firmware from trusted sources that match the device model and region. When unsure, we consult device-specific communities like XDA Developers or the Samsung Community for verified files and model-specific guidance.

    For other common issues, we keep troubleshooting steps practical. If Odin is stuck on setup connection, we reinstall drivers, try different ports and cables, and close any software that may conflict with USB drivers.

    AUTH or secure-check failures usually point to firmware signing or an OEM lock. We use official Samsung firmware or files signed for that device. Trying to bypass secure checks risks legal trouble and can trip Knox.

    COM port detection problems often resolve by changing the cable or port, reinstalling drivers, or ensuring the device is in proper Download Mode. We confirm the correct button combo for Download Mode and try another PC when COM never appears.

    Error Primary Causes Immediate Actions When to Seek Repair
    WRITE FAIL Odin Corrupt firmware, wrong model, bad USB, failing eMMC/UFS Verify checksum, redownload firmware, change cable/port, reinstall drivers, flash single partitions Persistent write failures after software steps
    PARTITION ERROR Odin Incorrect PIT usage, mismatched partition table, incomplete firmware package Do not Re-Partition unless PIT matches, restore original PIT, use stock re-partition package Partition table damage preventing boot
    Odin flash fail: setup connection Driver conflicts, bad cable, incorrect port Reinstall drivers, try different cable/port, close conflicting software Cannot establish any COM connection
    Odin fail error: AUTH/SECURE CHECK Unsigned firmware, OEM lock, region/CSC mismatch Use official or properly signed firmware, avoid bypass attempts When device is OEM locked and requires official service
    COM port detection USB issues, not in Download Mode, driver problems Enter correct Download Mode, change cable/port, reinstall Samsung drivers, try another PC Hardware USB controller faults

    Advanced Solutions for Persistent Issues

    When simple fixes don’t work, we dive into more complex troubleshooting. This includes dealing with Odin flash fail and Odin stuck on setup connection. These steps aim to fix deeper problems like software corruption, driver issues, and tool incompatibilities that regular resets can’t solve.

    advanced Odin troubleshooting

    First, try a factory reset using Recovery Mode if your device can boot to it. A factory reset Odin approach removes user data and can fix system-level corruption that stops flashing. We suggest this after backing up your files and when your device boots but keeps failing or shows odd software behavior.

    Here’s how to do a recovery reset: boot into Recovery Mode, pick the wipe data/factory reset option, confirm, and let the device finish. A reset is good when software corruption stays after many flashing attempts or when partitions don’t match, causing Odin flash fail.

    Next, look into using other flashing tools if Odin keeps failing. Heimdall is a cross-platform, open-source tool that works on Linux, macOS, and Windows. Samsung Smart Switch can handle official firmware updates for certain models. There are also service center tools and platform-specific utilities for other safe options.

    Heimdall might work where Odin doesn’t, but it needs the right firmware packaging and sometimes splitting tar files into correct parts. Always use trusted guides and be aware that third-party tools might not work with newer Samsung security. Pick tools that fit your device model.

    Reinstall USB drivers to check for connection problems. In Device Manager, remove Samsung USB drivers and choose to delete the device software. Reboot your PC, then install the latest Samsung USB Driver for Mobile Phones from a reliable source.

    If Windows installs wrong drivers, temporarily disable driver signature enforcement only when needed. Follow safe reboot steps. Also, check motherboard vendor sites like Intel or AMD for chipset driver updates. This can improve USB controller stability and lower the chance of Odin stuck on setup connection.

    Here’s a detailed checklist for advanced troubleshooting:

    • Backup all data before any factory reset Odin attempt.
    • Use Recovery Mode to perform a factory reset if system-level corruption exists.
    • Try Heimdall or Samsung Smart Switch as alternate flashing tools when Odin fails.
    • Uninstall and reinstall USB drivers, delete driver software, reboot, then install fresh drivers.
    • Update motherboard chipset drivers to stabilize USB ports and avoid Odin stuck on setup connection.

    These advanced steps help when basic fixes don’t work. Always proceed carefully, document each step, and use device-specific guides to lower risks during advanced Odin troubleshooting.

    Preventive Measures for Future Flashes

    We focus on steps that reduce risk and keep devices stable when flashing firmware. Small habits cut the chance of errors and save time if Odin stuck on setup connection or other issues appear. Follow practical routines and document each device before making changes.

    Keeping firmware updated

    We recommend using official OTA updates from Samsung or your carrier whenever possible. Regular updates minimize mismatches between bootloader, modem, and system versions that often cause flash failures. When manual flashing is necessary, download the latest compatible firmware and double-check region and carrier codes to prevent Odin flash fail.

    Understand device specifications

    We advise recording exact model numbers such as SM- and CSC codes before selecting firmware. Confirm binary versions and hardware variants like Exynos versus Snapdragon to avoid installing the wrong build. Consult Samsung support pages or your device manual so you can understand device specs and pick firmware that matches the device precisely.

    Best practices for flashing

    We use a checklist to prepare every flash. Back up user data, charge the battery to at least 60 percent, and use original or high-quality USB cables. Run Odin as Administrator on a reliable Windows PC and prefer USB 2.0 ports when available.

    • Use verified firmware sources and match CSC and model codes.
    • Avoid Re-Partition unless a PIT file is required by the device.
    • Try alternate ports, cables, or another PC if Odin stuck on setup connection occurs.
    • Capture Odin logs to help troubleshoot Odin when errors occur.

    We caution about unofficial firmware and mods that trip Knox or void warranty. Follow firmware update best practices and consult device-specific threads on XDA Developers and the Samsung Community for tested approaches. These steps help prevent Odin flash fail and make future flashes safer and smoother.

    Resources for Further Support

    When Odin flash fails, we look for help from trusted sources. We check community forums, official channels, and step-by-step videos. Using all three helps us avoid mistakes like Odin stuck on setup connection.

    Online communities like XDA Developers and Samsung Community are great. They have threads with verified firmware links and guides. We look for posts that match our model and include success stories.

    For hardware issues or warranty questions, we reach out to Samsung support. We use Samsung Smart Switch for updates and backups. Official help ensures we don’t void our warranty and get clear repair instructions.

    Video tutorials are also helpful. They show how to use Odin, from Download Mode to fixing errors. We choose recent videos that fit our device and Android version. This way, we get both written and video guidance to troubleshoot Odin safely.

    FAQ

    What does “Odin flash failed” mean and how do we diagnose it?

    “Odin flash failed” means Odin couldn’t write the firmware. To diagnose, check Odin’s message box and log for errors. Look for “WRITE FAIL”, “PARTITION ERROR”, or “All threads completed. (succeed 0 / failed 1)”.

    Make sure the firmware matches your device’s model and CSC region. Use checksums to check file integrity. Also, check USB communication and device symptoms.

    Why does Odin show “WRITE FAIL” and how can we fix it?

    “WRITE FAIL” means Odin couldn’t write to internal storage. It could be due to corrupt firmware, bad USB connection, or incompatible firmware. Try redownloading firmware from trusted sources like SamMobile or Frija.

    Use an original high-quality USB cable. Switch to a rear USB 2.0 port. Reinstall Samsung USB drivers. Try flashing individual files (BL then AP). If errors persist, your device’s storage might be faulty.

    What causes “PARTITION ERROR” and what precautions should we take?

    “PARTITION ERROR” means the firmware’s partition layout doesn’t match your device’s. This is often due to using the wrong PIT file or selecting Re-Partition without a matching PIT. Never check Re-Partition unless you have the exact PIT for your model.

    To recover, get the correct PIT and stock firmware for your exact model/region. Or restore the original PIT. When unsure, consult device-specific resources on XDA Developers or Samsung Community to avoid damage.

    Odin is stuck on “setup connection” or doesn’t show a COM port. What should we do?

    “Odin stuck on setup connection” means your PC can’t detect the device. First, ensure your phone is in Download Mode. Use a known-good data cable on a rear USB port (preferably USB 2.0).

    Check Windows Device Manager for a Samsung or COM entry. If absent or shows “Unknown Device”, reinstall the Samsung USB Driver for Mobile Phones. Run Odin as Administrator. Close Kies/Smart Switch, try another USB port or PC, and disable USB power-saving in Windows.

    How do locked bootloaders, Knox, or secure checks cause flash failures?

    Locked bootloaders and security measures like Knox block unsigned or mismatched firmware. Errors like “SECURE CHECK FAIL” or “AUTH” indicate firmware signing or OEM restrictions. Use official, signed firmware for your device.

    Trying to bypass these protections can trip Knox, void warranties, and may be illegal. For models with strict verification, authorized service or official updates are safest.

    What USB troubleshooting steps reliably reduce Odin errors?

    Use a high-quality, original Samsung data cable and avoid USB hubs. Prefer rear motherboard USB ports and try USB 2.0 over USB 3.0. Reinstall or update Samsung USB drivers and check Device Manager for proper COM port assignment.

    Disable conflicting apps (Kies, Smart Switch) and Windows power management for USB. If problems persist, test with another PC to rule out host-side issues.

    Which drivers and software do we need before flashing with Odin?

    You need the latest compatible Odin version and the Samsung USB Driver for Mobile Phones. Optionally, Samsung Kies or Smart Switch can provide drivers but must be closed during flashing. Download firmware from reputable sources like SamMobile, Frija, or official Samsung repositories.

    Run Odin as Administrator on Windows and temporarily disable antivirus/firewall if they interfere.

    Can Heimdall or other tools help when Odin fails?

    Heimdall is an open-source, cross-platform alternative that can sometimes succeed where Odin fails. It requires correct firmware components and more manual packaging, so it has a steeper learning curve. Samsung Smart Switch can handle official updates.

    We caution that third-party tools may not bypass modern Samsung verification. Consult device-specific guides before attempting alternate tools.

    When should we perform a factory reset or full recovery instead of flashing?

    A factory reset via Recovery Mode is appropriate when the device boots to recovery or has system-level corruption. It erases user data, so we insist on backups first. If repeated flash attempts leave inconsistent software states but the device still boots to recovery, a factory reset can clear corruption before reattempting a controlled flash with correct firmware.

    How do we prevent Odin flash failures in future attempts?

    Follow a checklist: back up data, charge the device to at least 50–80%, use verified firmware matching the exact model and CSC, use original or high-quality cables, run Odin as Administrator, avoid Re-Partition unless required with a correct PIT file, prefer USB 2.0 rear ports, and keep Samsung drivers up to date. Consult device-specific threads on XDA Developers and Samsung Community and capture Odin logs for troubleshooting.

    Where can we find reliable firmware and community support for Odin issues?

    For firmware, use sources such as SamMobile, Frija, and official Samsung firmware repositories. For community guidance, consult XDA Developers device subforums, Samsung Community forums, and relevant Reddit communities (for example, r/GalaxyS or r/Android). For hardware faults or warranty-covered repairs, contact Samsung Support or an authorized service center.

    What should we do if repeated attempts still return “All threads completed. (succeed 0 / failed 1)”?

    That message signals a failed write lifecycle. We systematically: verify firmware integrity and model match, reinstall drivers, switch cable and port, try another PC, and attempt partitioned flashes (BL, then AP). If software measures fail, suspect hardware issues like damaged storage and seek professional diagnostics and repair. Capture and share Odin logs on trusted forums to get targeted guidance.

  • How to Fix a Slow Samsung Phone After a Firmware Update

    How to Fix a Slow Samsung Phone After a Firmware Update

    Many Samsung users in the United States face issues like slow performance and battery drain after updates. This lag can be short-term or a sign of deeper problems that need fixing.

    This guide offers practical steps to fix Samsung phone lag. We start with basic checks like restarting and checking for more updates. Then, we dive into clearing caches, optimizing storage, and managing apps.

    We also cover performance tweaks and when to reinstall apps or reset your phone. Remember, always back up your data before making big changes. These tips work for many Samsung models, but results may vary.

    Firmware updates bring new security and features, but they can slow things down. Our guide helps you boost your Samsung’s speed without losing those updates.

    Key Takeaways

    • Post-update lag may be temporary; restart and wait before deeper troubleshooting.
    • Clearing app and system cache can resolve many performance issues quickly.
    • Freeing storage and limiting background apps helps speed up Samsung models.
    • Use developer options and reduce animations for measurable responsiveness gains.
    • Reinstall problematic apps first; consider a factory reset only after backing up data.
    • Solutions apply across One UI versions, but results depend on model and storage.

    Understanding Why Your Samsung Phone Is Lagging

    After a firmware update, we often see a slowdown. It’s like the phone has aged overnight. We’ll explore common causes and how new features affect speed. This way, you can fix Samsung phone lag without guessing.

    Common Causes of Lag After Updates

    Background tasks often cause lag. Android and Samsung services re-index apps and rebuild caches. This uses CPU, RAM, and storage, slowing things down.

    App incompatibilities are another issue. Apps not updated for the new firmware can crash or use too much CPU. This makes Samsung phones slow after an update.

    Residual or corrupted cache from the old version can also cause problems. Temporary files can freeze or stutter until cleared.

    Storage issues matter too. Full or fragmented storage slows down file access and app loading. Check your free space to solve Samsung phone lag.

    Firmware bugs can also slow you down. Some updates introduce bugs that affect system services or GPU drivers. These issues slow devices until fixed by Samsung.

    Battery-saving rules and thermal management can also slow you down. Power profiles may change after an update, limiting performance. This makes phones feel slow.

    Impact of New Features on Performance

    New One UI features and services use more resources. Enhanced animations and AI tasks add to CPU and memory use. This slows down your phone.

    Visual upgrades need more GPU power. Smoother transitions and richer effects can slow older Galaxy models. Disable unnecessary features to speed up your phone.

    Security enhancements and monitoring use CPU and memory. This increases power use and slightly slows down your phone. Review settings to find a balance between security and speed.

    Cause How It Shows Quick Action
    Background indexing High CPU, slow app launches Wait a few hours; keep device on Wi‑Fi and charging
    App incompatibilities Crashes, battery drain Update or reinstall affected apps
    Residual cache Stuttering, erratic behavior Clear app and system cache
    Low storage Slow file access, app lag Free up space, offload media
    Firmware bugs Unusual crashes, UI freezes Check for hotfix updates from Samsung
    Power/thermal throttling Reduced peak performance Adjust battery mode or cool device

    Initial Steps to Troubleshoot Lag Issues

    When a Samsung phone starts lagging after an update, we start with simple checks. These often fix the problem. We recommend trying the following before moving to deeper fixes.

    Restart Your Samsung Device

    Rebooting clears temporary RAM use and ends background tasks that may be stuck after an update. To restart Samsung devices, press and hold the power or side button, then tap Restart. After the device boots, wait a few minutes so post-update optimization tasks can complete.

    If a normal restart does not improve performance, try a soft reset. On many Galaxy phones, press and hold Volume Down + Power for about 10–15 seconds to force a reboot without losing data. This often resolves post-update lag caused by frozen services.

    Check for Additional Updates

    Some performance issues stem from bugs fixed by follow-up patches. We check Settings > Software update > Download and install to see if Samsung released a quick fix. While here, we recommend updating apps via the Google Play Store, since app updates can resolve compatibility problems that cause slowdowns.

    Use a stable Wi‑Fi connection when you update Samsung firmware or apps to avoid corrupted downloads. After installing patches, leave the phone idle for about an hour so background optimization and indexing can finish and reduce the chance of lingering post-update lag.

    Step Action Why It Helps
    Basic Restart Press and hold power/side button → Restart Clears RAM and restarts background services
    Soft Reset Hold Volume Down + Power for 10–15 seconds Force reboot without data loss; fixes frozen processes
    Check System Patch Settings → Software update → Download and install Installs follow-up fixes to reduce post-update lag
    Update Apps Open Google Play Store → Manage apps → Update all Ensures compatibility after updating Samsung firmware
    Post-Update Wait Let device sit idle for ~60 minutes after updates Allows background optimization processes to finish

    Clear Cache to Improve Performance

    When your Samsung device feels slow after an update, clearing cached files can help. It removes temporary data that causes lag without touching your personal files. We’ll show you how to clear app cache and system cache partition safely.

    How to clear app cache

    Open Settings, tap Apps, then choose the app that’s acting up. Select Storage, then tap Clear Cache. This clears temporary files while keeping app data and sign-ins.

    Focus on browsers, social apps, and streaming clients if they use a lot of storage or crash often. Clearing cache for several heavy apps is better than a blanket clear, unless problems persist across many apps.

    Clearing system cache: a step-by-step guide

    The system cache partition stores temporary OS files used to speed operations. Clearing it can fix issues after firmware updates and may reduce Samsung phone lag.

    General recovery-mode steps vary by model. Power off the device. Press and hold Volume Up plus Bixby and Power on models with Bixby, or Volume Up plus Power on models without Bixby. Release when the Samsung logo appears. Use the volume keys to highlight Wipe cache partition and confirm with the Power button. Choose Reboot system now when finished. Wipe cache partition removes temporary system files and does not erase personal data.

    Check model-specific instructions on Samsung support for exact button combinations. Ensure the battery is charged before entering recovery mode to avoid interruptions when you attempt to clear cache partition Samsung.

    Action Purpose Effect on Data Best Use
    Clear app cache (Settings > Apps > Storage > Clear Cache) Remove temporary files for individual apps Preserves app data and sign-ins When a specific app crashes or uses much space
    Wipe cache partition (Recovery Mode) Clear temporary OS files that may cause system slowdowns Does not erase personal files or settings After firmware updates or persistent Samsung phone lag
    Targeted cache clearing for multiple apps Reduce accumulated temporary files across apps App data retained; may require reopening some apps When overall device performance is poor and we want to speed up Samsung

    Optimize Storage Space on Your Phone

    After a firmware update, our Galaxy can fill up fast, causing Samsung phone lag. We need a plan to free space and keep performance steady. Below, we show steps to identify big offenders and move media off the device. This helps speed up Samsung and avoid future slowdowns.

    Start by checking Storage under Settings > Battery and device care > Storage or open Settings > Storage. This gives an overview of what uses space. To find individual apps, open Settings > Apps and sort by size. App size plus data and cache reveals the real cost of each app.

    Identify Storage-Hogging Apps

    Look for apps that store lots of media or offline content. Podcast players, offline maps, and messaging apps that save images and videos often top the list. We check both app size and cached data before deciding what to remove.

    For seldom-used apps that hold large caches, we either clear those caches, uninstall the app, or disable it if it’s preinstalled and cannot be removed. Clearing caches helps speed up Samsung without losing account data.

    Tips for Offloading Media Files

    Photos and videos are common culprits. We recommend enabling Back up & sync in Google Photos and then using the Free up space option to delete local copies that are already backed up. That step will free up storage Samsung efficiently.

    For music and large downloads, we prefer streaming or deleting local downloads. For podcasts and offline content, we remove older episodes after we confirm they are no longer needed. This reduces storage use and helps prevent Samsung phone lag.

    On supported Galaxy models, we move media to a microSD card to keep internal storage lean. We also run Storage recommendations in Battery and device care periodically to remove large files and duplicates.

    When other steps fail, we consider clearing system caches from recovery mode with the clear cache partition Samsung option. That action can free temporary system space and often helps speed up Samsung after an update.

    Disable Unnecessary Background Apps

    After an update, Samsung phones might lag more. We need to check which apps run in the background and cut back on unnecessary activity. Making small changes to background processes can greatly improve speed and battery life.

    How to Manage Background Processes

    We start by opening Settings, then Battery and device care, and tap Battery to see app usage. This shows which apps use a lot of power and run in the background. Another way is Settings > Apps > See all apps > Battery for app-specific details.

    When we find a problem app, we go to Settings > Apps > [App] and tap Force stop. To stop it from starting again, we tap Battery and toggle Background activity or select Optimize battery usage. These steps help control background apps on Samsung phones.

    We can also run Device care and press Optimize now to close idle apps and free up RAM. This tool temporarily speeds up Samsung phones. But, some services might reopen if apps have auto-start permission. So, we check app permissions and autostart settings too.

    Recommended Apps to Disable

    We should disable or uninstall apps that use a lot of power or run in the background often. Look at apps that show frequent wake locks or high background usage. This includes advertising-heavy free apps, redundant preinstalled apps, and social apps that use data a lot.

    Consider disabling some weather widgets, aftermarket launchers, and old system utilities that don’t get updates. Limiting background activity for these apps will help speed up Samsung phones and reduce lag after updates.

    Be careful with core services like Google Play Services or Samsung System UI. Instead of disabling them, we suggest limiting their permissions and background activity. This way, we avoid breaking essential functions while still reducing lag on Samsung phones.

    Adjusting Performance Settings

    When a firmware update makes our Galaxy slow, small tweaks can help. We show you how to enable developer tools and adjust animation scales. This way, you can speed up Samsung devices safely, without using risky mods or third-party apps.

    reduce animations Samsung

    To access deeper controls, start by going to Settings > About phone > Software information. Tap Build number seven times. Then, enter your PIN when asked. This unlocks developer options Samsung in the main Settings list.

    In developer options Samsung, we suggest two safe changes. Set Background process limit to 2 or 3 to control background apps. Also, check Window animation scale, Transition animation scale, and Animator duration scale. Set each to 0.5x or turn them off for a faster interface. These steps can make older hardware feel quicker.

    But be careful with advanced toggles. Turning off ANR dialogs or forcing background limits can cause apps to act strangely. If an app acts up, change the setting back to fix it.

    For a system-level fix without developer options Samsung, go to Settings > Accessibility. Enable Reduce animations if available. This lowers GPU load and can speed up older phones, though it might make them look less polished.

    We recommend making changes slowly and testing each one. Reducing animations Samsung and limiting background processes can speed up your Samsung device. But, if you start to have stability issues, go back to the default settings.

    Reinstall Problematic Apps

    After an update, some apps can slow down your Samsung phone. It’s wise to check these apps before taking big steps. Reinstalling them often solves crashes and speeds up your device without a full reset.

    Start by checking apps in Settings. Go to Settings > Apps > See all apps. Tap each app to see Battery and Storage use. Look for high CPU use, background activity, or large data sizes.

    Use Android’s Battery and Data usage screens to find troublemakers. If lag stops in Safe Mode, a third-party app is likely the problem.

    Identifying apps causing slowdowns

    Boot into Safe Mode by pressing and holding Power, then touch and hold Power off and select Safe mode. If your phone runs better, a third-party app is causing the lag. Check recent app updates in Google Play and read reviews for issues after an OS update.

    Focus on apps that run all the time in the background. Streaming services, social media, and unknown utilities are common culprits. Remove or reinstall apps that use a lot of battery or data.

    Steps to uninstall and reinstall

    Here’s how to reinstall apps and fix post-update lag.

    1. Open Settings > Apps > [Problem App].
    2. Tap Uninstall. For system apps, choose Disable.
    3. Restart your phone to clear out old resources.
    4. Reinstall the app from Google Play for a fresh version.

    Reinstalling apps usually keeps cloud data safe. For apps with local data, back up or export data first. If reinstalling doesn’t solve the lag, contact the app developer through the Play Store.

    If an app update is the issue, be careful about rolling back. Sideloading older APKs can be risky. Only test older versions if you’re sure they’re safe and compatible.

    Check Where to Look Action
    High battery or CPU use Settings > Apps > [App] > Battery Uninstall, restart, reinstall
    Large cache/data Settings > Apps > [App] > Storage Clear cache, then reinstall if needed
    Background network activity Settings > Data usage or Android Battery usage Restrict background data or reinstall
    Suspected third-party conflict Boot into Safe Mode Remove recent apps until lag stops
    Post-update reports Google Play app page reviews and release notes Wait for fix, contact developer, or reinstall

    Factory Reset: A Last Resort

    When firmware changes cause trouble, a factory reset can fix it. We use this step when other fixes don’t work. It removes system-level problems and conflicting settings.

    factory reset Samsung

    We consider a factory reset for severe lag, crashes, or system instability. If Samsung support or your warranty technician suggests it, follow their advice. Always back up your data before resetting.

    When to prepare a backup

    • Start with Settings > Accounts and backup > Backup and restore to sync data with your Google account or Samsung Cloud.
    • Use Google Photos or OneDrive to store images and video off-device before wiping the phone.
    • Save messages via Google Drive or a trusted third-party app if you want chats preserved.

    Methods to secure a full copy

    1. Use Smart Switch on a PC or Mac to create a complete device backup over USB or Wi‑Fi.
    2. Manually copy documents and media to a computer by connecting the phone with a USB cable and exporting local files.
    3. Verify backups by opening a saved photo or message in the cloud or on your computer before you reset.

    Clearing the system cache first is also a good idea. A targeted clear cache partition Samsung step can remove temporary files that cause lag without erasing personal data.

    When backups look good, follow the reset path: Settings > General management > Reset > Factory data reset > Confirm. After the reset, install essential apps first and test performance before restoring everything from backup Samsung. This staged approach helps confirm whether the reset resolved the Samsung phone lag or if a deeper hardware check is needed.

    Maintaining Performance After Fixes

    After fixing issues, it’s key to keep up the good work. Post-update lag often gets better with new patches. Regular updates help keep your Samsung phone running smoothly.

    Regularly Update Your Software

    We check for updates in Settings > Software update often. We also turn on automatic updates on Wi‑Fi. This way, we get patches quickly.

    Follow-up fixes often solve problems that cause lag. We update apps in Google Play and the Samsung Galaxy Store too. This keeps everything running smoothly.

    Routine Maintenance Tips for Your Samsung Phone

    We reboot our phones every week. We clear caches for big apps once a month. Keeping 10–15% free space helps too.

    Running Device care optimizations and uninstalling unused apps helps. This reduces background activity and speeds things up.

    We back up to trusted cloud services and use Smart Switch for full backups. For older devices, turning off new visual features helps. We also watch battery and thermal health to avoid slowness.

    Most lag is temporary and can be fixed with these steps. If problems last, we reach out to Samsung support. They help keep our devices fast and reliable.

    FAQ

    Why is my Samsung phone slower right after a firmware or Android security update?

    After an update, your phone might feel slow. This is because Android and Samsung services are reorganizing apps and rebuilding caches. They also run optimization tasks that use up CPU, RAM, and I/O.

    App incompatibilities, leftover or damaged cache, less free storage, and occasional firmware bugs can also slow things down. Often, the phone speeds up within a few hours. But if it doesn’t, try the steps below to make your Samsung device faster.

    What simple checks should we do first when experiencing post-update lag?

    First, try a normal restart by holding the side/power button and choosing Restart. Wait a bit for the optimizations to finish. If it’s still slow, do a soft reset by pressing Volume Down + Power for 10–15 seconds on many Galaxy models.

    Then, check for any new updates in Settings > Software update. Update your apps from the Google Play Store. Make sure your Wi-Fi is stable while updating. Let your device sit idle for an hour after updates to let background tasks complete.

    How do we clear app cache, and will it delete our data?

    To clear an app’s cache, go to Settings > Apps, pick the app, tap Storage, then Clear Cache. This removes temporary files but keeps your app data, sign-ins, and settings safe. Focus on clearing big or problem apps like browsers, social apps, and streaming services for better results.

    What is the system cache partition and how do we clear it on Samsung?

    The system cache partition holds temporary OS files to speed up operations. Clearing it can solve problems after firmware updates. Here’s how: turn off your device, press and hold Volume Up + Bixby/Power (or Volume Up + Power on models without Bixby), and release when you see the Samsung logo.

    Use the volume keys to navigate to “Wipe cache partition” and confirm with the Power button. Then, select “Reboot system now.” This won’t erase your personal data. But, button combos vary by model, so check Samsung’s support pages before you start. Make sure your battery is charged.

    How can we identify apps that are hogging storage or causing slowdowns?

    Open Settings > Battery and device care > Storage (or Settings > Storage) to see how much space is being used. In Settings > Apps, sort by size to find big apps. Use battery and data usage screens to spot apps using too much background activity.

    For a quick test, boot into Safe Mode (hold Power, then tap and hold Power off > Safe mode) — if lag disappears, a third-party app is likely the culprit.

    What are safe performance tweaks we can make in Developer Options?

    To access Developer Options, tap Build number seven times in Settings > About phone > Software information. Safe tweaks include setting a Background process limit to 2–3 and reducing animation scales (Window, Transition, Animator) to 0.5x or off for a faster UI. Be careful: advanced changes can affect app behavior, so revert any setting that causes problems.

    Will disabling background apps help, and which ones should we target?

    Yes—limiting or disabling high-background apps reduces CPU and battery load. Check Settings > Battery and device care > Battery > Usage since full charge or Settings > Apps > See all apps > Battery to find offenders. Stop or limit background activity for apps that use a lot of data or resources.

    Avoid disabling essential Google or Samsung services. Instead, limit their background permissions if needed.

    When should we uninstall and reinstall an app versus clearing its cache?

    If an app keeps crashing, uses too much CPU/data, or clearing the cache doesn’t help, uninstall and reinstall it from Google Play. This gets a fresh, compatible version. For apps with cloud sync, reinstalling won’t lose your data. For locally stored data, back up first. If problems continue after reinstalling, contact the app developer via the Play Store.

    How do we know if a factory reset is necessary, and how do we back up data first?

    Consider a factory reset only after trying restarts, cache wipes, storage cleanup, Safe Mode diagnostics, and app reinstalls. Resetting fixes deep system corruption or persistent instability. Back up using Samsung Cloud, Google account backups (Settings > Accounts and backup > Backup and restore), Google Photos or OneDrive for media, Smart Switch for a full device backup, or transfer files to a PC.

    Verify backups by checking a sample file before proceeding to Settings > General management > Reset > Factory data reset.

    What ongoing maintenance keeps our Samsung phone performing well after fixes?

    Keep your system firmware and apps updated, and enable automatic updates on Wi‑Fi. Run Device care regularly. Reboot weekly, clear caches for heavy apps monthly, and keep at least 10–15% free internal storage. Offload media to cloud services or microSD where supported.

    Reduce animations on older devices, monitor battery health and thermal conditions, and if hardware issues persist, consult an authorized Samsung service center.

    Are there risks to clearing the cache partition or using developer options?

    Wiping the cache partition is low risk and doesn’t erase personal data—it only removes temporary system files. Using Developer Options carries more risk if you change advanced settings; limiting background processes or disabling animations is generally safe, but avoid toggling critical services or setting extreme limits. Always document any changes so you can revert them if needed.